Table of Contents
Advertisement
Advertisement
Table of Contents

Related Manuals for MB QUART WRC-P

Summary of Contents for MB QUART WRC-P
- Page 1 Operation and Installation Manual WRC-P Watertight Marine Radio Controller...
-
Page 2: Table Of Contents
Introduction Please take the time to read all of the information in this manual. The WRC-P controls 2 different types of MB Quart systems: • System with DVD player (Model: WM1-DVD). • System with CD player (Models: WM1-CD and WR1-CD). -
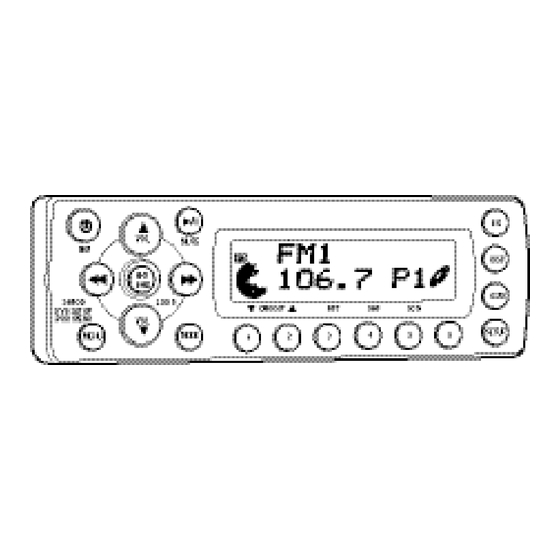
Page 3: Button Locations And Functions
Button Locations and Functions 1. Power On/Off and Display Dimmer: Press to turn the unit on or off. Press and hold to dim the display. Press and hold again to restore display’s illumination. 2. Volume Control: Press the button to increase the volume and press the button to decrease the volume. - Page 4 Button Locations and Functions 12. Multi-Function Button #4: Radio Mode: Press and hold until a beep is heard to store a radio station into memory #4 (CH4). Press and release when recalling preset radio station #4. CD Mode: Press to play all the tracks on the CD in random order. Press again to cancel. CD Changer Mode: Press to play all the tracks on the CD in random order.
-
Page 5: Dvd
General Operations Power On/Off: Press the button to turn the unit on and off. Selecting a Play Source: To select a play source, press the MODE button until the desired source appears in the display: AM1, AM2, FM1, FM2 or FM3 or Radio Station Call Letters (AM and FM Radio), SIRIUS (Satellite Radio Input, if connected), DVD PLAY (Built-in DVD/CD Player),... - Page 6 AM/FM Radio Operation (Continued) Manually Tuning in a Radio Station: Press and hold either the button until “MANUAL” appears in the display then release. Then press the until the desired radio station appears in the display. Tuning in a Radio Station Using Seek: Press and release either the button and the tuner will scan to the next strong station,...
-
Page 7: Sound Controls
AM/FM Radio Operation (Continued) Scanning Stored Radio Stations: 1. Press the ENT BND button to select either the FM1, FM2, FM3, AM1 or AM2 radio band. 2. Press the ASM button and the tuner scans for preset stations stored in the current band and pauses for 5 seconds at each station. - Page 8 Sound Controls (Continued) Treble: 1. Select the Treble mode (TRB) by pressing the SETUP button. 2. Increase the Treble by pressing the button. Decrease the Treble by pressing the button. 3. Control reverts back to volume control after 5 seconds. Balance: 1.
-
Page 9: Sound Controls
Sound Controls (Continued) Subwoofer Cutoff Frequency (SWF): 1. Select the Subwoofer Cutoff Frequency mode (SWF) by pressing the SETUP button. 2. To adjust the Subwoofer Cutoff Frequency press the button. SWF 160 = Low Pass 160Hz SWF 120 = Low Pass 120Hz SWF 80 = Low Pass 80Hz 3. -
Page 10: Disc Warnings
Disc Warnings Disc Formats Supported by this Player: Handling: • Dirt, dust, scratches and warping disc will cause non operation. • Do not place stickers on disc or scratch disc. • Do not place discs in the following places: Direct sunlight, Dirty, dusty and damp areas, Near car heaters, Car seats or dashboard. - Page 11 CD Operation (Continued) CD Track Selection: Press the button to select a lower track. Press the button to select a higher track. The track number will appear in the display. Ejecting a CD: 1. Press the OPEN button to fold down the front panel to access the disc slot.
-
Page 12: Dvd Operation
DVD Operation General Operations: 1. Press the button to turn the unit On. 2. Press the OPEN button on the WM1-DVD to fold down the front panel to access the disc player slot. 3. Gently insert the disc into the slot with the label side up. - Page 13 DVD Operation Ejecting a DVD: 1. Press the OPEN button to fold down the front panel to access the disc slot. 2. Press the button to eject a disc. DVD Chapter Selection: Press the button to select a lower chapter. Press the button to select a higher chapter.
-
Page 14: Dvd Operation
DVD Operation (Continued) Audio Language Menu: Press the AUDIO button during playback to select the desired audio/language setup. Subtitle Language Menu: Press the SUB-T button during playback. Each time the button is pressed, the subtitle language changes in sequential order. •... -
Page 15: Mp3 Disc Operation
MP3 Disc Operation General Operations: 1. Press the button to turn the unit On. 2. Press the OPEN button to fold down the front panel to access the disc player slot. 3. Gently insert the disc into the slot with the label side up. -
Page 16: Cd Changer Operation
CD Changer Operation (Option) Load CD’s into Changer: Insert the CD magazine into the external CD changer. Power On/Off: Press the button to turn the unit on. Selecting the Play Source: Press the MODE button until “CD-CH” appears in the display. CD Track Selection: Press the button to select a lower track. - Page 17 CD Changer Operation (Option) Repeating a CD Track or Disc: Select the desired track to be repeated. Then pre s s the R P T button and “RPT” will appear in the dis- p l a y. This track will play re p e a t e d l y. P ress and hold the R P T button.
-
Page 18: Sirius Satellite Radio Operation
Sirius Satellite Radio Operation (Option) Manual Tuning: Press the button until the desired channel appears in the display. Direct Tuning: 1. Press the MENU button until “Direct-T” appears in the display. 2. Press the button to select the first number of the desired channel. 3. -
Page 19: Sirius Satellite Radio Operation
Sirius Satellite Radio Operation (Option) (Continued) 2. Press the 1 or 2 button to select the desired category. 3. Press the button to select the desired channel inside the category. 4. Press the ENT BND button and the channel will start playing. Switching the Display: Press the DISP button to cycle through the fol- lowing display modes. -
Page 20: Ipod Operation
2. The unit will automatically switch to the IPOD mode and start playing. Note: The IPOD controls will become inoperable and the WRC-P will now control the IPOD. IPOD Button Location and Functions: 1. Menu Button: Same operation as the MENU button on an IPOD. -
Page 21: Ipod Operation
IPOD Operation (Continued) 5. Press the ENT BND button to start playing the selected song. Pausing a Track: Press the button to pause the track, press it again to resume play. Repeating a Track: Select the desired track to repeat, then press the RPT button once and “RPT”... -
Page 22: Usb Operation
WM1-DVD. 3. The unit will automatically switch to the USB mode and start playing. Note: The controls on the MP3 player will become inoperable, and the WRC-P will now control the MP3 player. Track Selection: Press the button to select a lower track. -
Page 23: Auxiliary Audio/Video Input Operation
On. 2. Press the MODE button until “AV IN” appears in the display. 3. Refer to the audio device’s owners manual for proper operation. Note: The WRC-P will not control the auxiliary source, but can adjust the sound controls. -
Page 24: General Operation
General Operations Power On/Off: Press the button to turn the unit on and off. Selecting a Play Source: To select a play source, press the MODE button until the desired source appears in the display: AM1, AM2, FM1, FM2 or FM3 (AM and FM Radio), SIRIUS (Satellite Radio Input, if connected), CD (Built-in CD Player),... - Page 25 AM/FM Radio Operation (Continued) Manually Tuning in a Radio Station: Press and hold either the button until “MANUAL” appears in the display then release. Then press the until the desired radio station appears in the display. Tuning in a Radio Station Using Seek: Press and release either the button and the tuner will scan up to the next strong sta-...
-
Page 26: Sound Controls
AM/FM Radio Operation (Continued) Automatically Store Radio Stations: 1. Press the ENT BND button to select either the FM1, FM2, FM3, AM1 or AM2 radio band. 2. Press and hold the ASM button until “AST” appears in the display. The tuner will search for the strongest stations and store them into memory. - Page 27 Sound Controls (Continued) Treble: 1. Select the Treble mode (TRE) by pressing the SETUP button. 2. Increase the Treble by pressing the button. Decrease the Treble by pressing the button. 3. Control reverts back to volume control after 5 seconds. Balance: 1.
-
Page 28: Sound Controls
Sound Controls (Continued) Subwoofer Cutoff Frequency (SWF): 1. Select the Subwoofer Cutoff Frequency mode (SWF) by pressing the SETUP button. 2. To adjust the subwoofer cutoff frequency press button. SWF 160 = Low Pass 160Hz SWF 120 = Low Pass 120Hz SWF 80 = Low Pass 80Hz 3. -
Page 29: Cd Operation
CD Operation CD Track Selection: Press the button to select a lower track. Press the button to select a higher track. The track number will appear in the display. Fast Forward/Fast Rewind: Push and hold the button to fast forward the music. -
Page 30: Mp3 Disc Operation
MP3 Disc Operation Disc Track Selection: Press the button to select a lower track. Press the button to select a higher track. The track number will appear in the display. Display Selection: Press the DISP button to display the following MP3 disc information: DIR NAME, TITLE, ARTIST and ALBUM. - Page 31 CD Changer Operation (Option) (Continued) CD Disc Selection: Press the 1 button to select a lower disc in the CD changer. Press the 2 button to select a higher disc in the CD changer. The disc number will appear in the display. Pausing a CD: Press the button to pause the disc, press it...
-
Page 32: Sirius Satellite Radio Operation
Sirius Satellite Radio Operation (Option) Manual Tuning: Press the button until the desired channel appears in the display. Direct Tuning: 1. Press the MENU button until “DIR - - -” appears in the display. 2. Press the button to select the first number of the desired channel. - Page 33 Sirius Satellite Radio Operation (Option) (Continued) Category Tuning: 1. Press the MENU button and “CATEGORY” starts flashing in the display. 2. Press the 1 or 2 button to select the desired Category. 3. Press the button to select the desired Channel inside the Category. 4.
-
Page 34: Sirius Satellite Radio Operation
Sirius Satellite Radio Operation (Option) (Continued) Recalling Memorizing Sirius Channel: 1. Press the ENT BND button to select either the SIR1, SIR2 or SIR3 band. 2. Press and release the Sirius channel recall button 1, 2, 3, 4, 5, or 6 to select the memo- rized channel. -
Page 35: Ipod Operation
2. The unit will automatically switch to the IPOD mode and start playing. Note: The IPOD controls will become inoperable and the WRC-P will now control the IPOD. IPOD Button Location and Functions: 1. Menu Button: Same operation as the MENU button on an IPOD. -
Page 36: Auxiliary Audio Input Operation
2. Press the MODE button until “AUX IN” appears in the display. 3. Refer to the audio device’s owner’s manual for proper operation. Note: The WRC-P will not control the auxiliary source but the sound controls can be adjusted. -
Page 37: Usb Operation
USB Operation General Operations: 1. Press the button to turn the unit On. 2. Connect a MP3 player to the USB cable com- ing from the WM1-DVD. 3. The unit will automatically switch to the USB mode and start playing. Note: The controls on the MP3 player will become inoperable, and the WM1-DVD will now control the MP3 player. -
Page 38: Installation
Installation... -
Page 39: Warranty
This warranty will be honored only in U.S.A. MB Quart offers to the original purchaser a one (1) year warranty period from date of purchase. Except as specified below, this warranty covers all defects in material and workmanship in this component. - Page 40 © Copyright 2008 WRC-P-UM Rev. A MB Quart 6-11-08...
Need help?
Do you have a question about the WRC-P and is the answer not in the manual?
Questions and answers