Table of Contents
Advertisement
Advertisement
Table of Contents

Related Manuals for Shintaro Blazer

Summary of Contents for Shintaro Blazer
- Page 1 USB 3.0 Single/Dual Display Docking Station User's Manual...
-
Page 2: Table Of Contents
Table of contents Safety instructions ............1 Copyright................1 Trademarks ...............1 Introduction...............2 Features................2 Package contents .............2 System requirements ............3 Product overview..............4 - Front ..................4 - Rear...................5 Connection................6 - Dual display docking station..........6 - Single display docking station ...........7 Installation ................ 8 - For Windows ®... -
Page 3: Safety Instructions
Before attempting to connect, operate or adjust this product, please save and read the User's Manual completely. The style of the product shown in this User's Manual may be different from the actual unit due to various models. Safety instructions Always read the safety instructions carefully: ■... -
Page 4: Introduction
Introduction The Shintaro Blazer Docking Station is a unique design for a computer that has extra connectivity demands. Through the docking station, you can extend the connection of a computer to more USB peripherals, Ethernet network, speaker and microphone using only one USB port on your computer. -
Page 5: System Requirements
System requirements The minimum requirements for the PC are: ■ 1.6 single core CPU or higher processor clock. Intel Pentium/Celeron family, or AMD K6/Athlon/Duron family, or compatible processor ■ 1GB of RAM ■ USB 2.0/3.0 port ■ 30MB of available disk space ■... -
Page 6: Product Overview
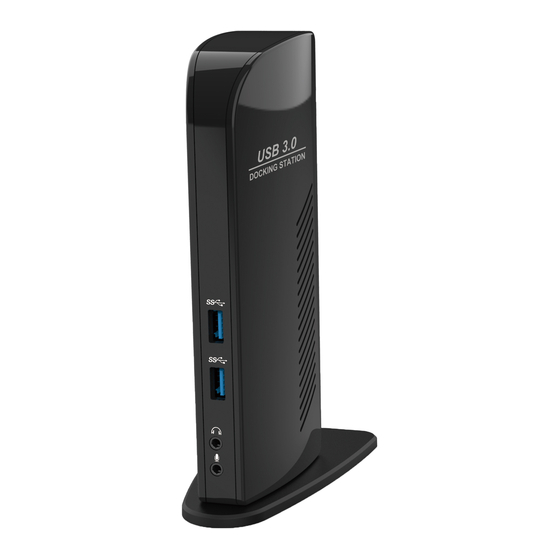
Product overview Front Power indicator: Lights up when the power is on. USB indicator: Lights up when a USB device is plugged into this unit. USB 3.0 ports: Connect to USB 3.0 devices. Speaker jack: Connect to a speaker or earphone. MIC jack: Connect to a microphone... -
Page 7: Rear
Rear Dual Display Single Display Docking station Docking Station USB 2.0 ports: Connect to USB 2.0 devices. RJ45 port: Connect to an Ethernet. DVI connector: Connect to a DVI monitor or projector. HDMI connector: Connect to a HDMI monitor or projector. Note: This function provided only on the model of Dual Head Docking Station. - Page 8 Connection To connect the USB peripherals, Ethernet, speaker and microphone, follow the illustrations below to connect the corresponding connectors. Dual display docking station Router Monitor peripherals Power adapter Earphone Microphone...
- Page 9 Single display docking station Router peripherals Power adapter Earphone Microphone...
-
Page 10: Installation
Installation Caution: DO NOT connect the docking to a computer before installing the provided driver. Note that the following strings and screen shots shown on this user's manual may vary slightly from each operation. For Windows ® 7/ Windows ® 8 user 1.Insert the supplied driver CD into a computer's CD/DVD- ROM. - Page 11 Note: If the AutoPlay does not appear automatically, locate and double-click on the Setup.exe file in the driver folder to launch the setup. Enter the administrator password and then click <Yes> to start the installation if a User Account Control dialog box appears. 3.
- Page 12 4. Be patient with the installation procedure, it may take a while. 5. Connect the Docking Station to a computer after the driver installation is completed. For connection details, refer to the chapter of Connection. 6. When the operating system detects the adapter, the reminder message will appear on the system tray as below.
-
Page 13: For Windows ® Vista User
For Windows ® Vista user 1. Insert the supplied driver CD into a computer's CD/DVD- ROM. 2. Click <Run Setup.exe> to start the installation. Note: ● If the AutoPlay does not appear automatically, locate and double-click on the Setup.exe file in the driver folder to launch the setup. ●... - Page 14 4. Be patient with the installation procedure, it may take a while. 5. Connect the Docking Station to a computer after the driver installation is completed. For connection details, refer to the chapter of Connection. 6. When the operating system detects the adapter, the reminder message will appear in the Windows System Tray as below.
-
Page 15: For Windows ® Xp User
For Windows ® XP user 1. Insert the supplied driver CD into a computer's CD/DVD- ROM. 2. Click <I Accept > for the next step. 3. Be patient with the installation procedure, it may take a while. Note: Click <Yes> to restart or <No> to manually restart later, if a prompting to restart computer message appears. -
Page 16: Verifying The Driver
Verifying the driver To verify the driver of the adapter, follow the step below to open the Device Manager on Windows operating system. 1. Following the path as below to open the device manager Windows ® 7/Windows ® 8: Control Panel\System and Security\ System\Device Manager Windows ®... -
Page 17: Display Configuration
Display configuration Note that the following screen shots in this section are using Windows ® 7 operating system. It may not match your operating system but the definitions of buttons, tabs and menus are the same. Utility settings The supplied utility allows configuring the display mode, screen rotation, screen resolution, and physical arrangement of your monitors. - Page 18 Description of the settings Option Description Displaylink manager Enable the Windows screen resolution page. Check for updates Check the latest driver and download if available USB3.0 Video Dock/Dual Head Video Dock(*The actual item is depending on the model) Screen Resolution Click to select an available resolution.
- Page 20 Options Description USB 3.0 Video Dock/Dual Head Video Dock (* The actual item is depending on the model) Fit to TV Adjust the size of Windows Desktop on the TV Note: This function works only when one add-on monitor is connected. Besides, this option will also only work in extended mode.
-
Page 21: Multi-Monitor Configuration
Multi-monitor configuration An extra DVI monitor can be connected through the Docking Station (HDMI ® and DVI monitors for Dual Head Station) if one monitor is already connected to the PC directly. Once the extra monitor is connected, it can be configured to use either “mirror mode”, “extended mode”... - Page 22 Extended mode 1. Refer to the Windows system configuration section to open the configuration page. 2. In the Display drop-down menu, select the preferred monitor. 3. Check the Multiple Displays > Extend these displays on Window ® 7/ Window ® 8, Extend the desktop onto this monitor box on Windows ®...
- Page 23 Cursor disappeared If the status remains in the extended mode but the adapter is disconnected, the desktop will still be panned to the add- on monitor. The cursor may not be found on the primary monitor in such a case. If it happens, connect the add- on monitor through the adapter again or keep moving the mouse.
- Page 24 Be the primary monitor 1. Refer to the Windows system configuration section to open the configuration page. 2. In the Display drop-down menu, select the preferred monitor. 3. Check the Make this my main display box on Window ® 7 /Windows ® Vista, Set as Main Monitor on Windows ®...
- Page 25 Supported resolution Before adjusting the resolution, refer to the table below for the supported resolution. Name Refresh rate Refresh rate 16 bit 32 bit 640x480 60 72 75 85 60 72 75 85 800x600 SVGA 56 60 72 75 85 56 60 72 75 85 1024x768 60 70 75 85...
-
Page 26: Audio Configuration
Audio configuration By default, when the docking station is connected to a computer, the audio configuration may be changed to USB (Multimedia) Audio Device automatically (this setting depends on models). If it does not work, follow the steps below to setup. For Widnows ®... - Page 27 For Widnows ® XP user 1. Click the DisplayLink icon to bring up the DisplayLink Manager on the Windows System Tray, and then select Audion Setup. 2. Click Audio tab, and then select USB Audio Device or DisplayLink Audio on the Sound playback option. 3.
-
Page 28: Uninstall The Driver
Uninstall the driver For Windows ® 7/ Windows ® 8 user 1. Open the Control Panel > Programs > Programs and Features > Uninstall or change the program, and then double click <DisplayLink Graphics>. 2. Click <Yes> to continue the procedure. 3. -
Page 29: For Windows Vista ® User
For Windows ® Vista user 1. Open the Control Panel > Programs > Programs and Features > Uninstall or change the program, and then double click <DisplayLink Graphics>. 2. Click <Yes> to continue the procedure. 3. Click <Yes> to restart your computer. -
Page 30: For Windows Xp ® User
For Windows ® XP user 1. Open the Control Panel > Programs > Programs and Features > Uninstall or change the program, and then double click <DisplayLink Graphics>. 2. Click <Yes> to continue the procedure. 3. Click <Yes> to restart your computer. -
Page 31: Specification
Specification Host Interface USB 3.0 HDMI ® 30pin Female Connector Connector Video output (Dual Display model) DVI HDDE 30pin Female Connector Host upstream link USB B Type Female Connector HUB downstream link USB A Type Female Connector Audio Port 3.5mm stereo mini-jack 2.1ch Ethernet Port RJ45 Connector Power... -
Page 32: Regulatory Compliance
For information on recycling of this product, please contact your local authorities, your household waste disposal service or the shop where you purchased the product. Shintaro Blazer Docking Station User's Manual...
Need help?
Do you have a question about the Blazer and is the answer not in the manual?
Questions and answers