Advertisement
INSTRUCTION MANUAL
GUIDE D'UTILISATION
MANUAL DE INSTRUCCIONES
DWMT70781L
Palm Sander
Ponceuse à paume
Lijadora de palma
If you have questions or comments, contact us.
Pour toute question ou tout commentaire, nous contacter.
Si tiene dudas o comentarios, contáctenos.
1-800-4-D
WALT • www.dewalt.com
e
INSTRUCTIVO DE OPERACIÓN, CENTROS DE SERVICIO Y PÓLIZA
DE GARANTÍA. ADVERTENCIA: LÉASE ESTE INSTRUCTIVO ANTES
DE USAR EL PRODUCTO.
1
Advertisement
Table of Contents

Related Manuals for DeWalt DWMT70781L


Summary of Contents for DeWalt DWMT70781L
- Page 1 If you have questions or comments, contact us. Pour toute question ou tout commentaire, nous contacter. Si tiene dudas o comentarios, contáctenos. 1-800-4-D WALT • www.dewalt.com INSTRUCTION MANUAL INSTRUCTIVO DE OPERACIÓN, CENTROS DE SERVICIO Y PÓLIZA GUIDE D'UTILISATION DE GARANTÍA. ADVERTENCIA: LÉASE ESTE INSTRUCTIVO ANTES DE USAR EL PRODUCTO.
-
Page 2: Specifications
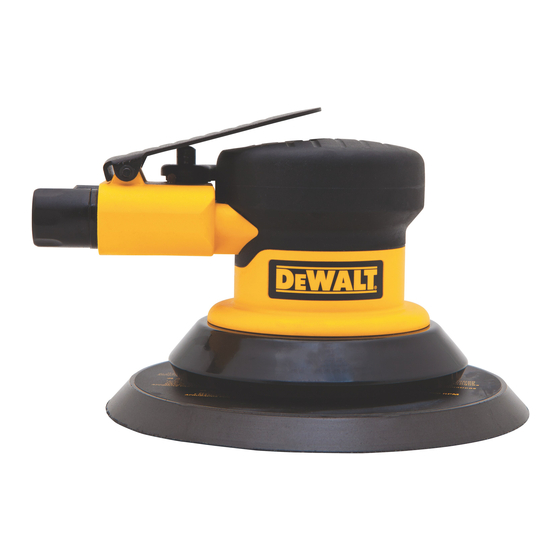
DWMT70781L PALM SANDER FIG.1 A. Housing Cover E Exhaust B. Sander Pad F. Trigger C. Air Valve Control Lever D. ¼"Air Inlet SPECIFICATIONS MODEL DWMT70781L FREE SPEED (@90PSI) 12000RPM EXHAUST TYPE Handle ORBIT DIAMATER 3/32" (23.8MM) PAD TYPE Stick-On PAD DIAMETER 6"... -
Page 3: Important Safety Instructions
• Arsenic and chromium from chemically-treated lumber Definitions: Safety Guidelines Your risk from these exposures varies, depending on how often you do this type of work. To reduce your exposure to these chemicals: The definitions below describe the level of severity work in a well ventilated area, and work with approved safety for each signal word. - Page 4 WARNING: WARNING: • Avoid prolonged use: repetitive motion or exposure to vibration • Never trigger the tool when not applied to a work object may be harmful to your hands or arms. Use gloves to provide Attachments must be securely attached. extra cushion, take frequent rest periods, and limit daily Loose attachments can cause serious injury.
- Page 5 WARNING: RISK OF EXPLOSION OR FIRE WARNING: RISK TO BREATHING (ASPHYXIATION) WHAT CAN HAPPEN HOW TO PREVENT IT WHAT CAN HAPPEN HOW TO PREVENT IT • Abrasive tools, such as • Always wear MSHA/NIOSH • Abrasive tools such as • Never operate tools near grinders, sanders, and approved, properly fitting face sanders and grinders,...
- Page 6 WHAT CAN HAPPEN HOW TO PREVENT IT • Using inflator nozzles for • DO NOT use inflator nozzles duster applications can cause for duster applications. WARNING: RISK OF INJURY serious injury. WHAT CAN HAPPEN HOW TO PREVENT IT • Air tools can cause the work •...
- Page 7 WARNING: RISK OF INJURY (CONTINUED) WARNING: RISK FROM FLYING OBJECTS WHAT CAN HAPPEN HOW TO PREVENT IT WHAT CAN HAPPEN HOW TO PREVENT IT • Improperly maintained tool • Maintain the tool with care. • Always wear ANSI Z87.1 CAN/ •...
- Page 8 WARNING: AIR SUPPLY AND CONNECTIONS • Do not use oxygen, combustible gases, or bottled gases as a power source for this tool as the tool may explode, WARNING: RISK OF CUT OR BURNS possibly causing injury. WHAT CAN HAPPEN HOW TO PREVENT IT •...
- Page 9 FEATURES HOUSING COVER AIR INLET The air tool has a cushion grip The tool’s air inlet (D) housing cover (A) to provide located at the bottom of protection against housing cracks the handle is used for from accidental drops of the air tool. connecting an air supply has a standard 1/4"...
-
Page 10: Installation
INSTALLATION Safety Rules For Pneumatic Tools 1) Inspect the air hose for cracks or other problems. Air Supply Replace the hose if worn. The recommended hook-up is shown in Figure A. Pneumatic tools 2) Never point an air hose at another person. operate on a wide range of air pressures. -
Page 11: Preparation For Use
PREPARATION FOR USE connected to the air supply as shown in figure A on page 11. Do not connect the tool to the air line system without incorporating an Proper Use Of The Tool easy to reach and operate air shut off valve. The air supply should be lubricated. -
Page 12: Pre-Start Checklist
• Lubricate the tool.(Please refer to the “Maintenance” section 10) Use only genuine Dewalt spare parts or parts which perform in the manual.) equivalently. Do not make temporary or permanent repairs with WARNING: Risk of unsafe operation. -
Page 13: Maintenance
SANDER PAD ASSEMBLY CONTINUED OPERATING INSTRUCTIONS • To assemble the sanding • Select a suitable abrasive disc and make sure that it is fixed pad (B), place the supplied securely to the tool. wrench onto the balance • Connect to suitable air supply as recommended. shaft nut (H). -
Page 14: Service Information
SERVICE INFORMATION MAINTENANCE CONTINUED Please have the following information available for all service calls: To Lubricate The Air Tool Manually: Model Number ________________________________________ 1. Remove any attachments on the air tool. Date and Place of Purchase ______________________________ 2. Disconnect the tool from the air supply source, place FULL THREE YEARS WARRANTY the air inlet face up. - Page 15 GLOSSARY CAUTION ATENCIÓN ATTENTION SEE OWNER’S MANUAL FOR PARA EL PROCEDIMIENTO DE CONSULTEZ LE MANUEL DE BREAK-IN PROCEDURES. ASENTADO DE LA MAQUINA, VER L’UTILISATEUR POUR LES MANUAL DEL OPERARIO. PROCEDURES DE RODAGE. CFM: Cubic feet per minute. WARNING ADVERTENCIA AVERTISSEMENT FALLS CAN CAUSE SERIOUS LAS CAÍDAS PUEDEN CAUSAR LES CHUTES PEUVENT CAUSER DE GRAVES...
Need help?
Do you have a question about the DWMT70781L and is the answer not in the manual?
Questions and answers