Table of Contents
Advertisement
Quick Links
Advertisement
Table of Contents

Subscribe to Our Youtube Channel
Summary of Contents for Clark 2003 Model Clark Foam Planer
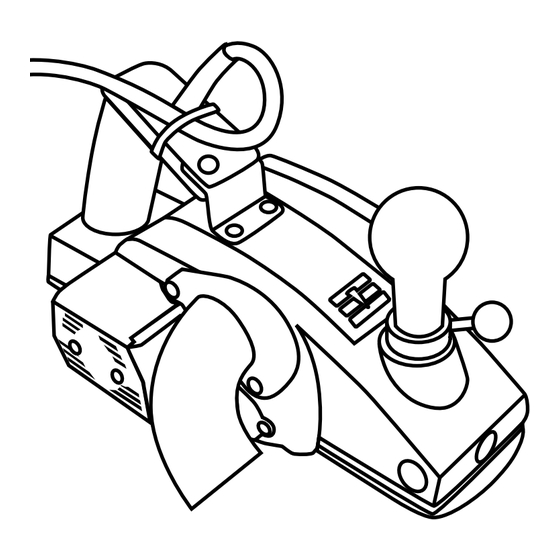
- Page 1 CLARK FOAM PLANER 2003 MODEL SAFETY AND OPERATING INSTRUCTIONS Version 1, 2003...
- Page 2 WARNING – SAFETY INSTRUCTIONS This planer is sold as is. The planer is designed for the specific purpose of shaping Clark Foam using the well-known techniques and equipment universally used in the polyurethane foam surfboard in- dustry since 1958. The planer is not suitable for any other purpose and may cause injury or death if used for any other application or if any unorthodox surfboard shaping methods or equipment are used.
-
Page 3: Table Of Contents
TABLE OF CONTENTS INTRODUCTION ..........................5 FEATURES ............................5 SERVICE ............................7 HELP LINE ............................7 FIRE DANGER ..........................7 CUSTOM PLANERS ........................7 BLADE EXCHANGE SERVICE - BLADE SHARPENING ............8 IMPORTANT BLADE CHANGING INSTRUCTIONS ..............8 BASE PLATE LUBRICATION ......................8 BASE PLATE MODIFICATION ....................9 POWER CORD ADJUSTMENT ....................9 KNOB SELECTION ........................9 THE DOUGHNUT AND DEPTH ADJUSTMENT INDICATOR ..........10... -
Page 5: Introduction
The planer is assembled at Clark Foam from a combination of stock parts, modified stock parts, and parts fabricated by or for Clark Foam. The main body is a Hitachi P20-SB. Clark Foam has sold a modified Hitachi F-20 and P-20SB series planer since 1988. It has proven durability and a good safety record. - Page 6 The large depth adjustment mechanism knob can be customized using knobs available from Clark Foam and commercially available knobs. The depth adjustment knob’s tension is adjustable. A foam seal keeps dust and debris out of the depth adjustment mechanism significantly reducing maintenance.
-
Page 7: Service
We can usually rob parts we do not stock from new planers being assembled. We can also order any part on the planer. It will probably be easier to purchase parts from Clark Foam rather than from a local repair center because so many parts are modified. -
Page 8: Blade Exchange Service - Blade Sharpening
Send them to Clark Foam, 25887 Crown Valley Parkway, Laguna Niguel, California 92677. The blades are sharpened at the Clark Foam Factory using a state of the art, automatic sharp- ening machine. The blades are indexed on the blade holder using the same jig that comes with each planer. -
Page 9: Base Plate Modification
WD-40, light oils, Triflow, Teflon, and hard waxes have been successfully used. BASE PLATE MODIFICATION The edges of the rear base plate are left square and sharp on new planers. They were left this way as many shapers want foam dust and wood dust to be pushed ahead of the planer. If the edges are rounded the planer will lift over the dust. -
Page 10: The Doughnut And Depth Adjustment Indicator
Again, this is a very important decision. If you change your mind at a later date a new DOUGHNUT, small knob, and 3/16" shaft material can be purchased from Clark Foam. After you have finished the above procedure you might find that the adjustment is loose and there is backlash or play. -
Page 11: Disassembly Of The Depth Adjustment Mechanism
DISASSEMBLY OF THE DEPTH ADJUSTMENT MECHANISM It is important that you remember the position of each part for re-assembly. It might be a good idea to write down the position of each part. The unit will not work properly if a part is missing. -
Page 12: Adjusting The Maximum Cutting Depth
This means the blade will start cutting just as the depth adjustment indicator starts turning. This is the factory setting. Individual shapers may prefer different settings. Shim washers are available from Clark Foam for changing this adjustment. -
Page 14: Depth Adjustment Mechanism Assembly And Adjustment
Less shim will raise the front base plate. More shim will lower it. Extra shims are available from Clark Foam. 3. Carefully put the front base plate in position. Make sure everything is perfectly aligned. -
Page 15: Dust Exhaust Outlet
the DOUGHNUT. Check the movement. If it is still too loose repeat the process. This is a key adjustment and due to wear it may need to be repeated later in the life of the planer. 9. Carefully check the way the depth adjustment operates. Check the alignment between the front base plate and the rear base plate to see if it is the desired setting. -
Page 16: Maintaining The Brushes
Clark Foam has developed a vacuum system for the 2003 Model Planer. We also stock com- ponents and supplies for vacuum systems. Our system and components are chosen carefully for optimum vacuum efficiency, high productivity, and a neutral feel on the planer. -
Page 17: Power Cord Maintenance And Adjustment
Since the Clark Foam planers were first introduced we have seen a lot of power cord damage. Shapers often try to repair the damage with tape. This is not recommended. When a power cord is damaged order a new power cord from Clark Foam and install it exactly the same way the old one was installed. -
Page 18: Replacing Belts
REPLACING BELTS The drive belt between the cutter motor and the cutter lasts surprisingly long. They do, however, eventually wear out. To change the belt, turn the pulleys and guide the belt off the pulleys. The only thing that needs to be removed is the guard. Never operate the planer with the guard off. SHAPING TIPS FOR THE 2003 MODEL Until the experienced shaper becomes familiar with any new planer they will have trouble with accurate depth adjustment. -
Page 19: Planer Length And Width Theory
This is a radical departure from the prior planers sold by Clark Foam. They had a rear handle angle that favored down pressure. The rear handle angle of the Skil 100 planer provides slightly more downward pressure than the 2003 Model, but the Skil 100 is a lot heavier. -
Page 20: Skil 100 Planer Comparison To The 2003 Model
Most Skil 100 planers have the rear base plates modified to 8" or less in length. The Model 2003 has a 6 1/2" rear base plate. (It is possible to make an extended base plate for the Model 2003 from 1/4" aluminum plate and shims. We tried this at Clark Foam and saw no advantage.) - Page 21 Pro Model. Performance will also be improved after the bearings have been broken in. By frequently using the Clark Foam blade sharpening service the effective power of the 2003 Model can be significantly increased relative to the common practice of using dull blades on Skill 100 planers.
-
Page 22: History
HISTORY We added this section because many people question why Clark Foam is in the power planer business. We also think some history might be interesting to a person who uses power plan- ers to earn their living. In 1988 the Skil Corporation suddenly announced they were discontinuing production of all power planers. -
Page 23: Suggestions
P-20SB and were making some pretty trick modifications. By 2003 we realized that Clark Foam had made some serious errors. First we did not include a manual such as this one with all of our modified planers. A lot of shapers were really struggling with the required maintenance and repairs. -
Page 24: Tool Kit And Parts
TOOL KIT AND PARTS A “T” socket wrench for changing the blades. A jig for indexing blades using the blade holder. (For an instruction Manual contact Clark Foam.) An Allen Wrench for the DOUGHNUT under the big knob. A depth of cut spacer ring that can be installed to decrease the maximum cutting depth.
Need help?
Do you have a question about the 2003 Model Clark Foam Planer and is the answer not in the manual?
Questions and answers