Table of Contents
Advertisement
RockSolid POS
EQUIPMENT INSTALLATION INSTRUCTIONS
In preparation for your initial Installation Call, you will
need to follow these instructions in a specific order.
Make sure you received all the equipment by checking it against the packing list.
If anything is missing please contact your Retail Systems sales representative immediately.
If you have any questions regarding these instructions please contact your Help Desk at
1-800-882.1137 and they will direct your call to the appropriate person.
This document was updated on December 8, 2005.
Advertisement
Table of Contents

Summary of Contents for True Value RockSolid POS
- Page 1 RockSolid POS EQUIPMENT INSTALLATION INSTRUCTIONS In preparation for your initial Installation Call, you will need to follow these instructions in a specific order. Make sure you received all the equipment by checking it against the packing list. If anything is missing please contact your Retail Systems sales representative immediately.
- Page 2 True Value Company PREPARATION These instructions will walk you through setting up your primary POS PC/Server, and a second PC which will be used as an office workstation. NOTE: Do not unpack anything before reading the installation procedure. The installation procedure needs to be performed in a specific order.
-
Page 3: Table Of Contents
True Value Company TABLE OF CONTENTS BATTERY BACKUP ....................... 4 Connect the Battery ......................4 Charge the Battery......................5 Connecting Equipment to the Back-UPS ................ 5 Battery Back-Up Outlets................... 5 Surge Only Outlets....................5 NETWORK SET UP......................... 6 Ethernet Wiring Diagram (CAT 5e Cable)..............8 POS / SERVER SET UP...................... -
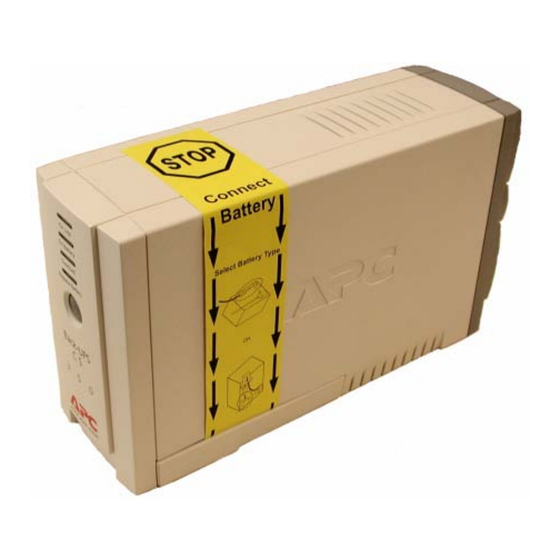
Page 4: Battery Backup
BATTERY BACKUP True Value Company BATTERY BACKUP In compliance with Department of Transportation (DOT) regulations, the Back-UPS is shipped with the internal red battery wire disconnected. The Back-UPS will not operate until the internal red wire is connected to the battery. -
Page 5: Charge The Battery
True Value Company BATTERY BACKUP Charge the Battery During normal operation, the Back-UPS charges the internal battery any time it is connected to a wall outlet. 1. Once connected, allow the Back-UPS to charge for a full eight hours. 2. While the Back-UPS receives its initial charge, you may continue with the Network Setup part of the installation. -
Page 6: Network Set Up
NETWORK SET UP True Value Company NETWORK SET UP - 6 - RockSolid Equipment Installation Instructions_beta... - Page 7 True Value Company NETWORK SET UP You will be required to set up your in-store network. If you do not feel you have the expertise for this, then we recommend that you hire a local specialist who can troubleshoot your network in case you run into any difficulties down the road.
-
Page 8: Ethernet Wiring Diagram (Cat 5E Cable)
NETWORK SET UP True Value Company Ethernet Wiring Diagram (CAT 5e Cable) CAT5e Cable is short for Category 5e cable. Cat5e cable is network cabling consisting of four twisted pairs of copper wire terminated by RJ45 connectors. Cat 5e cabling supports frequencies up to 350 MHz and speeds up to 1000 Mbps. -
Page 9: Pos / Server Set Up
True Value Company POS / SERVER SET UP POS / SERVER SET UP Cash Drawer 1. Unpack the cash drawer. 2. Be careful when removing the packing material because there is a special cable enclosed in the box. It looks like a heavy duty phone cord. -
Page 10: Monitor
POS / SERVER SET UP True Value Company Monitor 1. Unpack the monitor. 2. Set the monitor on top of the PC. 3. Connect the Power Cable to the back of the monitor. 4. Plug the Power Cable into the battery backup side of the UPS. -
Page 11: Receipt Printer
True Value Company POS / SERVER SET UP Receipt Printer The Receipt Printer and its Power Supply are packaged in separate boxes. 1. Unpack both the Receipt Printer and its Power Supply. 2. Connect the Power supply to the port on the back of the printer. -
Page 12: Barcode Scanner
POS / SERVER SET UP True Value Company Barcode Scanner The scanner consists of several parts, the scanner a coiled cable and the stand. 1. Assemble the stand according to the scanner instructions. 2. Locate the stack of 4 USB connections on the rear of the 3. -
Page 13: Signature Capture Pad
True Value Company POS / SERVER SET UP Signature Capture Pad 1. Remove Signature Capture Pad from the packing. It is already assembled. 2. Be sure to place spare batteries for the stylus in a safe place. 3. Locate the stack of 4 USB connections on the rear of the PC. -
Page 14: Credit Card Swipe
POS / SERVER SET UP True Value Company Credit Card Swipe The Credit Card Swipe is an optional piece of equipment. It will be provided if you are processing credit cards through RockSolid. 1. Unpack the Credit Card Swipe. 2. Mount the Credit Card Swipe to the desired location that you wish to use for this purpose. -
Page 15: Display Pole
True Value Company POS / SERVER SET UP Display Pole The Display Pole is an optional piece of equipment. 1. Unpack the display pole. 2. Assemble it according to the instructions enclosed with the Display Pole. 3. Connect the power cord to the USB cable. -
Page 16: Back Office Workstation Installation
BACK OFFICE WORKSTATION True Value Company BACK OFFICE WORKSTATION INSTALLATION A Back-UPS is not required for the Back Office Workstation. At the very least, you should use a surge protected multiple outlet power strip. However, for Best Practices, you should always use a Back-UPS on any PC. -
Page 17: Monitor
True Value Company BACK OFFICE WORKSTATION Monitor 1. Unpack the monitor. 2. Set the monitor on top of the PC. 3. Connect the Power Cable to the back of the monitor. 4. Plug the Power Cable into the battery backup side of the UPS. -
Page 18: Dymo Label Printer
BACK OFFICE WORKSTATION True Value Company Dymo Label Printer 1. Unpack and assemble the Dymo Label Printer. 2. Do not connect it to the Back Office Workstation PC. REV Backup Drive 1. Unpack and assemble the REV Backup Drive. 2. Do not connect it to the Back Office Workstation PC.
Need help?
Do you have a question about the RockSolid POS and is the answer not in the manual?
Questions and answers