
Summary of Contents for Lilin D6601 Series
- Page 1 User's Manual D6601 Series Robotic Vacuum Cleaner Before using, please read the contents on the "Safety Instructions" Pages carefully to ensure safe operations of the robot.
-
Page 2: Table Of Contents
Table of Contents Before Using Robot Features Safety Instructions Cleaning Modes Packing List Main Body Anatomy Button Functions Indicator Descriptions Installation of Remote Controller Batteries Installation of Charging Base Pairing Robot with Remote Controller Setting Current Time How to use How to Start and Pause Cleaning How to Charge How to Schedule... -
Page 3: Before Using
Before Using Robot Features Frequency Conversion Technology Using this technology by remote controller to adjust the cleaning speed according to different working environment. Will use less power and produce lower noise. Bluetooth Wireless Remote Controller You don't have to point at the robot to operate and can use it more conveniently. The remote controller also has the direction control function of rocker handle. -
Page 4: Safety Instructions
Safety Instructions To reduce the risk of injury or damage, you should keep the safety instructions in mind when using the robot. Basic Safety Instructions After reading, please keep the manual carefully. This is security warning symbol. It alerts there exists potential danger,which may cause property damage and / or severe personal injury or even death. - Page 5 Safety Instructions WARNING Do not touch the power adapter Do not let small children or pets with wet hands. sit or stand on the robot. Or may cause a electric shock. Or may cause injury or product damage. Do not spray or place Turn off the power switch inflammables 、...
- Page 6 Safety Instructions CAUTION Do not let the robot pick up Do not let the bottom frame and liquids, blades, thumbtacks, charging terminals of charging kindling, etc base touch metallic objects. Or may cause product failure. Or may cause product failure. Do not pour liquids(e.g.water, Do not use the robot when dust detergent,etc) into the robot.
-
Page 7: Cleaning Modes
Cleaning Modes Auto Mode AUTO: The robot will clean automatically in kinds of cleaning paths till it returns to the charging base to recharge. Spot Mode SPOT: The robot will spiral approximately 2.4 meters in diameter, intensively cleaning a localized area. (The robot can be controlled by the remote controller to walk to the localized area and then clean it.) Edge CleaningMode... -
Page 8: Packing List
Packing List Main Body Charging Base Remote Controller (1 PCS) (1 PCS) Power Adapter (1 PCS) Side Brush (2 PCS) User's Manual Robotic Vacuum Cleaner Before using, please read the contents on the "Safety Instructions" Pages carefully to ensure safe operations of the robot. User’s Manual Microfiber Mop (1 PCS) -
Page 9: Main Body Anatomy
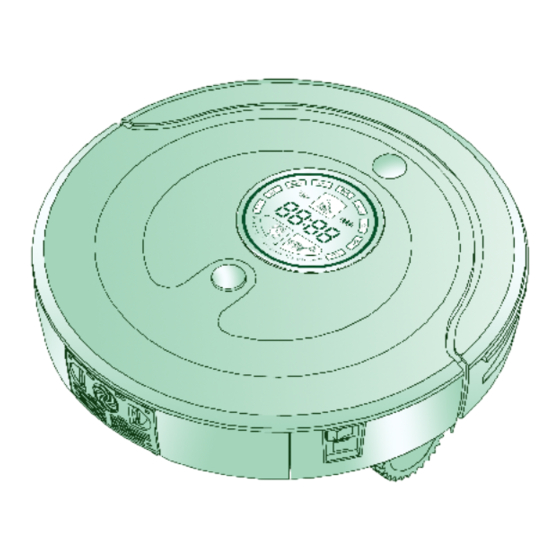
Main Body Anatomy Decorative Panel Front Cover IR Receiver Display Screen Dust Bin Button Rubber Bumper Transparent Window Power Switch DC Jack Top View Universal Wheel Charging Terminal UV Lamp Battery Cover Side Brush Left/Right wheel Main Brush Dusting Brush Mop Plate Dust Bin Cliff Sensor... -
Page 10: Button Functions
Button Functions Charge Power Indicator Power Forward Leftward Rightward Backward Auto Clean Mute Spot Edge Speed Zigzag Remote Controller Power Power Button Power Indicator : Press any button, if this indicator lights, it means the remote controller works properly. Charge Press this button, the robot will look for charging base to recharge automatically. -
Page 11: Indicator Descriptions
Indicator Descriptions Indicator Lights Indicator Instructions : Auto Cleaning Light Spot Cleaning Light Day Light(Monday, Tuesday, ..., Sunday Light) UV Light Power Light Time/Error Code Light Touch Buttons : CLEAN Press this button, the robot will enter into auto cleaning mode. CLEAN SCHEDULE Press this button to select Day and cycle from Monday to Sunday to time when setting time. -
Page 12: Installation Of Remote Controller Batteries
Installation of Remote Controller Batteries 1. Lift the clasp on the back of remote controller and open the battery cover. 2. Install Two AAA alkaline batteries(Pay attention to the corrected polarity). 3. Close the battery cover. Note:Please take batteries out when the remote controller will not be used for a long time. Installation of Charging Base Lift the clasp on the back Connect the power... -
Page 13: Setting Current Time
Setting Current Time 1.Setting the "Day" 2.Setting the "Minute" and "Hour" Turn on the power switch, and press Press SCHEDULE button continuously CHARGE button instantly to enter into the till the first figure on the time display flashes, current time setting(At this moment, Monday then press CHARGE button to select the correct light is pulsing). -
Page 14: How To Use
How to Use How to Start and Pause Cleaning 1.Start Cleaning Turn on the power switch. Touch CLEAN button, the robot will enter into auto cleaning mode. The AUTO light is always on till robot returns to the charging base to recharge. -
Page 15: How To Schedule
2.Manual Charging If the robot is used for the first time or you want to charge the robot during its cleaning, please charge the robot manually. Ways of Manual Charging: Position the robot pointing Press CHARGE button on C h a r g e t h e r o b o t at the charging base manually. -
Page 16: How To Use Mop
Note: You must set the current time before setting a schedule. Hour Light Minute Light Day Light Time Display How to Use Mop 2.Stick the mop in the mop plate. 1. Get the mop wet. 3. Install the mop plate to the 4. -
Page 17: Care And Maintenance
Care and Maintenance Before performing the maintenance of robot, please ensure that the power switch is off. Cleaning Dust Bin If dust bin is full, the suction power will be weakened. Please empty dust bin before and after every use. Please follow the steps as below: Press dust bin button to Hold dust bin by both Use cleaning brush to... -
Page 18: Cleaning Main Brush And Dusting Brush
Cleaning Main Brush and Dusting Brush Excessive amounts of foreign materials adhereing to the brushes can damage the robot. Please clean the brushes at least once per week. Turn the robot over and put Remove brush bracket Lift up the right side of it on a smooth soft and level by lifting both fixed clasps. -
Page 19: Cleaning The Sensors And Charging Terminal
Cleaning the Sensors and Charging terminal Turn the robot over, put it on a smooth soft and level surface. Use a soft and dry cloth or cleaning brush to clean the sensors and charging terminal. Please follow the steps as below: Cleaning Side Brushes Excessive amounts of foreign materials adhereing to the brushes can damage the robot. -
Page 20: Cleaning The Mop
Cleaning the Mop To avoid odors, the mop should be washed in time after every use. Please follow the steps as below. S e p a r a t e t h e m o p Wash the mop carefully. Dry the mop in a from the mop plate sunny, well-ventilated... - Page 21 Take out the right and Dry the right and left Make the hole of wheels left wheels and wash them. wheels in a well-ventilated align with the hole of wheel place and avoid the direct f r a m e , t h e n i n s t a l l t h e sunlight.
-
Page 22: Troubleshooting
Troubleshooting Error Codes Problems What to do Dust bin or fan doesn't work Please check the installations of dust bin and E001 properly fan components. The main brush or dusting Please clean the main brush and dusting brush E002 brush don't work properly and check their installation The cliff sensors failure Wipe off the cliff sensors with a dry cloth... -
Page 23: Reference
Reference Specifications Model: D6601 Main Body Dimension φ360*92mm Weight 3.5kg Rated Power 18-30W Rated Voltage DC 14.8V Working Time About 120min Charging Voltage/Current DC24V 1A Noise Level 45dB Capacity of Dust Bin About 800mL Battery Type DC14.8V 2200mAh Max Speed About 300mm/sec Min Speed About 150mm/sec...