
Related Manuals for Camco 18

Summary of Contents for Camco 18
- Page 1 Bottom-mount no frost Refrigerators Model 18 Owner’s Manual Part No. 350A4632P001 Cat. No. WR6M406 11/98...
- Page 2 Service during this warranty period must be performed by an Authorized Camco Service Agent. 2. Neither Camco or the Dealer is liable for any claims or damages resulting from the failure of the Refrigerator or from service delays beyond their reasonable control.
-
Page 3: What Is Covered
CUSTOMER WARRANTY (for customers in U.S.) What is Covered FULL ONE-YEAR WARRANTY For one year from date of original purchase, we will provide, free of charge, parts and service labor in your home to repair or replace any part of your refrigerator that fails because of a manufacturing defect. - Page 4 Other servicing generally should be referred to qualified service personnel. Caution must be exercised, since improper servicing may cause unsafe operation. In the United States: 800-626-2002 In Canada: Consult yellow pages for the nearest Camco Service Centre.
-
Page 5: Table Of Contents
If you do need service, you can Normal Operating Sounds ..29 relax knowing help is only a phone call away. In Canada, you can call the Camco Answer Centre at 1-800-361-3400 Troubleshooting Tips 24 hours a day, 7 days a week. -
Page 6: Warranty
Help Us Help You We’re proud of our quality products and we are committed to providing dependable service. You’ll see it in this easy-to-use Owner’s Manual and you’ll hear it in the friendly voices of our customer service department. Best of all, you’ll experience these values each time you use your refrigerator. -
Page 7: Safety Precautions
IMPORTANT SAFETY INFORMATION. READ ALL INSTRUCTIONS BEFORE USING. WARNING! Use this appliance only for its intended purpose as described in this Owner’s Manual. Safety Precautions When using electrical appliances, basic safety precautions should be followed, including the following: Before it is used, this Repair or replace refrigerator must be immediately all electric... -
Page 8: Risk Of Child Entrapment
IMPORTANT SAFETY INFORMATION. READ ALL INSTRUCTIONS BEFORE USING. DANGER! Risk of Child Entrapment Child entrapment and suffocation are not problems of the past. Junked or abandoned refrigerators are still dangerous, even if left "for just a few days". If you are getting rid of your old refrigerator, please follow the instructions below to help prevent accidents and pollution. -
Page 9: How To Connect Electricity
IMPORTANT SAFETY INFORMATION. READ ALL INSTRUCTIONS BEFORE USING. WARNING! How to Connect Electricity Do not, under any circumstances, cut or remove the third (ground) prong from the power cord. For personal safety, this appliance must be properly grounded. The power cord of this appliance is equipped with a 3-prong (grounding) plug which mates with a standard 3-prong (grounding) wall outlet to minimize the possibility of electric shock hazard from this appliance. -
Page 10: Preparing To Install The Refrigerator
Preparing to install the refrigerator. Read these instructions completely and carefully. Water Supply to the Icemaker (on some models) You will need to connect your icemaker to a cold water line. A water supply kit containing copper tubing, shutoff valve, fitting and instructions is available at extra cost from your dealer. - Page 11 Preparing to install the refrigerator. Levelling Your Refrigerator Your refrigerator comes with either adjustable rollers or adjustable legs. Either rollers or legs should be set so the refrigerator is firmly positioned on the floor and the front is raised just enough that the doors close easily when opened about halfway.
-
Page 12: Reversing The Door Swing
Reversing the Door Swing When Reversing the Door Swing: • Read the instructions all the way through before starting. • Note: Stainless steel doors are not reversible. • Handle parts carefully to avoid scratching paint. • Set screws down by their related parts to avoid using them in the wrong places. - Page 13 Reversing the Door Swing Remove Fresh Food Door (Top Door) a.Tape the door shut with masking tape. b.Remove the hinge cover (on some models). With a 5/16" socket, remove 2 screws that hold the top hinge to the cabinet. c. Lift the hinge straight up to free the hinge pin from the socket in the top of the door.
- Page 14 Reversing the Door Swing Transfer Bottom Hinge Bracket to the Left (cont.) c. Remove plug button and screw from the bottom Plastic Washer left side of the cabinet and install at the bottom right. d. Reinstall the spacer shim, hinge bracket, screws and plastic washer to the bottom left side of the cabinet.
- Page 15 Reversing the Door Swing To Reverse Door Handles To Transfer The Fresh Food Door Handle To The Right • Remove the four handle mounting screws. Fresh Food Door • Using a putty knife, remove the four screw hole plug buttons from the right side of the Handle Mounting door.
- Page 16 Reversing the Door Swing B. On models with partial width freezer door handle. Remove the Plug Button and Screw from the top right hand side of the door. Remove the two screws from the handle Note: The two handle screws have different Tapping Screw threads.
-
Page 17: Operating Instructions
Operating Instructions About the controls on the refrigerator. The temperature controls on your refrigerator have letters and numbers. Initially set the fresh food control at 5 and the freezer control at C. If you want colder or warmer temperatures, adjust the fresh food temperature first. - Page 18 Operating Instructions How To Test Temperatures Use the milk test for the fresh food compartment. Place a container of milk on the top shelf and check it a day later. If the milk is too warm or too cold, adjust the temperature controls. Use the ice cream test for the freezer compartment.
- Page 19 Operating Instructions Energy-Saving Tips • Location of your refrigerator is important. Try not to locate it next to your range, a heating vent or where the sun will shine directly on it. • Don't open doors more often than necessary. •...
-
Page 20: Features
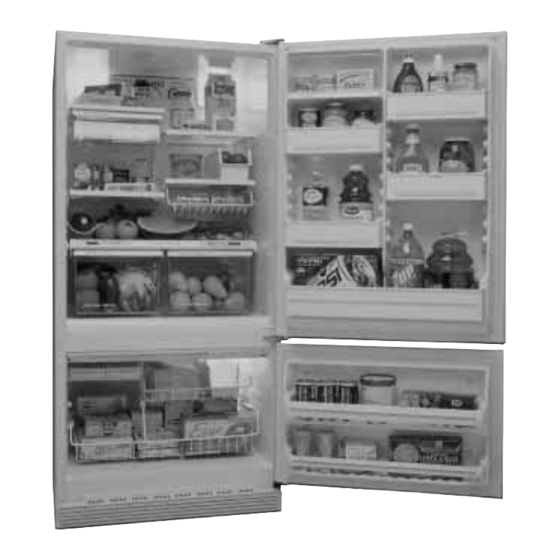
All about refrigerator shelves, storage drawers & features Not all features are on all models. Shelves Wire In the fresh food compartment are adjustable shelves to suit your needs. To remove shelves, tilt shelf up at front (1), then lift it up and out of tracks on rear wall of refrigerator (2). - Page 21 About the storage drawers Not all features are on all models. Adjustable Humidity Drawers (Only on models so equipped) Slide the control on the drawer cover all the way to the "MAX" setting to provide high humidity recommended for most vegetables. Slide the control on the drawer cover all the way to the "MIN"...
- Page 22 Some Additional Features Not all features are on all models. Door Gallon Storage The lower portion of the fresh food door is designed with a robust fixed shelf that has sufficient capacity to comfortably accommodate large gallon beverage containers. Snuggers The Snugger is used to help secure tall containers.
- Page 23 Some Additional Features Not all features are on all models. Freezer Shelves & Baskets On models with two sliding baskets Both the lower and upper baskets slide out to provide easy access to foods stored in the freezer. When the lower basket is pulled out, the upper basket may be pushed back to further improve access to the lower basket.
- Page 24 Some Additional Features Not all features are on all models. Ice Cube Tray Shelf Some models have a small separate shelf for ice cube trays. If you choose to install an automatic ice maker, this shelf is removed, inverted and inserted into the left hand side of the lower basket.
-
Page 25: Automatic Icemaker
Some Additional Features Automatic Icemaker Kit Automatic Icemaker Kit (optional at extra cost) (optional at extra cost) An Automatic Icemaker Kit is available at extra cost. The kit will automatically replace the ice you use and will keep a bin full of ice for your convenience. Ask your retailer for details. -
Page 26: Care And Cleaning
Care And Cleaning Of The Refrigerator Cleaning – Outside The door handles and trim can be cleaned with a cloth dampened with a solution of mild liquid dishwashing detergent and water. Dry with a soft cloth. Don’t wax handles or trim. Keep the finish clean. - Page 27 Care And Cleaning Of The Refrigerator Behind refrigerator Care should be taken in moving your refrigerator away from the wall. All types of floor coverings can be damaged, particularly cushioned coverings and those with embossed surfaces. Pull the refrigerator straight out and return it to position by pushing it straight in.
- Page 28 Care And Cleaning Of The Refrigerator Preparing to move? Disconnect power cord from wall receptacle. Remove all foods and clean interior. Such loose items as grill, shelves, storage pans, ice bin, covers and removable parts should be protected or secured with tape. This prevents their coming loose and causing damage.
-
Page 29: Normal Operating Sounds
Normal operating sounds. Depending on the placement of the refrigerator in your kitchen, you may want to place a piece of rubber backed carpet under the refrigerator to reduce noise. Icemaker (on some models). Occasionally you will hear ice cubes dropping into the ice bin. -
Page 30: Food Storage Guide
Food Storage Guide General Rules for Freezing Food and Suggested Storage Times For Meat & Poultry Food Specialists Advise: • Do not refreeze frozen foods which have thawed completely. • You may safely refreeze foods that have thawed if they still contain ice crystals or if they are still cold - below 5°C or 40°F. - Page 31 Food Storage Guide Freezing Purchased Frozen Foods Keep them in their original containers. Such foods include TV dinners, fish, bulk vegetables, pies, cakes, pastries, berries, etc. Freezing Meat, Fish and Poultry Wrap well in freezer-weight foil, forming it carefully to the shape of the meat. This expels as much air as possible.
- Page 32 Suggested Storage Times For Meat & Poultry STORAGE PERIOD (To maintain its quality) REFRIGERATOR FREEZER 35° to 40° F 0‚F 2° to 5°C –18°C PRODUCT DAYS MONTHS FRESH MEATS Roasts (Beef and Lamb) 3 to 5 8 to 12 Roasts (Pork and Veal)
- Page 33 Food Storage Guide What To Store in the High Humidity Drawer (on models so equipped) This refrigerated drawer is designed to keep UNWRAPPED FOODS fresh by retaining the natural moisture content of foods such as: • Artichokes • Cherries • Peas, green •...
-
Page 34: Call For Service
Before you call for service… Food Storage Guide Read this Problem/Solution List Problem Possible Causes Refrigerator Does Not • May be in defrost cycle when motor does not Operate operate for about 30 Minutes. • Temperature control in OFF position. •... -
Page 35: Troubleshooting Tips
Before you call for service… Food Storage Guide Troubleshooting Tips Problem Possible Causes Fresh Food Or Freezer • Temperature control not set cold enough. Compartment Temperature • Warm weather - frequent door openings. Too Warm • Door left open for long time. •... - Page 36 Before you call for service… Problem Possible Causes Moisture Forms On • Not unusual during periods of high humidity. To Cabinet Surface help prevent rust, wipe surface dry and reset temperature control one setting cooler. Moisture Collects Inside • Too frequent or too long door openings. •...
Need help?
Do you have a question about the 18 and is the answer not in the manual?
Questions and answers