Table of Contents
Advertisement
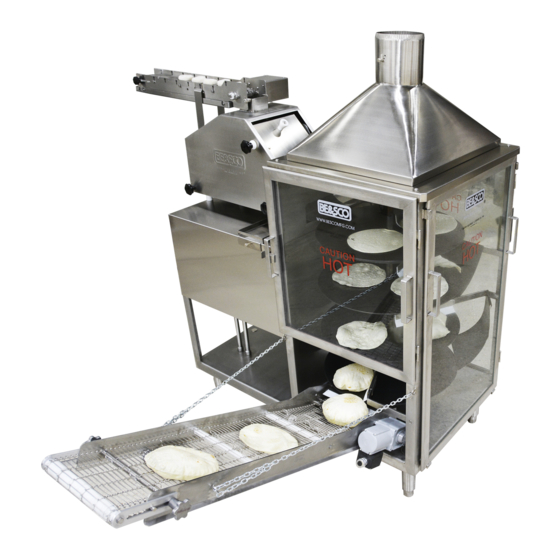
Shown with the optional
Dough Trolley Loader
Shown as a Right Exit
also available as a
Straight Exit or Left Exit.
THIS MANUAL MUST BE RETAINED FOR FUTURE REFERENCE.
INSTRUCTIONS AND WARNING CONTAINED IN THIS MANUAL MUST
BE READ, UNDERSTOOD AND FOLLOWED.
!
IN CASE OF POWER FAILURE, TURN OFF GAS AND FOLLOW
DO NOT STORE OR USE GASOLINE OR OTHER FLAMMABLE VAPORS
OR LIQUIDS IN THE VICINITY OF THIS OR ANY OTHER APPLIANCE.
POST IN A PROMINENT LOCATION INSTRUCTIONS TO BE FOLLOWED IN THE
EVENT USER SMELLS GAS. THIS INFORMATION SHALL BE OBTAINED BY
CONSULTING YOUR LOCAL GAS SUPPLIER. AT A MINIMUM:
• TURN OFF GAS
• EXTINGUISH ANY EXISTING FLAMES
• CONTACT YOUR GAS SUPPLIER
• IF YOUR GAS SUPPLIER CAN'T BE REACHED, CONTACT
LOCAL FIRE DEPARTMENT
IMPROPER INSTALLATION, ADJUSTMENT, ALTERATION, SERVICE OR
MAINTENANCE CAN CAUSE PROPERTY DAMAGE, INJURY OR DEATH.
READ THE INSTALLATION, OPERATING AND MAINTENANCE INSTRUCTIONS
THOROUGHLY BEFORE INSTALLING OR SERVICING THIS EQUIPMENT.
WARNINGS
POWER FAILURE WARNING
SHUT DOWN PROCEDURES FOR OVEN.
FOR YOUR SAFETY
WARNING
Shown with Exit Conveyor and
1
Beta 900 Tortilla Oven
Midwedge Tortilla Press.
10/15/13
Advertisement
Table of Contents

Summary of Contents for BE&SCO Beta 900 Tortilla Oven
-
Page 1: Warnings
WARNINGS Shown with the optional Dough Trolley Loader Beta 900 Tortilla Oven Shown with Exit Conveyor and Midwedge Tortilla Press. Shown as a Right Exit also available as a Straight Exit or Left Exit. THIS MANUAL MUST BE RETAINED FOR FUTURE REFERENCE. -
Page 2: Precautions
Precautions KEEP THE BETA 900 FREE AND CLEAR FROM COMBUSTIBLES. DO NOT OBSTRUCT THE FLOW OF COMBUSTION AND VENTILATION AIR. DISCONNECT ELECTRICAL POWER PRIOR TO MAINTENANCE AND CLEANING. ALL MAINTENANCE AND CLEANING MUST BE PERFORMED ACCORDING TO THIS MANUAL. NEVER USE ANY SHARP OBJECTS, CAUSTIC OVEN CLEANER, OR DEGREASER TO CLEAN MACHINE OR PRESS PLATES. -
Page 3: Table Of Contents
Table of Contents Warnings ..............................1 Precautions..............................2 Table of Contents............................3 Policy & Procedure for Returning BE&SCO Parts ..................4 Storyboards, Delivery & Damage, Beta 900 Manual, Training DVD............5 Installation Requirements ..........................6 Location & Placement of Machine ....................... 7 Electrical Specifications ..........................11 Gas Specifications ............................. -
Page 4: Policy & Procedure For Returning Be&Sco Parts
Policy & Procedure for Returning BE&SCO Parts Returning BE&SCO Parts: To return any BE&SCO parts you must follow BE&SCO’s procedure for returning. No returns will be accepted outside of this procedure. BE&SCO warrants parts for 1 year or 3000 hours, which ever comes first, for full credit. -
Page 5: Storyboards, Delivery & Damage, Beta 900 Manual, Training Dvd
Delivery & Damage We tightly pack all our equipment and strap them on heavy wooden skids before giving them to the shipping company. After we give the merchandise to the shipping company, they are responsible for delivering your purchase; therefore, BE&SCO will not be responsible for the loss or damage of your shipment. -
Page 6: Installation Requirements
Installation Requirements (For a Qualified Service Person) A Qualified Service Person will be responsible for completing the work in the sections listed below. Anyone else doing so could easily damage the Beta Max, hurt him or himself, and void the warranty. 1. Specifications 2. Gas Pipings 3. -
Page 7: Location & Placement Of Machine
Location and Placement of Machine Placement of the unit must meet all the following standards: • In an open work area. This way anyone can access the Beta 900 easily, especially for maintenance. • Where the ventilation areas are not blocked. If blocked the flow of air to the combustion compartment will be restricted and stop proper ventilation. - Page 8 Beta 900 with Straight Exit with optional Dough Trolley Loader...
- Page 9 Beta 900 with Right Side Exit with optional Dough Trolley Loader...
- Page 10 Beta 900 with Left Side Exit with optional Dough Trolley Loader...
-
Page 11: Electrical Specifications
Electrical Specifications (For a Qualified Service Person) ELECTRICAL SPECIFICATIONS: Voltage 220/240 AC Cycles 60 Hz Phase Single Phase 4 Wire Amperage 14.5 Total Power Usage 3.16KW Total Heating Element Wattage (With Midwedge Only) 3000 Drive Motor Size 1/8 HP / 220V / 3 Phase Drive Motor Voltage 90 VDC Conveyor Motor Size 1/50 HP / 1/20 HP... -
Page 12: Gas Specifications
Gas Specifications (For a Qualified Service Person) NATuRAl GAS SPECIFICATIONS: P art U. S . U nits S I U nits (International S tanda rds ) Gas heating Value 1000 BTU/cu.ft 37.3 MJ/cu.mm Gas Specific Gravity (Air = 1.0) 0.63 0.63 Gas Supply Pressure 5.5" W.C. 1.35 kPa Gas Inlet Pressure (at manifold) 3.5"... -
Page 13: Gas Piping
Gas Piping (For a Qualified Service Person) DO NOT INSTALL AN ADDITIONAL REGULATOR WHERE THE BETA 900 CONNECTS TO THE GAS SUPPLY. Each BETA 900 has been adjusted at the factory to operate on natural gas and the right-sized gas supply system is essential to run the Beta 900. Gas piping must agree with local codes, or in the absence of local codes, to the National Fuel Gas Code, NFPA 54-1984 and ANSI Z223.1-1984. -
Page 14: Ventilation
Ventilation (For a Qualified Service Person) AIR INTAKE: The Beta 900 uses the air in the room while it operates. The direct vent cannot restock the air supply so make sure about 30 CFM is available for the Beta to use. Consult a ventilation expert to increase the supply of air entering the room if necessary. -
Page 15: Assembly Instructions
Assembly Instructions (For a Qualified Service Person) The BETA 900 is very easy to assemble. It comes put together for the most part. This section will show you how to attach the oven hood and conveyor. 1. Set the oven hood on top of the oven over the flange. See picture A. Put the 6”... - Page 16 Assembly Instructions (For a Qualified Service Person) This section will show you how to attach the oven and press slides and scrapers. Do the following to complete the assembly. 1. Attach all (white) Tyflon scrapers to the scraper holders. See diagram A & B. 2.
-
Page 17: General Guidelines
General Guidelines THIS SECTION IS PROVIDED FOR THOSE WHO HAVE CAREFULLY READ THE INFORMATION CONTAINED IN THIS MANUAL, ARE FAMILIAR WITH THE FUNCTION OF THE BETA 900 MACHINE OR, HAVE HAD PREVIOUS EXPERIENCE WITH THE OPERATION OF THE EQUIPMENT DESCRIBED. After the completion of proper hook-up and installation, please observe the following procedures and suggestions: •... -
Page 18: Midwedge Installation
Midwedge Installation There are no electrical controls on the MIDWEDGE because the power, speed, and temperature are all controlled from the Electrical Control Panel of the BETA 900 Oven. For instructions on the MIDWEDGE electrical controls, see the FLOUR TORTILLA Section of the Electrical Control Panel on the OVEN Operation Instructions. -
Page 19: Oven Control Panel
Control Panel Power Section 1. The Master Switch is a red mushroom-head button. It turns the power on and off and is also the emergency shut down switch. Pull to turn power ON and push to turn power OFF. 2. The Control Fuses protect the Beta 900 system against an overload in the main power supply. - Page 20 Control Panel Flour Tortilla Section 8. The Heat Switch is a red mushroom-head button that turns on the electrical power to the MIDWEDGE. Pull the switch to turn power ON and push to turn power OFF to the MIDWEDGE. 9. The Temperature Controller controls the temperature for the MIDWEDGE bottom plate.
-
Page 21: Oven Section Start-Up
Oven Section Start-up BE SURE OVEN DOORS ARE CLOSED. Pull the (POWER) Master Switch out. Pull the (OVEN) Power Switch out. The oven round plates and long exit conveyor will turn on. PUSH the Oven Heat button in. If a sparking sound is heard, the igniter is sparking to light the pilot tree. -
Page 22: Midwedge Section Start-Up
Midwedge Section Start-up PULL the (FlOuR TORTIllA) Heat out. Wait until temperature controller reaches set point. PuSH the (FlOuR TORTIllA) Press Motor button in. This starts the Midwedge press plates moving and opens and closes the hopper gate. You’re ready to make tortillas! Mid Wedge Tips: Push in the switch marked (Flour Tortilla) Press Motor so it is flush with... -
Page 23: Shutdown Operation
Shutdown Operation Midwedge Oven Pull the (OVEN) PuSH the (FlOuR TORTIllA) Oven Heat in. Press Motor button out. PULL the (FlOuR TORTIllA) PuSH the (OVEN) Power Switch button out. Heat out. PuSH the (POWER) Master Switch out. Shut Down Complete... -
Page 24: Dough Making
Dough Making Introduction: Without good dough you can’t make good tortillas. This section will give you some information about dough making. The best way to make dough easily is to use a premix. Each brand tells you exactly how to make their dough, so by following their instructions you won’t have to guess about ingredient amounts. - Page 25 Dough Making Troubleshooting Problem 1: Dough ball is sticky to the touch. Cause Solution Dust dough balls with Dough is too soft. flour used in dough making. Dough batch was Make new batch and mixed too long. correct dough mixing. Dough batch was Make new batch and mixed at too high a...
- Page 26 Dough Making Troubleshooting Problem 3: Dough proofs too soon. Cause Solution Dust dough balls with Dough mix too soft. flour used in dough making. Dough batch was Make new batch and mixed too long. correct dough mixing. Dough batch was Make new batch and mixed at high speed.
-
Page 27: Tortilla Making
Tortilla Making Introduction: If you have read the other sections, Tortilla Making ought to be a easy. This section offers some suggestions about tortilla making, and then goes onto explain exactly how to make tortillas. Over proofing is a common problem in tortilla making. If you find running dough hard to do, check to see if the dough has over proofed. - Page 28 Tortilla Making Troubleshooting Problem 1: Tortilla has broken edges, grainy appearance and some holes. Cause Solution Allow longer Dough not proofed proof time. long enough. Better proofing Poor proofing environment or use environment. proofing box. Not enough water Add more water to mix.
- Page 29 Tortilla Making Troubleshooting Problem 4: Tortilla not round in shape. Cause Solution Adjust rounding machine. Dough balls are not round. Correctly operate rounding machine. Check and correct dough-mixing. Dough is too sticky. Line pan with parchment paper. Press Plates need Contact a Qualified adjusting.
- Page 30 Tortilla Making Troubleshooting Problem 6: Tortilla crumbles under Press Plates. Cause Solution Check dough-mix and Dough is too soft. cut back on the amount of water used. Lower Press Plate Press plates are too hot. temperature. Press plates too Check Press Plates adjustment.
- Page 31 Tortilla Making Troubleshooting Problem 9: Major sticking problem when machine is first used after being stopped a while. Cause Solution Read Start-up Start-up done wrong. section in manual. Cleaning was not done Read Cleaning correctly, or at all. section of manual. Problem 10: Part of tortilla is pressed.
-
Page 32: Recipes
Flour Tortilla Recipe using the Vertical Cutter Mixer Ingredients: • 25 lbs. All Purpose Flour • 1 (2 lb.) bag of Minom premix • 3 lbs. of shortening • 6 quarts of water • Sheet pan 7x11 with pan-liner • Plastic Bun Pan bag Instructions: 1. Place the following ingredients into a Vertical Cutter Mixer: All Purpose Flour, Minom premix, and shortening. 2 MINUTES 2. - Page 33 Flour Tortilla Recipe using a Hobart Mixer Mixing Instructions using a Hobart Mixer (Masa para tortillas de harina hechas en la maquina Hobart) STEP #1 Place in mixer: (Necesita que poner en la maquina Hobart) 25 lbs. of flour-All Purpose Flour (25 lbs.
-
Page 34: Cleaning Supplies
Cleaning the Beta 900 BE&SCO Cleaning Supplies Introduction: Cleaning keeps the inside and outside of the machine free from dust, flour, or any other build-up. If the machine remains unclean for along period of time, the oil and build-up clog the moving parts and could slow or halt production and damage the unit. -
Page 35: Cleaning The Beta 900
Cleaning the Beta 900 Precautions: • Unplug electrical power before cleaning the machine. • Allow machine to cool down for 30 minutes before cleaning. • Wear oven mitts for protection. • Never use any sharp objects, caustic oven cleaner, and/or degreaser on the machine. •... - Page 36 Cleaning the Beta 900 WARNING Make sure you have all the BE&SCO approved cleaning items and service products. Never clean the Beta 900 with any brand name cleaners, degreasers, and/or sharp objects. 2. Remove the press slide. 3. Remove four oven Teflon scrapers from...
- Page 37 Cleaning the Beta 900 9. Clean the press plates 10. Spray Slick’em on a 11. Use vacuum to remove with damp soft cloth. cloth. Wipe the plates all the debris in the motor Never use any cleaning clean. Then pivot the compartment area.
- Page 38 Removing a stuck tortilla during production Introduction: Occasionally the dough ball passes through the Press Plates and will stick to the plate instead of coming out the Exit Slide. If the machine stays on uncleaned for a long period of time the flour accumulates and dough balls will begin to stick and clog the Press Plates.
- Page 39 Removing a stuck tortilla during production Always use the oven mitt when clearing a stuck tortilla. The locking pin is extremely hot. 1. Turn off the Press Motor. 2. Pull the locking pin and place it under the machine. Caution: locking pin extremely hot. 3.
-
Page 40: Troubleshoot Guide
Troubleshooting Guide Mechanical and Oven PROBLEM CAUSE SOLUTION 1. Machine will not run, burners A. No power to machine. A. Check branch line circuit will not come on, conveyor will breaker. not run, lights will not work. B. Power fuses blown. B. -
Page 41: Maintenance Press & Oven
Maintenance of Midwedge Materials: • 911211002 Grease • 911211003 Grease Precautions: • Unplug electrical power before any repair. • Allow Midwedge to cool down for 30 minutes before repairing. Part Replacement: • Check the CAM ROLLERS every 1500 hours of machine operation time and REPLACE them if grooves appear on wheel surface. - Page 42 Maintenance of Midwedge The parts in the BETA 900 System have been kept to a minimum. It is therefore less likely that these machines will experience downtime. The information below is provided if the machines need servicing. Maintenance should only be performed by qualified servicemen. Maintenance or service by other than qualified servicemen may result in damage to the Beta 900 and/or injury to the operator.
- Page 43 Maintenance Schedule BETA 900 Oven Preventative Maintenance Schedule DAILY ITEM TWICE A DAY WEEKLY (After every use) Check plates, make sure they are clean and have a smooth surface. Check Flame Switch Check all electrical cords and connectors for wear and tear. Using the soft cloth clean oven plates in a circular motion.
- Page 44 Maintenance Schedule OF THE CONE BEARING Sub Plate CHECK IF REPLACE ONCE A EVERY YOU NEED TO IT AT DESCRIPTION / ITEM WEEK 500 HRS. REPLACE at 3000 1500 HRS. HRS. Pump Grease through Grease Zerk Fitting to lubricate the Cone Bearing (Any personnel can do) Cone Bearing (Qualified Service Technician only)
- Page 45 Maintenance Schedule MIDWEDGE PRESS Preventative Maintenance Schedule 1500 HRS. or ITEM TWICE A DAY EVERYDAY WEEKLY 6 MONTHS Using a soft cloth clean both top and bottom press plates in a circular motion. Spray Slick’em on a soft cloth and apply to both top and bottom press plates.
-
Page 46: Closing Statement
Closing Statement In this manual we have covered a lot of information. You should now know how to care, operate and repair the machine, prepare dough, and make tortillas. Use the troubleshooting sections if you encounter any problems if anyone else operates this machine, we suggest they read through the whole manual as well. -
Page 47: Parts & Pictures Warning
Parts & Pictures Warning Disconnect power before maintenance. Install BE&SCO parts only. When ordering parts know: machine model, machine serial number, operational hours, and BE&SCO part number (if no part number, know the parts and number nearby the desired part). - Page 48 Face Panel Layout ITEM DESCRIPTION PART NO. CONTROLLER, 1/16 DIN TEMP 371116127 SWITCH, MOMENTARY 312242021 SWITCH, MAINTAINED 312300023 FuSEHOlDER 4 AMP 361222202 FUSE, 1 AMP MOTOR 361222200 LIGHTED SWITCH B-12-011 HOUR METER 381411132 FUSE, 3 AMP MOTOR 361222201 OVEN POTENTIOMETER B-10-079 MIDWEDGE POTENTIOMETER B-10-091...
- Page 49 Face Panel Wiring Schematic...
- Page 50 INNER PANEL FOR BROTHERS MOTORS...
- Page 51 Inner Panel Wiring Schematic Using Fincor/Safetronics Drive Controller...
- Page 52 Inner Panel Wiring Schematic Using Toshiba Drive Controller...
- Page 53 D-10-013 Electrical Face Panel - Watlow Temperature Controller and new Press Motor Switches Wiring Diagram Temperature Controller Conversion...
- Page 54 D-10-013 Electrical Face Panel - Chromalox Temperature Controller and new Press Motor Switches Wiring Diagram...
- Page 55 Retrofit Conversion (New DTL Power Supply) Item Description Part No. DTl Power Supply 24 Volt 331212101 DIN Rail 6 inches long 811500002 6-32 x 3/8 Rd. Hd. SST Screw 721223008 6-32 x 1 HEX Standoffs 791523002 A. Black Wire is connected with black wire off of Pin 1 from Speed Controller. B.
- Page 56 Latest Retrofit Conversion (Supersedes Altech Corp. DTL Power Supply) ITEM DESCRIPTION PART NO. CONNECTOR 2 PIN, 2 WIRE 352410008 CONNECTOR 6 PIN, 2 WIRE 352410009 STANDOFFS 6-32X1 731523002 6-32X3/8 SST SCREWS 721322101 HEX NuTS 6-32 SST 731523171 POWER SuPPlY, 24 VOlTS 331212101 WAGO 3 SLOT 352410012 A. Black wire connected with Black wire off of Pin 1 from Speed Controller. B.
-
Page 57: Oven Parts
Oven Parts ITEM DESCRIPTION PART NO. TABLETOP D-10-006 RIGHT GlASS DOOR ASSEMBlY (straight exiting) D-11-022 lEFT GlASS DOOR ASSEMBlY (straight exiting) D-11-023 RIGHT GlASS DOOR ASSEMBlY (left exiting) D-11-022 lEFT MEDIuM GlASS DOOR ASSEMBlY (left exiting) D-10-046 RIGHT MEDIuM GlASS DOOR (right exiting) D-10-031 lEFT GlASS DOOR ASSEMBlY (right exiting) D-11-023... - Page 58 Oven Parts (continued) ITEM DESCRIPTION PART NO. Teflon Oven Scraper Case TEFLON OVEN SCRAPERS B-11-007 D-11-008A 1st Oven Slide -Straight, left Exit C-10-043 2nd Oven Slide -Straight, left Exit C-10-044 3rd Oven Slide -Straight, left Exit C-10-045 CONVEYOR MOTOR - 120V C-10-111 CONVEYOR MOTOR - 220V C-10-113 Teflon Oven Scraper Case...
- Page 59 Oven Parts (continued) ITEM DESCRIPTION PART NO. VENT HOOD D-11-001 3/4 CARBON BEARING 532416033 TOP OVEN HUB B-10-041 ROUND OVEN PLATE C-11-022 BOlT 1/4 - 20 X 1 1/4 HEX 711122010 NuT 1/4 - 20 HEX 731622018 1/20 HP. 120:1 AC MOTOR 331009145 OVEN SHAFT B-10-094...
- Page 60 Sub Plate Face Block is removed, showing the bottom of the block. Bottom of the Face Block Grease Zerk Face Block is mounted, showing the top of the block. The Face Block is facing upwards where the Gearmotor mounts and the Grease Zerk is facing up. Grease Zerk...
- Page 61 Top Press Plate ITEM DESCRIPTION PART NO. TOP PRESS PLATE C-09-001 TOP PLATE SIDE SUPPORT B-09-003 BOlT, 1/4-20 X 1 SOC CAP 711222154 HEATER ELEMENT 413100002 CLAMP, HEATER A-09-027 BOlT, 1/4-20 X 1HEX HD 711522083 1/4 SAE FlAT WASHER 741600139 TOP PLATE COVER C-09-040 10-32 X 1/4 ROuND HD SCREW...
- Page 62 Midwedge Bottom Press Plate ITEM DESCRIPTION PART NO. BOTTOM PRESS PLATE C-09-002 BOTTOM PLATE SIDE SUPPORT C-90-014 BOlT, 5/16-18X3/4 HEX HD. SST 711122008 5/16X1 1/4 FENDER WASHER 741000010 CAM ROLLER ASSEMBLY B-12-008 1” RETAINING RING 751000006 CAM ROLLER SHAFT C-09-003 BUSHING 1/2 I.D.
- Page 63 New Motor Assembly ITEM DESCRIPTION PART NO. BEARING CUP 531817047 CONE BEARING 531818046 3 PH 1/20 HP MOTOR 331009145 MOTOR MOUNT C-10-107 .75X1.25X.25 GREASE SEAL 911211004 BOlTM 5/16-18X5 711522117 lOCK WASHER - 5/16 741500133 WASHER - 5/16 FlAT 741600138 HEX NuT 5-16 FlAT 731622016 1/4 -20X3 8 SST SET SCREW 722622190...
- Page 64 Midwedge Main Assembly Open Closed Midwedge Press Motor ITEM DESCRIPTION PART NO. SHELL ASSEMBLY D-09-005 GATE ASSEMBLY C-09-015 LOCKING PIN ASSEMBLY B-09-004 EXIT CHUTE C-09-007 KNOB A-09-001 C-09-059 BOTTOM PLATE ASSEMBLY D-09-002 TOP PLATE ASSEMBLY C-09-004 MOTOR MOUNT PLATE C-09-057 1/15 HP GEARMOTOR C-12-058...
- Page 65 Midwedge Safety Switch The Safety Switch activates when opening and closing the shell of the Midwedge. Opening the Midwedge shell activates the Safety Switch and turns the Press Motor off. Closing the Midwedge shell activates the Safety Switch. To restart the Press Motor, pull the Flour Heat Switch on. (Make sure Press Motor Button is also on.) THE MIDWEDGE SHELL SHOULD NEVER BE OPEN WHILE MAKING TORTILLAS.
- Page 66 Midwedge Power Box ITEM DESCRIPTION PART NO. 12 PIN CONNECTOR 352400100 3 PIN CONNECTOR C-09-025 CONNECTOR FEMALE THERMOCOUPLE 411520052 PG7 BRASS CONNECTOR ASSEMBLY 921312071 CONNECTOR 12 PIN PART “B” 352400007 MOTOR HARNESS ASSEMBLY C-09-023 THERMOCOUPLE ASSEMBLY C-10-035 TOP PLATE HARNESS ASSEMBLY C-09-021 BOTTOM PLATE HARNESS ASSEMBLY C-09-022...
- Page 67 Burner Assembly Proximity Switch...
- Page 68 New Style Dough Loader SENSOR & CABLE Part Number: 311600005 Part Number: 352410001 Cable Straight...
- Page 69 Dough Trolley Loader (optional feature)
- Page 70 Dough Trolley Loader Assembly (optional feature) ITEM DESCRIPTION PART NO. Loader, Flour Pan B-75-003 Loader, Right Side Panel Assy B-75-007 Loader, Left Side Panel Assy B-75-006 Motor Cover C-75-005 Motor Drive and Controller for DTL 331010103 Loader, Shaft End A-75-004 Cover, Motor Plate C-75-000 Shaft...
- Page 71 Dough Trolley Loader Assembly (optional feature)
- Page 72 Gas Valve Assembly ITEM DESCRIPTION PART NO. 1/2 THERMOSTAT 411714001 3/4 GAS VAlVE 411713005 KNOB, LOW 150/550 THERMOSTAT 611113002 Thermostat Marker The Beta 900 Thermostat Dial should always be set to 325.
- Page 73 Ignitor and Pilot Assembly ITEM DESCRIPTION PART NO. SPARK IGNITOR C-10-055 CABLE ASSEMBLY SPARK IGNITOR 411911033 PROJECTOR, 411912036 IGNITOR BOOT INJECTOR, 1/2 TR2 411211027 PILOT FLAME SWITCH 411410039...
- Page 74 DTL Stepper Motor wiring diagram ITEM DESCRIPTION PART NUMBER CONNECTOR, 4 PIN MINI MAlE 352410004 CONNECTOR, 8 PIN MINI MALE 352800100 MOTOR, STEPPING/ENCODER 331010103...
- Page 75 Rear Cables From Large Electrical Control Box DESCRIPTION PART NUMBER THERMOCOUPLE ASSEMBLY C-10-035 MID-WEDGE POWER CORD C-10-036 8 PIN MINI FEMALE GREY CABLE 352800101 MID-WEDGE CONTROl CORD ASSEMBlY (BROTHER) C-10-037...
- Page 76 Optional Beta 900 120 Volt conversion to 220 Volt Parts List 1. Remove part # 331010104 DRIVE MOTOR CONTROllER 2. Remove part # C-10-111 CONVEYOR MOTOR ASSY 110V ( NEW STYlE) 3. Replace with part # 331010107 MOTOR, DRIVER CONTROllER 1 1/4 HP 220 VOlT 4.
- Page 77 Optional LP Gas Conversion Parts List ITEM DESCRIPTION PART NO. INJECTOR #70, LPG GAS BETA 900 A-10-045 #70 GAS ORIFICE A-11-044 #68 GAS ORIFICE A-11-045 #65 GAS ORIFICE A-11-046 #60 GAS ORIFICE A-11-047...
- Page 78 CONVERSION INSTRUCTIONS (Chromalox Temperature Controller to Watlow Temperature Controller) This conversion is for Beta 900, Wedge Press and Beta 14’s. OLD CHROMALOX NEW WATLOW Temperature Controller Temperature Controller 10 9 WHITE WIRE WIRE SHOWING THE CONVERSION WATLOW IN RED CHROMALOX IN BLUE Must have a jumper wire from...
-
Page 79: Decal Locator Assembly
Decal Locator Assembly For the Beta900 - Right Exit with an optional Dough Trolley Loader WARNING: BE&SCO Decals are placed on every machine for customer safety. If a BE&SCO Decal is removed or damaged another Decal can be ordered through the BE&SCO Parts Department. Top View Front View Item... - Page 80 Decal Locator Assembly For the Beta900 - Right Exit with an optional Dough Trolley Loader WARNING: BE&SCO Decals are placed on every machine for customer safety. If a BE&SCO Decal is removed or damaged another Decal can be ordered through the BE&SCO Parts Department. Right View Left View Item...
- Page 81 Decal Locator Assembly For the Beta 900 - Right Exit without a Dough Trolley Loader WARNING: BE&SCO Decals are placed on every machine for customer safety. If a BE&SCO Decal is removed or damaged another Decal can be ordered through the BE&SCO Parts Department. Top View Front View Item...
- Page 82 Decal Locator Assembly For the Beta 900 - Right Exit without a Dough Trolley Loader WARNING: BE&SCO Decals are placed on every machine for customer safety. If a BE&SCO Decal is removed or damaged another Decal can be ordered through the BE&SCO Parts Department. Right View Left View Item...
- Page 83 Decal Locator Assembly For the Beta 900 - Straight Exit with optional Dough Trolley Loader WARNING: BE&SCO Decals are placed on every machine for customer safety. If a BE&SCO Decal is removed or damaged another Decal can be ordered through the BE&SCO Parts Department. Right View Item Description...
- Page 84 Decal Locator Assembly For the Beta 900 - Straight Exit with optional Dough Trolley Loader WARNING: BE&SCO Decals are placed on every machine for customer safety. If a BE&SCO Decal is removed or damaged another Decal can be ordered through the BE&SCO Parts Department. Left View Item Description...
- Page 85 Decal Locator Assembly For the Beta 900 - Straight Exit without a Dough Trolley Loader WARNING: BE&SCO Decals are placed on every machine for customer safety. If a BE&SCO Decal is removed or damaged another Decal can be ordered through the BE&SCO Parts Department. Right View Item Description...
- Page 86 Decal Locator Assembly For the Beta 900 - Straight Exit without a Dough Trolley Loader WARNING: BE&SCO Decals are placed on every machine for customer safety. If a BE&SCO Decal is removed or damaged another Decal can be ordered through the BE&SCO Parts Department. Left View Item Description...
- Page 87 Decal Locator Assembly For the Beta 900 - Left Exit with optional Dough Trolley Loader WARNING: BE&SCO Decals are placed on every machine for customer safety. If a BE&SCO Decal is removed or damaged another Decal can be ordered through the BE&SCO Parts Department. Right View Front View Item...
- Page 88 Decal Locator Assembly For the Beta 900 - Left Exit with optional Dough Trolley Loader WARNING: BE&SCO Decals are placed on every machine for customer safety. If a BE&SCO Decal is removed or damaged another Decal can be ordered through the BE&SCO Parts Department. Left View Item Description...
- Page 89 Decal Locator Assembly For the Beta 900 - Left Exit/Box with optional Dough Trolley Loader WARNING: BE&SCO Decals are placed on every machine for customer safety. If a BE&SCO Decal is removed or damaged another Decal can be ordered through the BE&SCO Parts Department. Front View Right View Item...
- Page 90 Decal Locator Assembly For the Beta 900 - Left Exit/Box with optional Dough Trolley Loader WARNING: BE&SCO Decals are placed on every machine for customer safety. If a BE&SCO Decal is removed or damaged another Decal can be ordered through the BE&SCO Parts Department. Left View Item Description...
- Page 91 Decal Locator Assembly For the Beta 900 - Left Exit without a Dough Trolley Loader WARNING: BE&SCO Decals are placed on every machine for customer safety. If a BE&SCO Decal is removed or damaged another Decal can be ordered through the BE&SCO Parts Department. Front View Right View Item...
- Page 92 Decal Locator Assembly For the Beta 900 - Left Exit without a Dough Trolley Loader WARNING: BE&SCO Decals are placed on every machine for customer safety. If a BE&SCO Decal is removed or damaged another Decal can be ordered through the BE&SCO Parts Department. Left View Item Description...
- Page 93 Decal Locator Assembly For the Beta 900 - Left Exit/Box without a Dough Trolley Loader WARNING: BE&SCO Decals are placed on every machine for customer safety. If a BE&SCO Decal is removed or damaged another Decal can be ordered through the BE&SCO Parts Department. Right View Front View Item...
- Page 94 Decal Locator Assembly For the Beta 900 - Left Exit/Box without a Dough Trolley Loader WARNING: BE&SCO Decals are placed on every machine for customer safety. If a BE&SCO Decal is removed or damaged another Decal can be ordered through the BE&SCO Parts Department. Left View Item Description...
-
Page 95: Warranty
Original Equipment Warranty BAKERY EQUIPMENT & SERVICE CO., INC. warrants that its products, as supplied to the original user, is free from defects in material and workmanship, and is suitable for the use for which it is sold. The Company’s obligation under this warranty shall be limited to replacing, or at the option of BAKERY EQUIPMENT &...
Need help?
Do you have a question about the Beta 900 Tortilla Oven and is the answer not in the manual?
Questions and answers
TURN PRESS OFFWHEN NOT IN USE Where is this is located
The power switch on the BE&SCO Beta 900 Tortilla Oven is referred to as the "Master Switch" and is used for emergency shutdown. The exact physical location is not specified in the provided information.
This answer is automatically generated
everything on my machine is working but the spinning tables will randomly stop turning.
The spinning tables (conveyor) randomly stopping on the BE&SCO Beta 900 Tortilla Oven could be caused by:
1. Conveyor power cord not plugged in – plug it into an outlet.
2. Conveyor drive chain broken – replace or repair the chain.
3. Plates slipping or needing adjustment – remove covers under the machine to adjust or repair.
This answer is automatically generated
Beta 900 Tortilla press switch side showing error (open)
The error (open) on the switch side of the BE&SCO Beta 900 Tortilla Oven likely indicates that a gate or safety switch is open, preventing operation. This is a safety feature to ensure the machine only runs when all components are properly closed and secured.
This answer is automatically generated
Where is the location for the pressure adjustment knob on BE&SCO Beta 900 Tortilla Oven