Advertisement
Quick Links
Advertisement

Related Manuals for Cobra Automotive G100

Summary of Contents for Cobra Automotive G100
- Page 1 G100 - G300 ISTRUZIONI COMPLETE COMPLETE INSTRUCTIONS...
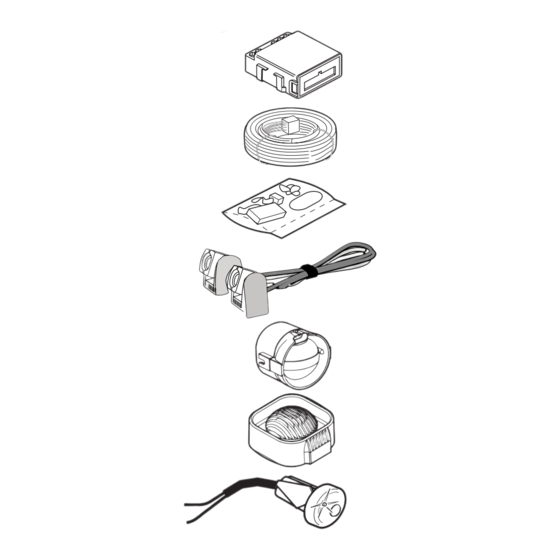
- Page 2 1 - LEGENDA E CONTENUTO DEL KIT. Ôçëå÷åéñéóìüò Çëåêôñïíéêüò åãêÝöáëïò Ìç áõôïôñïöïäïôïýìåíç óåéñÞíá Ðßíáêáò åëÝã÷ïõ Êáëùäßùóç Êáëùäßùóç óåéñÞíáò Óáêßäéï ìå áîåóïõÜñ Åã÷åéñßäéï ÷ñÞóôç ‘Åëáóìá ôñõðÞìáôïò ÁéóèçôÞñáò õðåñÞ÷ùí Âñá÷ßïíáò Áõôïêüëëçôá ãéá ôá ôæÜìéá Áõôïôñïöïäïôïýìåíç óåéñÞíá ISTRUZIONI COMPLETE G100-G300...
- Page 3 AKG 193 AKG 363 ACG 196 ACG 366 AKG 368 AKG 198 ISTRUZIONI COMPLETE G100-G300...
- Page 4 60 _______ RADIO CONTROL FUNCTIONS CHECK . da 61 a 66 ______ PROGRAMMABLE FUNCTIONS (G100 -G300). 67/68 ______ HOW TO PROGRAMME THE (G100 - G300) SYSTEM . 68/69 ______ PROCEDURE FOR ADDING NEW RADIOCONTROL DEVICES (G100) AND NEW DRIVER CARDS (G300).
-
Page 5: Personal Pin Code
For the procedure make reference to the manual at page 69 on www.cobra-at.com 2.1 - Personal PIN CODE. Each G100 - G300 system has a PIN code that is used to disarm the system in emergencies. This is a PIN CODE CARD sample... - Page 6 3 - INTRODUCTION. These anti-intruder alarm systems are controlled by a radio control device - G100 or G300 - with Driver Card with high security codes. This technology provides an extremely high degree of protection against any attempt to reproduce the code.
- Page 7 4 - ADDITONAL PROTECTIONS (G100-G300). You can increase the protection level of the system with the following additional sensors: 5452: Level monitor module. When the system is armed, this sensor will detect the vehicle being jacked up to tow it away or steal the wheels.
-
Page 8: List Of Functions
• Driver card armed / disarmed. • Disablement of the sensor transducer and / or external sensor. • Driver card functions. G100 - G300 • Volumetric protection of the vehicle’s interior by ultrasonic sensor not requiring sensitivity adjustment. • Perimetric protection. When the alarm is armed, after 25 s the siren will sound if a door or the bonnet or boot is opened. - Page 9 G100 - G300 • Door / bonnet / boot open signal. .• Automaticsystem arming. • Automatic start prevention arming (starter). • Start prevention alarm. 5.3 - List of advanced functions (programmable). These are special functions that require programming in keeping with the desired operating characteristics of the alarm system.
- Page 10 6 - LIST OF STANDARD FUNCTIONS (not programmable). G100 RADIOCONTROL BUTTON FUNCTIONS (G100). Button A This button arms the alarm and blocker system, deactivates the volumentric input and additional sensors input, activates the panic option, gives access to the programming function, selects the line and raises the buzzer volume in the programming table, and activates the Car Finder option.
- Page 11 (if enabled). The sensor has been disabled; all the other protection functions remain active. The sensors will be automatically reactivated the next time the system is armed COMPLETE INSTRUCTIONS G100-G300...
- Page 12 E) Press the Unlock (open) button on the vehicle’s original radiocontrol device for the system disarmed signal. F) The confirmations of the happened self-learning process of the signal is confirmed by an acoustic signal emitted by the buzzer. COMPLETE INSTRUCTIONS G100-G300...
- Page 13 5 s after the LED has flashed. The LED will flash again to confirm its deactivation. • Arm the system by pressing the radiocontrol button: the sensors are deactivated but all the other protections are active. The sensors will be automatically reactivated the next time the ignition is turned on. COMPLETE INSTRUCTIONS G100-G300...
- Page 14 NOTE: with the alarm disconnected, disconnecting a self learning module from the Cobra Bus line, when the G100/G300 is armed the indicator lights will flash 8 times and if the Buzzer is activated it will signal 8 times by the buzzer.
-
Page 15: Silent Arming
They can only be used if they are re - enabled through the self-learning procedure.The system can memorize up to a maximum of 4 radiocontrol devices (G100), or 4 Driver Cards (G300). 7 - LIST OF BASIC FUNCTIONS As the functional characteristics of this system can be personalised, the installer will have clearly marked in this manual which of them are enabled. - Page 16 The engine block is automatically activated 2 min. after the ignition key has been turned off (G100). The LED will flash. The engine cannot be started up now; to disarm the system it is necessary to press radio control button “B”. In the case of G300, it is necessary for the Driver Card to be recognised, with inition key is turned ON.
- Page 17 OFF position the ignition key and after 25 s the alarm system and the engine immobiliser will be armed again. In order to switch off the system in the theft protection mode, it is necessary to enter the full Pin Code. COMPLETE INSTRUCTIONS G100-G300...
- Page 18 “A” and “B” one has the trunk opening. This is signalled by a 4 s flashing of the indicator lights, and the automatic exclusion of the internal and door ultrasound devices, and the additional modules, too, if they are connected. When the trunk is closed the system automatically reactivates. COMPLETE INSTRUCTIONS G100-G300...
- Page 19 In order to store the speed limit, press the button on the LED panel when the vehicle is travelling at the desired speed. To deactivate the function, press the button on the LED panel once whilst the vehicle is moving. COMPLETE INSTRUCTIONS G100-G300...
- Page 20 G300; page 4 line 6 active in the programming tables for the G100), at a speed other than 0, there is a delay of 4 min.; if the vehicle stops this calculation is suspended. A cyclic sequence of alarms is generated after 4 min. which last 4 min..
- Page 21 9.4 - Ultrasonic volumetric sensor (if foreseen G100- G300). The sensor heads can be installed on the upper part of the front windshield or back window side-columns, making sure that they are not covered when the sun-shield flaps are lowered.
- Page 22 (LED + button) is used during programming operations and in the user recognition. 10 - VEHICLE SPEED SENSOR CONNECTION - VSS (G100 - G300). The VSS signal frequency is proportional to the speed of the vehicle (it is normally a rectangular signal with f max = 4 KHz).
- Page 23 COMPLETE INSTRUCTIONS G100-G300...
- Page 24 14.2 - Programming pages available for the G300 version. Ý Ý COMPLETE INSTRUCTIONS G100-G300...
- Page 25 è è COMPLETE INSTRUCTIONS G100-G300...
- Page 26 COMPLETE INSTRUCTIONS G100-G300...
- Page 27 This signal will be emitted about every 10 s to remind you of the number of the page where you are positioned. 15.2 - How to enable/disable a (G100) function. After accessing one of the tables, press radiocontrol button “A” and position yourself on the line number corresponding to the function you want to enable/disable.
- Page 28 16 - PROCEDURE FOR ADDING NEW RADIOCONTROL DEVICES (G100) AND NEW DRIVER CARDS (G300). G100 16.1 - Procedure for adding new radiocontrol devices (self-learning).
- Page 29 To exit the procedure voluntarily, it is necessary to close the bonnet. This operation can be performed at any time. COMPLETE INSTRUCTIONS G100-G300...
-
Page 30: Alarm Record
Pay attention to the LED signals that remain available until the next time the system is armed or until the ignition is turned on. The signals (number of flashes) identify the cause of the alarm. COMPLETE INSTRUCTIONS G100-G300... - Page 31 • A longer pause is interpreted by the system as the end of entering the first digit, which is signalled by a long flash of the LED. Repeat this operation for all the other digits. COMPLETE INSTRUCTIONS G100-G300...
- Page 32 19 - REPLACE OF THE BATTERY. 19.1 - Flat battery in the radiocontrol device (G100) or Driver Card (G300). If when one of the radiocontrol buttons is pressed the LED flashes for a short time or in an irregular way this means that the battery is low. For a Driver Card, the flat battery signal consists of 10 flashes of the LED installed in the vehicle.
-
Page 33: Troubleshooting
19.2 - Trouble shooting. COMPLETE INSTRUCTIONS G100-G300... - Page 34 This product is configurated to meet the requirements of the European Directive for alarm systems. Utilisation of the buzzer function is allowed only for markets outside the European Community only. Activating this function invalidates the EC Declaration of Conformity. COMPLETE INSTRUCTIONS G100-G300...
- Page 35 Before starting to install the system, disconnect the negative lead from the battery and do not reconnect it until installation is completed. This system is compatible with motor vehicles that have a 12 V battery with earthed negative lead. COMPLETE INSTRUCTIONS G100-G300...
- Page 36 LEGENDA COLORI / LEGENDA OF COLOURS. giallo verde nero marrone bianco grigio rosso rosa viola arancio orange pink yellow green black brown white grey blue violet jaune vert noir marron blanc gris rouge violet orange rose bleu amarillo verde negro marrón blanco gris...
- Page 37 SCHEMA A BLOCCHI AUTOAPPRENDIMENTO G300. G300 SELF LEARNING BLOCK DIAGRAM. DOOR MICRO / DOOR ACTUATOR / DOOR MICRO / DOOR ACTUATOR / DOOR MICRO / DOOR MICRO / DIODE...
- Page 38 SCHEMA A BLOCCHI AUTOAPPRENDIMENTO G300. G300 SELF LEARNING BLOCK DIAGRAM. lijqossüqsa/ lgvaíiólüy jßíçóçy püñsay/ lijqossüqsa/ MIKROSPÍNAÈ DVE Í AKTIVAÈNÍ ÈLEN DVE MIKROSPÍNAÈ DVE Í MIKROBRYTARE DÖRR MANÖVRERINGSORGAN DÖRR MIKROBRYTARE DÖRR lgvaíiólüy jßíçóçy püñsay/ lijqossüqsa/ lijqossüqsa/ AKTIVAÈNÍ ÈLEN DVE Í MIKROSPÍNAÈ DVE Í MIKROSPÍNAÈ...
- Page 39 SCHEMA A BLOCCHI AUTOAPPRENDIMENTO G300. G300 SELF LEARNING BLOCK DIAGRAM. Esempio di collegamento per macchine senza segnalazione delle frecce in apertura e in chiusura. Example of connection for vehicles without flashing of the indicator lights upon opening and closing. DOOR ACTUATOR DIODE CONNECTÉ...
- Page 40 GR CZ SCHEMI DI AUTOAPPRENDIMENTO G300. G300 SELF LEARNING DIAGRAM. Esempio di collegamento per macchine senza segnalazione delle frecce in apertura e in chiusura. Example of connection for vehicles without flashing of the indicator lights upon opening and closing. Äßoäoy lgvaíiólüy jßíçóçy püñsay Ø...
- Page 41 ATTENZIONE! (G300). COLLEGAMENTO PERIMETRIA. Se viene effettuato il collegamento del filo BLU-ROSA per la perimetria ai pulsanti porta, attivare la riga 4 pagina 3 delle tabelle di programmazione. WARNING! (G300). PERIMETRY CONNECTION TO THE COURTESY LIGHT. If the wire (BLUE-PINK) for the perimetry is connected to the courtesy light, disable line 4 page 3 of the programming table.
- Page 42 ORIGINAL HORN AND ADDITIONAL SIREN CONNECTION + / – ORIGINAL HORN 87 30 ORIGINAL RELAY CONTROLLED VIA A NEGATIVE ORIGINAL HORN CONNECTION FOR SYSTEMS WITHOUT SIREN + / – KLAXON ORIGINAL 4007 I OUT=3A MAX 87 30 RELAIS SUPPLEMENTAIRE C O N N E X I O N K L A X O N AV E C R E L A I S...
- Page 43 ÓÕÍÄÅÓÌÏËÏÃÉÁ ÊÏÑÍÁÓ Ï×ÇÌÁÔÏÓ PØIPOJENÍ KLAKSONU PRO MODELY BEZ ORIGINÁLNÍ SIRÉNY ANSLUTNING AV ORIGINALHORN OCH EXTRA SIREN + / – ÅÑÃÏÓÔÁÓÉÁÊÇ ÊÏÑÍÁ ORIGINÁLNÍ KLAKSON ORIGINAL SIGNALHORN 87 30 ÅÑÃÏÓÔÁÓÉÁÊÏ ÑÅËÅ ÅËÅÃ×ÏÌÅÍÏ ÁÐÏ ÁÑÍÇÔÉÊÇ ÅÍÔÏËÇ ORIGINÁLNÍ RELÉ OVLÁDANÉ MÍNUSEM ORIGINALRELÄ MED NEGATIV STYRNING ÓÕÍÄÅÓÌÏËÏÃÉÁ...
- Page 44 LEGENDA / LEGENDA. VERROUILLAGE CENTRALISE PANNEAU DE SECOURS PAINEL DE EMERGÊNCIA ÊÅÍÔÑÉÊÏÉ ÌÇ×ÁÍÉÓÌÏÉ ÊËÅÉÓÉÌÁÔÏÓ ÐÉÍÁÊÁÓ ÁÍÁÃÊÇÓ CENTRÁLNÍ ZAMYKÁNÍ PANEL NOUZOVÉHO SENTRALLÅS NÖDPANEL SEGNALE DI TACHIGRAFO SIGNAL DE TACHYGRAPHE 60 80 100 MODULES ADDITIONNELS SINAL DE TAQUÍGRAFO MÓDULOS ADICIONAIS AUX1 ÓÇÌÁ ÔÁ×ÕÃÑÁÖÏÕ ÐÑÏÓÈÅÔÅÓ...
- Page 45 G300 (Loudspeaker) 60 80 100 AUX2...
- Page 46 G300 (Siren) 60 80 100 AUX2...
- Page 47 AUX1...
- Page 48 06DE2373B - 05 / 07...
Need help?
Do you have a question about the G100 and is the answer not in the manual?
Questions and answers
How to set the alarm?
To set the alarm on the Cobra Automotive G100, arm the system. When armed, opening the bonnet, boot, or door, or attempting to start the vehicle, will trigger an acoustic and visual alarm cycle lasting approximately 30 seconds. If a volumetric sensor is included, the alarm will also be triggered by intrusion into the passenger compartment. The system remains armed after the alarm cycle ends.
This answer is automatically generated