Table of Contents
Advertisement
Quick Links
INSTRUCTION MANUAL
• DVD/MP3/AM/FM/CD Receiver
• Flip Down/Full Detachable Front Panel
• DVD/DVD-R/DVD-RW/SVCD/VCD/MP4/MP3/WMA/
CD-R/CD-RW Compatible
• SD/MMC Card Input
• Front USB/AUX Input
• 3.2 Inch TFT-LCD Display
1
2
PLEASE READ THIS INSTRUCTION MANUAL CAREFULLY BEFORE OPERATING YOUR UNIT.
DVD/MPEG4/SVCD/VCD/CD/MP3/CD-R/CD-RW PLAYBACK
8
7
9
DVD/MPEG4/SVCD/VCD/CD/MP3/CD-R/CD-RW PLAYBACK
50
EQ
DISP
ST
3.2 inch
16
5
50
EQ
DISP
DM800i
DM800i
iContact
4
12
10 11
15
26
DM800i
Advertisement
Table of Contents

Subscribe to Our Youtube Channel
Related Manuals for Logic DM800i

Summary of Contents for Logic DM800i
-
Page 1: Instruction Manual
DM800i INSTRUCTION MANUAL • DVD/MP3/AM/FM/CD Receiver • Flip Down/Full Detachable Front Panel • DVD/DVD-R/DVD-RW/SVCD/VCD/MP4/MP3/WMA/ CD-R/CD-RW Compatible • SD/MMC Card Input • Front USB/AUX Input • 3.2 Inch TFT-LCD Display DVD/MPEG4/SVCD/VCD/CD/MP3/CD-R/CD-RW PLAYBACK DM800i DISP 3.2 inch iContact 10 11 PLEASE READ THIS INSTRUCTION MANUAL CAREFULLY BEFORE OPERATING YOUR UNIT. - Page 2 DM800i MP3-Compatible AM/FM DVD Receiver INSTRUCTION MANUAL Introduction: Congratulations! You have purchased the next generation in Car AM/FM Multi Media Players. Our engineers have spent years to bring you the best car stereo players available. This unit features next generation Advanced “SMART USB”...
-
Page 3: Table Of Contents
CONTENTS Before You Begin Installation Installation in the dashboard Detaching and Attaching the front panel Supporting the Unit Wiring Connection 4-5� Operation Locations of Parts (Main Unit) Locations of Parts (Remote Control) General Operations Listening to Radio 9 Operations Common for CD/MP3/WMA/VCD/DVD/MP4 9-10 Listening to CD/MP3/WMA 10-11 Playing DVD/VIDeO CD/MP4 11-13 Customizing Audio/Video Settings Setting Up the DVD Player Troubleshooting 15� Problem During DVD/VCD Playback Specifications... -
Page 4: Before You Begin
BEFORE YOU BEGIN PRECAUTIONS: CAUTION: USE OF CONTROLS OR ADJUSTMENT OR PERFORMANCE OF PROCEDURES OTHER THAN THOSE SPECIFIED HEREIN MAY RESULT IN HAZARDOUS RADIATION EXPOSURE. THE USE OF OPTICAL INSTRUMENTS WITH THIS PRODUCT WILL INCREASE EYE HAZARD. • Keep this manual handy as a reference for operating procedures and precautions. • Always keep the volume low enough so you can hear sounds outside of the car. • Protect this product from moisture. -
Page 5: Installation
INSTALLATION PRECAUTIONS • Choose the mounting location carefully so that the unit will not interfere with normal driving functions. • Avoid installing the unit where it would be subject to high temperatures, such as from direct sunlight or hot air from the heater, or where it would be subject to dust, dirt or excessive vibration. • Use only the supplied mounting hardware for a safe and secure installation. • Be sure to remove the front panel before installing the unit. NOTE: Inclination angle for car radio installation must not exceed 30˚ otherwise the front panel will not open. -
Page 6: Supporting The Unit
INSTALLATION & WIRING CONNECTION TO SUPPORT THE UNIT 1. UNIT 2. RELEASE CASE 3. DASH BOARD 4. HEX NUT Dashboard 5. LOCK WASHER 6. PLAIN WASHER 7. CAR BODY 8. REAR SUPPORT STRAP 9. TAPPING SCREW 10. M5 X 15 HEX BOLT WIRING CONNECTION IN / OUT CONNECTOR 2 Video Out: Yellow Connect to external A/V system to display DVD Audio Out (GRAY) Rear : White (L) Red (R) Connect this wire to rear seat A/V monitor system Video In: Yellow... - Page 7 WIRING CONNECTION DRIVING WITH VIDEO DISPLAY Follow the instructions below so video will display even when the vehicle is in motion. Note: Always follow local laws regarding driving with video. Steps: Connect the GRAY wire to the WHITe wire. INSTALLING REAR CAMERA FOR REVERSE MOTION Follow the instructions below to have the unit automatically switch to a read camera (not included) to guide the driver when parking or moving in reverse. REAR REAR FRONT FRONT ISO CONNECTOR VIDEO OUT 1 ISO CONNECTOR REAR VIDEO OUT 1 REAR ANTENNA CONNECTOR ANTENNA CONNECTOR CAMERA IN VIDEO IN VIDEO OUT 2 AUDIO OUT...
-
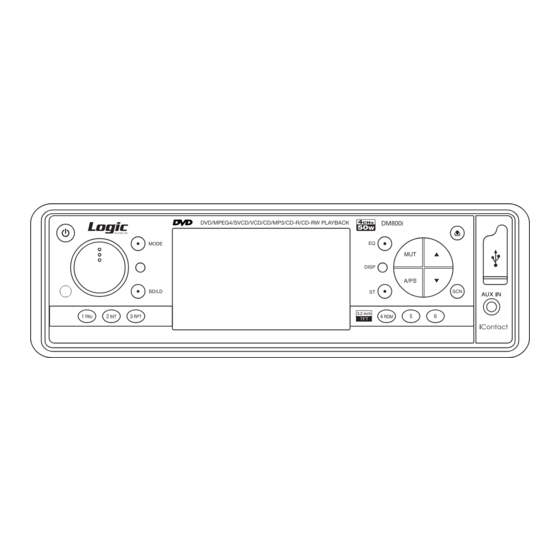
Page 8: Operation
OPERATION 3.2 inch iContact DVD/MPEG4/SVCD/VCD/CD/MP3/CD-R/CD-RW PLAYBACK DM800 DVD/MPEG4/SVCD/VCD/CD/M LOCATIONS OF PARTS (MAIN UNIT) 10 11 10 11 DISP DVD/MPEG4/SVCD/VCD/CD/MP3/CD-R/CD-RW PLAYBACK DM800i DVD/MPEG4/SVCD/VCD/CD/MP3/CD-R/CD-RW PLAYBACK DM800i 3.2 inch DISP DISP 3.2 inch 3.2 inch iContact 18 19 20 DVD/MPEG4/SVCD/VCD/CD/MP3/CD-R/CD-RW PLAYBACK DM800 DVD/MPEG4/SVCD/VCD/CD/M... -
Page 9: Locations Of Parts (Remote Control)
OPERATION LOCATIONS OF PARTS (REMOTE CONTROL) 1. POWeR ON/OFF 2. MODe 3. PLAY/PAUSe 4. TITLe 5�. SeLeCT MODE 6. SeeK+/SeeK- / CD TRACK/SeARCH 7. VOL +/VOL- 8. GOTO Title Goto Dual Step 9. AUDIO 10. eNTeR Sub-T Setup Menu 11. NAVIGATION 12. AUTO SeeK / PReSeT SCAN / RePeAT 13. RANDOM / BAND / LOUDNeSS Angle 14. DUAL SEEK-... -
Page 10: General Operations
OPERATION GENERAL OPERATIONS Turning the unit ON/OFF ( Press “ ” button to turn on unit. To turn off, press and hold the button again. Selecting a source (MODE) Press MODE repeatedly to switch between TUNeR, CD/DVD, AUX IN, USB or SD/MMC mode. Loading a Disc 1. Press to open the front panel 2. Insert a disc into the disc loading slot Ejecting a Disc Press button to eject disc Adjusting Volume • Head Unit: Rotate VOL knob right or left to increase or decrease volume. • Remote Control: Press VOL+ or VOL- to increase or decrease volume. Mute Button • Head Unit: Press MUT button to mute the sound at once. Press again to return to previous volume level. -
Page 11: Listening To Radio
OPERATION RESET The reset button is placed on the housing. To reset, use a sharp point object and press and hold the RESET button for 2 seconds. The reset button is to be activated for the following reasons: • Initial installation of the unit when all wiring is completed. • All the function buttons does not operate. • error symbol on the display. LISTENING TO RADIO Band (BD) Pressing this key repeatedly will cycle between each band as follows: FM1---FM2---FM3---AM1---AM2. Stereo / Mono (ST) Press ST button to switch between stereo and mono sound for FM radio reception. When reception of an FM station is weak, listening quality can be improved by switching to mono sound. Automatic or Manual tuning (SEEK + / SEEK –) When pressed quickly, these keys operate as MANUAL tuning mode. -
Page 12: Listening To Cd/Mp3/Wma
OPERATION Random Playback Press RDM during playback to play the tracks in random/shuffle order. Press it again to cancel. Stopping Playback 1. Press Stop on remote control during playback to stop playback. That position is stored in memory. 2. Press to continue. Playback starts from the position at which it was stopped. 3. To permanently stop playback, press Stop button twice. Fast Forward / Fast Reverse Note: �n rem�te ��ntr�l i� the �ame fun�ti�n a� �r �n head unit. -
Page 13: Playing Dvd/Video Cd/Mp4
New Generation iContact Smart USB Port: USB PORT e nhanced control of connected Portable Media Such as Flash Drives and digital MP3 players by using function keys on the DM800i or the remote control unit. Dm800i features the latest ID3 Tag support, which allows you to see the song’s name and which folder it’s located in, on the black matrix display. Front input iContact AUX IN at your fingertips: iContact Convenient easy to use front “AUX IN” input jack, allows easy connection of Portable media such as iPod and other digital MP3 Players using the iContact cables included. - Page 14 OPERATION Turning PBC ON/OFF (VCD only) PBC (Playback Control) is a feature found on VCD 2.0 and SVCD 1.0. PBC allows playback control and user interaction through the remote control or other input device. If PBC on, the player won’t auto start after inserting the disc because it will take time to select program on disc; if PBC off, the player will auto playback the program on disc one by one. 1. To turn ON PBC function, press PBC on the remote control. To turn OFF, press the button again. N�te: N�t all V�D/SV�D di��� have �B� fun�ti�n�. Repeat Playback FOR VCD 1. Press RPT on the remote control during playback. 2. every time you press this button, the unit switches to the following settings: Repeat 1 – Repeat the current playback track. Repeat All – Repeat all folders and tracks. Off – Turn repeat function OFF. Note: �B� feature in V�D di�� need� t� be �t�����ed in �rder t� u�e �e��eat ��layba���. FOR DVD You can choose between repeat playback of a title or chapter.
-
Page 15: Customizing Audio/Video Settings
Return to Root Menu (DVD only) During DVD playback, press and hold MeNU on head unit or remote control to return to root menu. N�te: S�me DVD� may n�t ��ntain a r��t menu. Slow motion playback This feature lets you slow down playback. 1. Press Slow on the remote control during playback. 2. Pressing it repeatedly will switch playback to the following steps: 1/2 - 1/ 3 - 1/4 - 1/5� - 1/6 - 1/7. N�te: • T� re�ume n�rmal ��layba���, ��re�� �LAY/�AUS� ( • There i� n� ��und during �l�w m�ti�n ��layba���. •... -
Page 16: Setting Up The Dvd Player
OPERATION SETTING UP THE DVD PLAYER You can flexibly customize the unit to suit your preference. You can set the language and other video and audio settings so when playback starts it will always use your preferred settings. Im���rtant: 1. Load any disc into the unit before you can access the setup. 2. Press SETUP on the remote control. Settings Category Options TV System NTSC, PAL, AUTO Auto Play ON, OFF TV Type 4:3PS, 4:3LB, 16:9 System Setup Password Setup password Rating Setup rating level... -
Page 17: Troubleshooting
TROUBLESHOOTING Check all wiring connections before referring to the list below. If problems persist after consult- ing the list, contact your nearest service dealer. SYMPTOM CAUSE SOLUTION If the power supply is properly The car ignition switch is No power. connected to the car accessory not on. circuits, but the engine is not running switch the ignition key to "ACC". Replace with a new fuse of The fuse is blown. -
Page 18: Problem During Dvd/Vcd Playback
TROUBLESHOOTING PROBLEMS DURING DVD PLAYBACK SYMPTOM CAUSE ACTION(SEE) Playback is not The loaded disc has a different Replace the disc with one featuring possible. region number from this unit. the same region number as this unit. A parental lock Parental lock is on. Turn parental lock off or change the message is displayed level. and playback is not possible. Dialog language (and The DVD playing does not feature You cannot switch among multiple subtitle language) multiple language recordings. languages if they aren’t recorded on cannot be switched. the disc. You can only switch between Switch using the system settings. items indicated in the disc menu. No subtitles are The DVD playing does not feature Subtitles are not displayed if they are displayed. subtitles. not recorded on the disc. You can only switch between Switch using the system settings. items indicated in the disc menu. -
Page 19: Specifications
SPECIFICATIONS DM800i MP3-Compatible AM/FM DVD Receiver CD/MP3/WMA PLAYER SECTION Signal to Noise Ratio > 60 dB Channel Separation > 50 dB (1kHz) Frequency Response 20Hz - 20 kHz TUNER (FM) Frequency range 87.5-107.9 MHz Sensitivity 2.8 µV Stereo separation 30 dB...
Need help?
Do you have a question about the DM800i and is the answer not in the manual?
Questions and answers