Table of Contents
Advertisement
Advertisement
Table of Contents

Subscribe to Our Youtube Channel
Summary of Contents for Fusion Keyboard
- Page 1 Operation Guide...
- Page 3 Thank you for your purchase of this Fusion keyboard. Designing, manufacturing and supporting the Fusion keyboard is a responsibility we take very seriously. We have made every effort to design a thoughtful, sturdy and easy-to- use learning tool. It is important for you to know that we stand behind our products and encourage you to call with any problem or suggestion you might have.
- Page 4 On the Fusion, open the document you would like to transfer to the computer. Allign the back of the Fusion with the IR Receiver and press the Send key on your Fusion. USB Flash Drive...
-
Page 5: Table Of Contents
Good Writing Checklists ..........11 Hotsheet .............. Centerfold Memory Expansion/USB ..........13 Text to Speech ..............14 WordStorm™ Word Prediction ........15 Perfect Form™ Keyboard Instruction ......19 Keyboard Lessons ............. 21 Options ................24 Passwords ................25 Troubleshooting..............26 Warranty ................ -
Page 7: Fusion Start Up
Menu will show all available options. (note: diff erent Fusion screens will off er diff erent options.) Start Up Fusion supports single or multiple users. Each user can be password protected. Create New User Press Enter takes you back... -
Page 8: Rechargable Battery / Automatic Shutoff
Rechargable Battery Your Fusion has a factory-installed rechargeable battery. Be certain that your Fusion unit is fully charged (24 hrs.) prior to use. To charge: Plug AC adapter into Fusion and check to see that red light on left side comes on indicating “charging.” If, after a few seconds, no red light appears, press the reset button (see diagram pg. -
Page 9: Desktop
Fusion Desktop Students create personal password-protectable desktop-style environments. Here Files, Folders and Programs will be listed. Files will be listed in the left column, Folders in the center, and Programs on the right. Press the Menu key to see options. -
Page 10: Writing
Fusion Writing From the “Desktop” press “N” to begin a new fi le. You will be prompted to name your new fi le. Type in the fi le name and press Enter. A blank screen will appear – ready to receive your text. By pressing Esc, you will exit your fi... -
Page 11: Spell Check / Thesaurus
Esc once to edit the word on the screen. To skip the word, press the Spell Check key again. If your Fusion is equipped with the text to speech feature, spell check options can be heard as they are highlighted. -
Page 12: Score
At any time students can press the Score key and the Fusion will generate a rough grade level score. The iSore combines traditional “readability” scoring with additional scoring data to produce an approximate grade level score. -
Page 13: Editor Keys
Editor Keys Editor Keys Quick Guide Arrow Left Move cursor one character back Arrow Right Move cursor one character forward Ctrl-left Move cursor one word back Crtl-right Move cursor one word forward Arrow up/dn Move cursor one line up or down Page up/dn Move cursor one page up or down Home... -
Page 14: Split Screen Vocabulary Program
“Split Screen Program.” The other is by creating a word list on your computer, transferring the list to a USB fl ash drive, then copying the list off the fl ash drive and onto the Fusion. All words in your list will be available in WordStorm word prediction program. - Page 15 You’ll see a “Load fi le from USB” window appear. At the bottom you’ll see fi le names. • Select the List fi le you’d like to copy to the Fusion and press Enter. • Open that fi le and press “Split Screen” to view the list.
-
Page 16: Sending Files
File Transfer The Fusion can transfer fi les directly into a Mac or PC in three different ways; wireless infrared, using a direct connection to the computer via a USB cable, or using a USB fl ash drive (see pg. 13). -
Page 17: Good Writing Checklists
Alt/C while in a document. Follow the steps below to create and add a new Writing Checklist: 1. Turn on your Fusion and wait a moment for the “Current Student:” window to show. - Page 18 Selecting a new Default Checklist To change the default setting for the Good Writing Checklist: 1. Press Ctrl-Alt-P at the opening screen. 2. Enter the Fusion Password. 3. Open or select the student desktop (F1-F8). 4. Open or create a fi le.
-
Page 19: Memory Expansion/Usb
At the desktop screen on the Fusion (desktop screen displays all fi les and folders), use the arrows on the keyboard to highlight the fi le you want to save to the USB fl ash drive. (Do not open the fi le, just make sure it is highlighted) •... -
Page 20: Text To Speech
To see and activate the speak options, turn your Fusion on and press the Menu key or use the shortcuts listed here and on your Hotsheet. -
Page 21: Wordstorm™ Word Prediction
WordStorm™ Word Prediction If you purchased a Fusion with WordStorm™ (Fusion’s Word Prediction program), simply open a fi le and press the Word Pred key to activate the program. WordStorm™ Word Prediction Easy, intelligent and complete Features • Learns new vocabulary as you write •... - Page 22 WordStorm features and options: Learn – previously used words become word prediction options (this feature can be disabled) Spacing – auto space after each selection and end punctuation Capitalization – fi rst word in each sentence is auto capitalized Phonetic – options will be offered based on phonetic misspellings Topic Specifi...
- Page 23 Follow the steps below to add phonetically misspelled words and the correct spelling to the WordStorm word prediction library. 1. Turn on your Fusion and wait a moment for the “Current Student:” window to show. 2. Press Crtl/Alt – P and enter the appropriate Super Password to access the “Super User”...
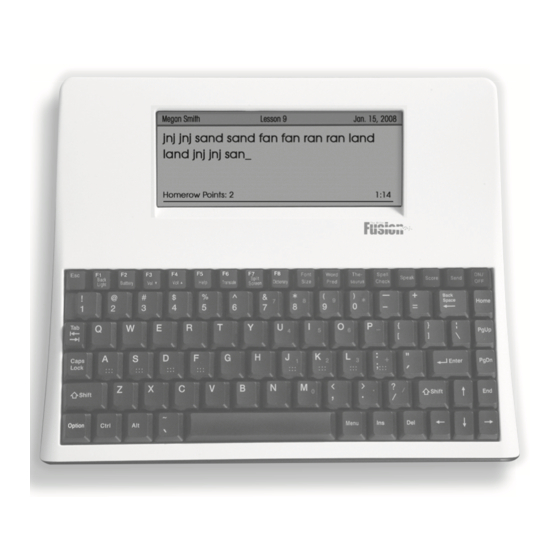
- Page 24 • View keyboarding scores by pressing the Score key while in the main/home keyboard instruction screen. All keyboard instruction options can be found by opening “Perfect Form” and pressing the Menu key. Special Note: Proper posture, handshape and homerow hand position are the foundations for speedy and accurate keyboarding.
-
Page 25: Perfect Form™ Keyboard Instruction
“Homerow” benchmark. Sending a report to the computer • Press the Send key while in the main/home keyboard instruction screen. • Set font on your computer to New Courier 9 pt. prior to sending. - Page 26 Benchmarks • • Accuracy • Homerow Points All three benchmarks must be passed before a student can progress to the next lesson. WPM and Accuracy benchmarks are adjustable. [Menu/Level/Set Level] Perfect Form™ Options • Disable the Homerow Reinforcement System • Disable the Shift Key Reinforcement System •...
-
Page 27: Keyboard Lessons
Keyboard Lessons At the “Desktop” screen ask student to use the arrow keys to highlight “Perfect Form” and press Enter. This is keyboard instruction menu. Students can access: Lessons, Assessment and Practice. Students can also adjust the keyboard instruction font size from this screen. (The instructor should do lessons 1-3 prior to introducing the Fusions to your students. - Page 28 “Homerow Finger Placement” is the next part of Lesson Two. Again, repeat the four points written on the screen while scanning and monitoring students (Students should not press Enter to move forward until you give the okay.) The fi nal part of lesson two is “Homerow Reinforcement.” Perfect Form requires students to maintain a homerow hand position throughout each lesson.
- Page 29 (The homerow reinforcement can be disabled – press the “Menu” key in the keyboard instruction menu screen). At the end of each 90 second lesson a “Lesson passed” or “Lesson not passed” message will appear along with benchmark scores.
-
Page 30: Options
Auto Repeat Option To disable auto repeat, open a fi le and press the Menu key. Arrow to “Setup,” then arrow down to “Keyboard Repeat.” Sticky Keys Option Press ON then immediately hold down Ctrl/Alt-P. Enter master password (see pg. -
Page 31: Passwords
Super User mode on the Fusion. Super User Mode To access the Super User mode, turn the Fusion on and press Ctrl/Alt-P. The Super Password prompt will display a “Passcode” number. Below you’ll fi nd the list of Passwords that correspond to the Passcode number. -
Page 32: Troubleshooting
When sending to a computer, I’m seeing misspelled words or extraneous characters. • Make sure that the rear of the Fusion is aligned with the infrared receiver and is no closer than 5 inches. • Try turning off the lights in the room and then send the document into the computer. -
Page 33: Warranty
During this period, if a defect should occur, AKT, Inc. will, at its option, repair or replace the Fusion at no charge. The Fusion must be returned during the warranty period to AKT, Inc. -
Page 34: Contact
Paso Robles, CA 93447 Shipping Address AKT, Inc. 2004 Dallons Drive Paso Robles, CA 93446 This Fusion guide is intended for use only by those who have purchased the Fusion keyboard. Any unauthorized reproduction of this guide is a copyright infringement. - Page 36 Fusion Keyboard · AKT, Inc. · (800) 797-7121 · www.writerlearning.com...
Need help?
Do you have a question about the Keyboard and is the answer not in the manual?
Questions and answers