
Related Manuals for Saber Compact SC17

Summary of Contents for Saber Compact SC17
- Page 1 WALK BEHIND SCRUBBER Operating Instructions MODELS: SC17 IPX4 Read these instructions before using the machine 98861 11/25/03...
-
Page 2: Machine Data Log/Overview
Phone Number: _________________________________________________________________________________________ OVERVIEW The Saber Compact is a battery powered, hard floor scrubber intended for commercial use. The appliance applies a cleaning solution onto a hard floor, scrubs the floor with a brush or pad, and then vacuums the soiled water back into the recovery tank. -
Page 3: Table Of Contents
Checking Battery Specific Gravity....4-2 Charging the Batteries........4-3 Changing Batteries........4-3 Battery Connections........4-3 Scrub Brushes..........4-4 Types............4-4 Replacing or Removing Scrub Brushes ..4-5 Installing Scrub Brushes ......4-5 Squeegee Blades...........4-5 Replace Squeegee Blade......4-5 Remove Squeegee Assembly....4-5 Service Schedule...........4-6 Machine Troubleshooting ......4-7 SC17 98861 11/25/03... -
Page 4: How To Use This Manual
NOTE: If a service or option kit is installed on your machine, be sure to keep the KIT INSTRUCTIONS which came with the kit. It contains replacement parts numbers needed for ordering future parts. SC17 98861 05/15/01... -
Page 5: Important Safety Instructions
Only chemicals recommended by the manufacturer shall be used. This appliance has been designed for use with the brushes specified by the manufacturer. The fitting of other brushes may affect its safety. Do not use on surfaces having a gradient exceeding 2%. SAVE THESE INSTRUCTIONS SC17 98861 05/15/01... -
Page 6: Hazard Intensity Level
Disconnect batteries before working on machine. Only qualified personnel should work inside machine. Always wear eye protection and protective clothing when working on or near batteries. Avoid skin contact with the acid contained in the batteries. WARNING Never allow metal to lie across battery tops. SC17 98861 05/15/01... -
Page 7: Safety Label Location
SAFETY LABEL LOCATION NOTE: These drawings indicate the location of safety labels on the machine. If at any time the labels become illegible, promptly replace them. SAFETY DECAL 81505 BATTERY CAUTION 80885 SC17 98861 05/15/01... -
Page 8: Technical Specifications
286 lbs/in² (1992.6 Kpa) Coverage 6700 ft²/hr Frame Construction Steel with epoxy powdercoat finish Minimum aisle u-turn width 44 in (111 cm) Maximum rated climb and descent angle with empty tanks Maximum rated climb and descent angle with full tanks SC17 98861 05/15/01... - Page 9 1.0 m/s². This is is a space-averaged, broad-band measurement a tri-axial, broadband measurement made determined according to IEC 704-I. This appliance during normal operation on a composite tile contains no possible source of impact noise. floor. SC17 98861 05/15/01...
-
Page 10: How The Machine Works
HOW THE MACHINE WORKS The Saber Compact is a battery powered, hard The function of the scrub system is to scrub the floor scrubber intended for commercial use. floor. The scrub system consists of a rotary The appliance applies a cleaning solution onto type disk scrub brush, motor, and lift linkage. -
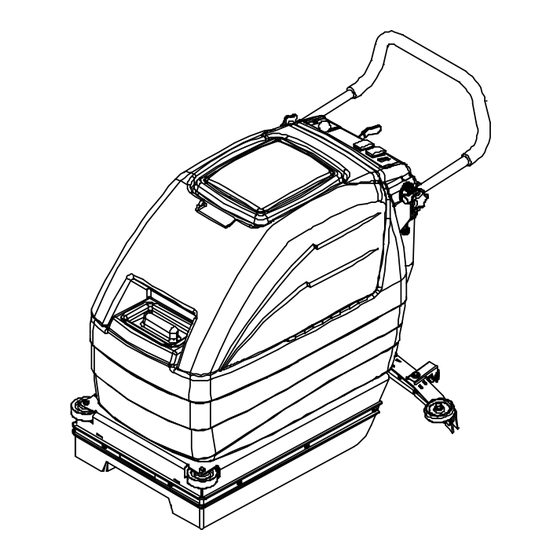
Page 11: Components
4. Recovery Tank Drain Hose 5. Recovery Tank Dome 6. Scrub Brush/Pad 7. Solution Tank 8. Solution Tank Cover 9. Solution Tank Drain Hose 10. Solution Strainer 11. Solution Tank Support Lanyard 12. Squeegee 13. Vacuum Motor 14. Solenoid Valve SC17 98861 05/15/01... -
Page 12: Controls
CONTROLS 1. Solution Control Lever 2. Brush Switch 3. Brush Lift Pedal 4. Vacuum Switch 5. Squeegee Lift Lever 6. Battery Charge Level Indicator 7. Hour Meter (Optional) 8. Circuit Breakers 9. Brush Reverse Switch SC17 98861 05/15/01... - Page 13 To lower the squeegee, lift and pull the lever 9. BRUSH REVERSE SWITCH to the right and then lower. Reverses the scrub brush motor. To raise the squeegee, lift the lever and push it to the left. To activate, press the top of the switch. SC17 98861 05/15/01...
-
Page 14: Machine Operation
NOTE: Read the chemical manufacturers recommended proportion instructions. 5. Replace solution tank cover. WARNING Flammable materials can cause an explosion or fire. Do not use flammable materials in the tanks. SC17 98861 05/15/01... -
Page 15: Emptying & Cleaning Tanks
The length of time between the first 4. Replace the drain plug and secure the drain and second pass depends on the amount of hose in the retainer. SC17 98861 05/15/01... -
Page 16: Maintenance
Do not overfill. Keep plugs firmly in 5. Ensure that all connections are tight and all place at all times. corrosion removed. 6. Every 4 to 6 months remove the batteries from the machine and clean the battery cases and battery compartment. SC17 98861 05/15/01... -
Page 17: Checking Battery Specific Gravity
0.004 (4 points), for each 10°F not thoroughly mixed, the reading may not be (6°C) above 80° (27°C). accurate. Subtract (-) from the specific reading 0.004 (4 points), for each 10°F (6°C) below 80°F (27°C). SC17 98861 05/15/01... -
Page 18: Changing Batteries
- blk + red FOR SAFETY: When charging, connect the charger to the batteries before connecting the charger to the AC wall outlet. Never connect the charger to the AC wall outlet first. Hazardous sparks may result. SC17 98861 05/15/01... -
Page 19: Scrub Brushes
Blue Pads (Scrubbing) are used for heavy-duty cleaning pads on the market and further add to scrubbing and light stripping. The blue pads the flexibility of the Saber Compact. Please remove less finish than brown stripping pads, refer to the following to assist in selecting the yet will remove black marks, stains and dirt. -
Page 20: Replacing Or Removing Scrub Brushes
3. Lower the scrub deck by pushing the pedal 4. Install squeegee blade. down and to the left. 5. Install squeegee retainer strap. 6. Install all screws starting from center and working to ends. 4. Locate the brush switch and turn on. SC17 98861 05/15/01... -
Page 21: Service Schedule
Thoroughly clean the machine Check carbon brushes in all vacuum, brush drive, and propel motors Blow out dust in motors Inspect motor commutators Clean chains, cables and pulleys Clean pivot points on squeegee and scrub deck linkages SC17 98861 10/19/02... -
Page 22: Machine Troubleshooting
Charge batteries Brush motor does not run, or runs Circuit breaker tripped Reset circuit breaker slowly Loose connection Check motor wires and connection Faulty brush motor Replace contactor contactor Worn brush motor brushes Replace brushes, check commutator SC17 98861 05/15/01... - Page 23 Little or no propel Low battery charge Charge batteries Machine turned on with Allow control button to directional control button(s) return to neutral. Restart not in neutral Controller overheated Allow cool down period Loose connection Check motor wires and connection SC17 98861 05/15/01...
Need help?
Do you have a question about the SC17 and is the answer not in the manual?
Questions and answers