Table of Contents
Advertisement
®
™
Iomega
StorCenter
Pro NAS 150d Server
Iomega, the stylized "i" logo, StorCenter, and all Iomega brand blocks are either registered trademarks or trademarks of
Iomega Corporation in the United States and/or other countries. Microsoft and Windows are either registered
trademarks or trademarks of Microsoft Corporation in the United States and/or other countries. Mac, Macintosh, and
AppleTalk are registered trademarks or trademarks of Apple Computer Inc. in the United States and/or other countries.
Certain other product names, brand names, and company names may be trademarks or designations of their respective
owners.
Advertisement
Table of Contents

Related Manuals for Iomega StorCenter Pro NAS 150d


Summary of Contents for Iomega StorCenter Pro NAS 150d
- Page 1 StorCenter Pro NAS 150d Server Iomega, the stylized "i" logo, StorCenter, and all Iomega brand blocks are either registered trademarks or trademarks of Iomega Corporation in the United States and/or other countries. Microsoft and Windows are either registered trademarks or trademarks of Microsoft Corporation in the United States and/or other countries. Mac, Macintosh, and AppleTalk are registered trademarks or trademarks of Apple Computer Inc.
-
Page 2: Safety Information
3. Unplug the Iomega StorCenter Pro from the Uninterruptible Power Supply (UPS) before cleaning. Do not use liquid or aerosol cleaners. Use a damp cloth for cleaning. 4. Do not use the Iomega StorCenter Pro near water. Do not spill liquid on or into the Iomega StorCenter Pro. -
Page 4: Key Features
® ™ About the Iomega StorCenter Pro NAS 150d Server Key Features Key Benefits Ports and Indicators Default Settings Key Features Network sharing Ethernet connectivity (10/100/1000Base-TX) Built-in USB printer sharing No server or host required Active Directory Services (ADS) Support... -
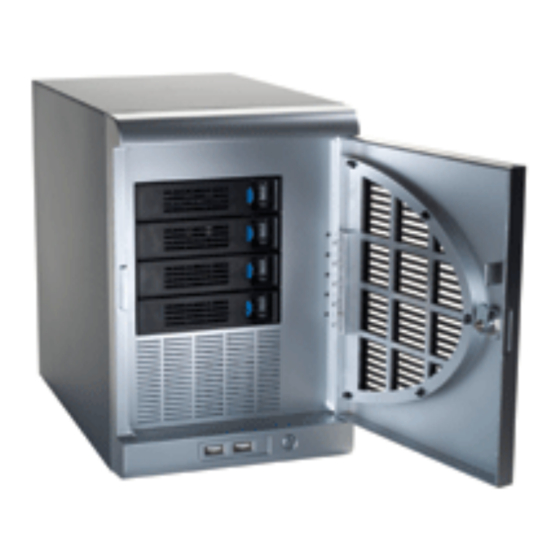
Page 5: Front Panel Ports/Indicators
USB storage devices with other systems on your network. 5. Power Button/Factory Reset Button—Use the power button to start or shut down the Iomega StorCenter Pro server. Hold the Power Button down for 12 seconds to reset the StorCenter Pro to factory defaults. -
Page 6: Rear Panel View
6. Drive Bays—The StorCenter Pro Server has four user-serviceable drive bays. See Using the Iomega StorCenter Pro 150d RAID for more information on replacing hard drives. Rear Panel 1. High Speed USB 2.0 Connectors—Supports devices such as USB storage devices and... -
Page 7: Default Settings
USB storage devices with other systems on your network. 2. Ethernet Connector—(10/100/1000Base-TX). Automatically detects your network speed. 3. AC Power—Plug the correct power cable into this connector and a UPS to power your StorCenter Pro. 4. AC Selector Switch—Make sure the voltage on the AC selector swtich on the back of the StorCenter Pro Server matches the power requirements for your country. -
Page 8: Check Package Contents
® ™ Connecting the Iomega StorCenter Check Package Contents Initial Setup Check Package Contents Verify that the box contains the following items: ® ™ Iomega StorCenter Pro NAS 150d Server Power cables (Models may vary) Solutions CD and Quick Start Guide... -
Page 9: Initial Setup
— or — Use the included network cable to connect the StorCenter Pro Server directly to a computer. 3. Connect the included power cord to the back of the Iomega StorCenter Pro and an Uninterruptible Power Supply (UPS). CAUTION! Make sure the voltage on the AC selector switch on the back of the StorCenter Pro Server matches the power requirements for your country. - Page 10 Iomega Discovery Tool Pro will automatically scan your network when launched. If you receive a message from Windows FireWall alerting you of network activity, click the unblock button. NOTE: The client computer must be on the same subnet or network segment as the Iomega...
- Page 11 You can also use Bonjour to discover and configure the StorCenter. See Using Bonjour for more information. 7. The Iomega Discovery Tool Pro software will list all discovered Iomega StorCenter Pro servers. Select the StorCenter Pro you would like to configure from the Discovery window, then click the Manage button. NOTE: Troubleshooting if Iomega Discovery does not list your StorCenter Pro.
-
Page 12: Using Bonjour
Iomega Discovery Tool Pro software installs and runs automatically when you install the software from the Solutions CD using either Automatic Install or Custom Install. You can also run the Iomega Discovery Tool Pro software directly from the CD without installing. However, for ease of use, Iomega recommends installing the software. -
Page 13: Device Settings
Bookmark pane on the right-hand side. Double click the StorCenter to enter Device Settings. top of page Device Settings top of page... -
Page 14: Accessing Device Settings
Device Settings Options The Iomega StorCenter Pro Device Settings tool allows you to configure a StorCenter Pro server. This section will describe the StorCenter Pro Device Settings screens and define the available options. Click on the screen names for more information: ®... - Page 15 Disk Backup Print Server top of page...
-
Page 16: Status Summary
Machine Name—Displays the name of your StorCenter Pro server. When you browse the network, the StorCenter Pro server will appear under this name. The default name of the StorCenter Pro server is Iomega-xxxxxx (where xxxxxx is the last 6 digits of the device's MAC address). -
Page 17: Alerts
Language—Select a language for the Device Settings Web Administration pages. The default is English. Factory Reset Button—Enable/Disable the Factory Default button on the StorCenter Pro server. Disable the Factory Reset Button to prevent other people who have physical access from resetting the device. Resetting the device changes the device password to its default and removes all users and shares. -
Page 18: System Status
Machine Name—Displays the name of your StorCenter Pro server. When you browse the network, the StorCenter Pro server will appear under this name. The default name of the StorCenter Pro server is Iomega-xxxxxx. Description—This text will appear in the server description field when you are browsing the network. - Page 19 top of page UPS Monitor The UPS Monitor reports information about your UPS including battery status and charge. Shutdown when battery is low—The StorCenter Pro will monitor the UPS battery and shutdown safely before the battery loses charge. top of page...
-
Page 20: User Management
Device Settings Home Disk Management User Management Network Group Management Disk Backup Shared Folder Management Print Server User Management The User Management screen displays the names and descriptions of all users. It also allows you to Add, delete, or edit users. You can change the Administrator password using the Change Password tool on the Basic page. - Page 21 top of page...
-
Page 22: Group Management
Device Settings Home Disk Management User Management Network Group Management Disk Backup Shared Folder Management Print Server Group Management The Group Management screen displays the name and description of all groups. It also allows you to create, delete, or update groups. NOTE: You cannot manage domain groups from this device. - Page 23 Device Settings Home Disk Management User Management Network Group Management Disk Backup Shared Folder Management Print Server Shared Folder Management The Shared Folder Management screen displays the name and supported protocols of each shared folder. It also allows you to create, delete, or update shares. Edit a share—Links to the Edit Shared Folder screen.
- Page 24 set the permissions for the entire 169.254.1.x range by adding the IP address 169.254.1.*. OK/Cancel—Your settings will NOT be updated unless you click the OK button. Click the Cancel button to reset the form. top of page...
-
Page 25: Disk Management
Redundant Array of Inexpensive (or Independent) Disks, is a method of combining multiple disks for data redundancy in case of a disk failure. This section describes each of the different types of arrays supported by Iomega StorCenter Pro server with two internal disks. - Page 26 RAID 0, RAID 5 stripes all of the available disks into one large volume; however, the space equivalent to one hard drive will be used to store parity data. If a hard drive fails, the Iomega StorCenter Pro server will rebuild your files using the parity data. RAID 5 requires at least 3 hard drives.
- Page 27 Device Settings Home Disk Management User Management Network Group Management Disk Backup Shared Folder Management Print Server Network IP Address—Displays the StorCenter Pro server's LAN IP address. MAC Address—Media Access Control Address. Displays the MAC address for the StorCenter Pro LAN interface. The MAC address is unique for each network interface. Settings—Links to the screen.
- Page 28 Subnet Mask—Specify the subnet mask for the StorCenter Pro server. The Subnet mask must be the same for all devices on the same subnet of the network. The default subnet setting is 255.255.0.0. Keep this default setting if your LAN has an IP address range in the format of 169.254.x.x.
- Page 29 Admin Password—Enter the password for a domain admin user. This is NOT the user name for your StorCenter Pro server. NOTE: You will not be able to modify the NT domain from the StorCenter Pro server. All domain tasks such as domain user and group creation and deletion and password changes must be performed on a different device.
-
Page 30: Print Server
When this service restarts, all current connections will be interrupted. Your computer should automatically reconnect to the share once the service has been restarted. If your connection is not restored, use the Iomega Discovery Too Pro software to reconnect to the StorCenter. -
Page 31: Disk Backup
Device Settings Home Disk Management User Management Network Group Management Disk Backup Shared Folder Management Print Server Applications This screen provides a quick status report for all available StorCenter Pro applications. Disk Backup—Displays the number of scheduled backup jobs. NOTE: Disk Backup is currently the only application available. - Page 32 NOTE: For best results, Iomega recommends that you only perform one backup task at a time. Please schedule your backup jobs with sufficient time to complete before the next backup starts. Not Scheduled—Allows you to create an unscheduled job. You will have to use the Run link on the Disk Backup page to execute this job.
- Page 33 Not Found The requested URL /support/manuals/250dseries/en/consolidated/linux-access was not found on this server.
-
Page 34: Filenaming Conventions
® Using the Iomega StorCenter Network Hard Drive Accessing Shares Using Device Settings Filenaming Conventions Backing Up With the StorCenter Pro Protecting Your Data Sharing a USB Storage Device StorCenter Pro Drives and Arrays Sharing a USB Printer Filenaming Conventions When sharing files on a network, you must choose filenames that are compatible with all devices that will use the file. -
Page 35: Protecting Your Data
Have a spare StorCenter Pro hot-swappable hard drive available Some RAID configurations allow a single hard drive to be replaced while in normal operation. As a result, Iomega recommends that you have a spare hard drive available in the event of a hard drive failure. This will permit a faster return to normal performance speeds. - Page 36 When a hard drive is removed, the system may take a few minutes to recognize the removal. Do NOT insert a replacement drive until the Iomega StorCenter Pro has recognized the drive removal. The Iomega StorCenter Pro will notify you of a hard drive removal through a notification email or the graphical user interface (GUI).
- Page 37 Your Iomega StorCenter Pro has hot-swappable hard drives for increased data accessibility and ease of maintenance. To enhance your experience with your Iomega StorCenter Pro, it is very important to become familiar with the basics of array and drive handling.
- Page 38 If a hard drive fails, the Iomega StorCenter will rebuild your files using the parity data. RAID 5 requires at least 3 hard drives.
- Page 39 Replacing a Hard Drive in the Iomega StorCenter Pro Your Iomega StorCenter Pro has been configured so that you can lose any single drive and the system will remain operational. However, your data may be lost if you are not using an array type that provides redundancy.
- Page 40 4. Slide the drive completely out of the bay. 5. Wait a couple of minutes while the Iomega StorCenter Pro recognizes that the drive has been removed. 6. Slide the replacement drive into the open bay. CAUTION! Use Iomega replacement drives only! Failure to do so will void your warranty.
- Page 42 REV Loader, or to another server over a TCP/IP network. Iomega recommends you store at least one backup copy of your StorCenter Pro in a safe, off-site location. If your backup is stored on cartridges that are stacked next to your StorCenter Pro, a fire or other disaster could destroy both the StorCenter Pro and the backup.
- Page 43 Backing Up a Client Computer Iomega recommends that you perform a full system backup once a week. The following steps will help you create a full system backup and schedule your daily backups. Using Roxio Retrospect Express Roxio Retrospect Express is a full-featured backup program.
- Page 44 Configure→Backup Sets. Script summaries can be viewed by clicking Automate→Manage Scripts. Iomega also recommends that you perform a test restore of your data backup to validate your backup set. For information on performing a restore, please see the Retrospect help system.
- Page 45 Backing Up Your Computer These steps will make a duplicate copy of your hard drive on your Iomega drive. 1. Install Retrospect on the computer you wish to back up. Retrospect is included on the Solutions CD that came with your StorCenter Pro Server.
- Page 46 Configure→Backup Sets. Script summaries can be viewed by clicking Automate→Manage Scripts. Iomega also recommends that you perform a test restore of your data backup to validate your backup set. For information on performing a restore, please see the Retrospect help system.
- Page 48 ® ™ Using the Iomega StorCenter Accessing Shares Using Device Settings Filenaming Conventions Backing Up With the StorCenter Pro Protecting Your Data Sharing a USB Storage Device StorCenter Pro Drives and Arrays Sharing a USB Printer Sharing a USB Storage Device You can increase the capacity of the StorCenter Pro by connecting up to four additional USB mass storage devices (such as hard drives and flash drives).
-
Page 49: Sharing A Usb Printer
When this service restarts, all current connections will be interrupted. Your computer should automatically reconnect to the share once the service has been restarted. If your connection is not restored, use the Iomega Discovery Too Pro software to reconnect to the StorCenter. - Page 50 Windows XP/2000 1. Log in to the Device Settings web Interface. 2. If necessary, enable the print server. 3. Connect a USB printer to the StorCenter. 4. Install the printer drivers on the client computer. 5. Click on the Start icon and select Printers and Faxes. 6.
- Page 51 6. In the Printer List, click the Add button. 7. In the Printer Browser, Click the IP printer button. 8. Select Line Printer Daemon - LPD from the Protocol drop down list 9. Enter the IP address of your StorCenter Pro in the Address field. 10.
-
Page 52: Troubleshooting
Troubleshooting If you encounter a problem while connecting or using your Iomega StorCenter Pro Server, check the topics listed below for possible solutions. Click on any of the following topics to expand or close the troubleshooting information. Drive does not power on Make sure you are using the power cable that came with your drive. - Page 53 How do I find the drive's IP address? Run the Iomega Discovery Tool Pro software. The Discover Tool will display a list of available StorCenter Pro Servers and list their name and IP address. top of page...
- Page 54 2. Double click Entire Network 3. Double click Microsoft Windows Network 4. Double click Workgroup Your Iomega StorCenter Pro Server should have a default name similar to Iomega-xxxxxx (where xxxxxx is an alpha-numeric listing) Windows 98/ME: 1. Double click Network Neighborhood 2.
- Page 55 How do I change the name of my StorCenter Pro Server? Always use Iomega Discovery Tool's Device Settings to change the drive's name. Changing the name on your host computer does not change the name on the network.
- Page 56 3. From the Advanced category, select Proxies. If you have a manual proxy server configured, either: Add the IP address you find in Iomega Discovery Tool to the No Proxy for list. How do I find the device's IP address? Select Direct connection to the internet.
- Page 57 When this service restarts, all current connections will be interrupted. Your computer should automatically reconnect to the share once the service has been restarted. If your connection is not restored, use the Iomega Discovery Tool Pro software to reconnect to the StorCenter.
- Page 58 CAUTION! Do not connect or disconnect printers while the StorCenter is performing a data transfer. When the connection is severed, the data transfer will be interrupted and data may be lost. top of page USB printer not recognized The StorCenter should automatically set up a print server when a USB printer is connected. The StorCenter will create a queue for one printer.
- Page 59 All StorCenter Pro NAS servers are fully tested, configured and optimized using only the hardware that ships inside the NAS. Upgrading or modifying the hardware in your Iomega NAS server, such as RAM, CPU, Hard Disks, Fans, Network Adapters, etc. is not supported and will void your warranty.
-
Page 60: How To Get Help
Iomega product, check our website at www.iomega.com. Please select your region carefully. Here's just some of what is available on Iomega's award-winning web support site 24 hours a day, 7 days a week: Answers to frequently asked questions (FAQs) Online help pages with troubleshooting or basic "how to"... -
Page 61: Limited Warranty
(c) third party products, including hardware or software, supplied with the warranted product. Iomega makes no warranty of any kind on products supplied by third parties, which, if included, are provided "as is" except to the extent such product is covered by a warranty supplied by the third party, in which case the owner shall deal with and obtain any warranty remedy direct from the third party. - Page 62 Your sole and exclusive remedy for a covered defect is repair or replacement of the defective product, at Iomega's sole option. Iomega may use either new parts or products or refurbished parts or products that Iomega has determined to be equivalent to new in performance to satisfy its warranty obligations.
- Page 63 NAS product; or (b) any alteration, change, modification or repair made on the NAS product by any party other than Iomega or its authorized service centers.
- Page 64 Iomega, along with proper identification, a return authorization number provided by the representative, and proof of purchase. Iomega will not protect, recover, or return data during warranty service so you should duplicate your data before shipment.
- Page 65 (c) third party products, including hardware or software, supplied with the warranted product. Iomega makes no warranty of any kind on products supplied by third parties, which, if included, are provided "as is" except to the extent such product is covered by a warranty supplied by the third party, in which case the owner shall deal with and obtain any warranty remedy direct from the third party.
- Page 66 Iomega's sole option. Iomega may use either new parts or products or refurbished parts or products that Iomega has determined to be equivalent to new in performance to satisfy its warranty obligations. If Iomega is unable to repair or replace a defective product, your alternate exclusive remedy, at Iomega's sole option, shall be a refund of the original purchase price.
-
Page 67: Regulatory Information
If necessary, consult an experienced radio/television technician for additional suggestions. NOTE: Changes or modifications to the electronics or enclosure of this product must be expressly approved by Iomega; otherwise, the user's authority to operate this product might be voided by the FCC. top of page California Residents This product contains a CR coin cell lithium battery which contains perchlorate material—... -
Page 68: Manufacturer/Responsible Party
CE (European Community) This Iomega product conforms to the following European Directive(s)and Standard(s): Application of Council Directives: 73/23/EEC, 89/336/EEC. Standards to which Conformity is declared: EN60950, EN55022, EN55024, EN61000-3-2, EN61000-3-3. Importer’s Name: Iomega International, S.A. Type of Equipment: Information Technology Equipment. -
Page 69: Using This Manual
Using This Manual Expanding Submenu Topics In the left hand menu, click a plus sign to reveal the submenu topic links. If there is no plus sign next to the title, there are no submenu links. Click the minus sign to hide the submenu.
Need help?
Do you have a question about the StorCenter Pro NAS 150d and is the answer not in the manual?
Questions and answers