Table of Contents
Advertisement
Advertisement
Table of Contents

Related Manuals for LG Spectrum


Summary of Contents for LG Spectrum
- Page 1 USER GUIDE...
- Page 2 Copyright©2012 LG Electronics, Inc. All rights reserved. LG and the LG logo are registered trademarks of LG Group and its related entities. Spectrum is a trademark of LG Electronics, Inc. All other trademarks are the property of their respective owners.
-
Page 3: Important Customer Information
Important Customer Information When using this product, the safety precautions below must be taken to avoid possible legal liabilities and damages. Retain and follow all product safety and operating instructions. Observe all warnings in the product operating instructions. To reduce the risk of bodily injury, electric shock, fire, and damage to the equipment, observe the following precautions. - Page 4 Important Customer Information Handle battery packs carefully This product contains a Li-ion battery. There is a risk of fire and burns if the battery pack is handled improperly. Do not attempt to open or service the battery pack. Do not disassemble, crush, puncture, short external contacts or circuits, dispose of in fire or water, or expose a battery pack to temperatures higher than 60°C (140°F).
- Page 5 Important Customer Information Avoid dropping the phone or battery. If the phone or battery is dropped, ● especially on a hard surface, and the user suspects damage, take it to a service center for inspection. If the battery leaks: ● Do not allow the leaking fluid to come in contact with skin or clothing.
-
Page 6: Environment Restrictions
Important Customer Information ENVIRONMENT RESTRICTIONS Do not use this product in gas stations, fuel depots, chemical plants or where blasting operations are in progress, or in potentially explosive atmospheres such as fueling areas, fuel storehouses, below deck on boats, chemical plants, fuel or chemical transfer or storage facilities, and areas where the air contains chemicals or particles, such as grain, dust, or metal powders. - Page 7 Important Customer Information SAFETY PRECAUTIONS FOR RF EXPOSURE Avoid using your phone near metal structures (for example, the steel ● frame of a building). Avoid using your phone near strong electromagnetic sources, such as ● microwave ovens, sound speakers, TV and radio. Use only original manufacturer-approved accessories, or accessories that ●...
- Page 8 Important Customer Information NON-IONIZING RADIATION Your device has an internal antenna. This product should be operated in its normal-use position to ensure the radiative performance and safety from interference. As with other mobile radio transmitting equipment, users are advised that for satisfactory operation of the equipment and for personal safety, it is recommended that no part of the human body be allowed to come too close to the antenna during operation of the equipment.
-
Page 9: Table Of Contents
Table of Contents Important Customer Information............1 Table of Contents ...................7 Technical Details ................... 10 The Basics ..................... 15 Phone Overview ......................15 Installing the Battery and microSD Card ..............18 Charging the Phone ....................20 Optimizing Battery Life ....................21 Turning the Phone On and Off ................23 Getting answers about how to use phone .............24 Phone’s Status Icons ....................26 Getting to Know the Home Screen ................28... - Page 10 Table of Contents Listening to Your Voicemail ..................62 Browser ........................63 Web ....................... 63 Maps ..........................69 Checking the weather ....................70 Changing Weather Settings ..................71 Backup Assistant .......................71 Communication ..................74 Contacts ........................74 Email ..........................84 Visual Voice Mail ......................86 Gmail .........................87 Messaging .........................97 Talk ..........................106 The Phone application ....................
-
Page 11: Table Of Contents
Table of Contents Safety ....................178 TIA Safety Information ..................178 Safety Information ....................182 Caution: Avoid potential hearing loss..............185 FDA Consumer Update ..................188 10 Driver Safety Tips ....................195 Consumer Information on SAR ................197 FCC Hearing-Aid Compatibility (HAC) Regulations for Wireless Devices ..199 Specifications ..................201 FAQ .....................202 Contacts ......................... -
Page 12: Technical Details
Technical Details Technical Details CDMA Designator Description Standard CDMA Dual-Mode Air Interface TIA/EIA-95A 14.4kbps Radio Link Protocol and Inter-band TSB-74 Basic Air Operations Interface ANSI J-STD-008 IS-95 Adapted for PCS Frequency Band TIA/EIA-IS2000 CDMA2000 1xRTT Air Interface TIA/EIA/IS-634 MAS-BS TIA/EIA/IS-651 PCSC-RS Network TIA/EIA/IS-41-C... - Page 13 Technical Details LTE Standard Designator Description Evolved Universal Terrestrial Radio Access (E-UTRA); User Equipment (UE) radio transmission TS 36.101 and reception Basic Air Interface Evolved Universal Terrestrial Radio TS 36.104 Access (E-UTRA); Base Station (BS) radio transmission and reception Evolved Universal Terrestrial Radio Access (E-UTRA);...
- Page 14 Technical Details FCC RF Exposure Information WARNING! Read this information before operating the phone. In August 1996, the Federal Communications Commission (FCC) of the United States, with its action in Report and Order FCC 96-326, adopted an updated safety standard for human exposure to Radio Frequency (RF) electromagnetic energy emitted by FCC regulated transmitters.
- Page 15 Technical Details FCC Notice and Cautions This device and its accessories comply with part 15 of FCC rules. Operation is subject to the following two conditions: (1) This device and its accessories may not cause harmful interference, and (2) this device and its accessories must accept any interference received, including interference that causes undesired operation.
-
Page 16: Technical Details
Technical Details Part 15.105 statement This equipment has been tested and found to comply with the limits for a class B digital device, pursuant to Part 15 of the FCC rules. These limits are designed to provide reasonable protection against harmful interference in a residential installation. This equipment generates, uses, and can radiate radio frequency energy and, if not installed and used in accordance with the instructions, may cause harmful interference to radio communications. -
Page 17: The Basics
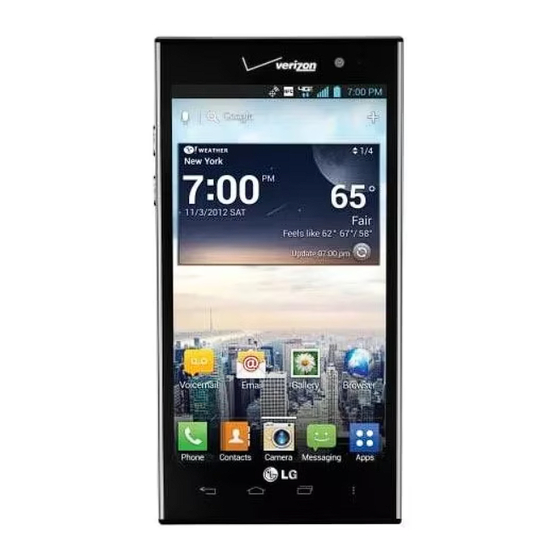
The Basics Phone Overview Front View Power/ Earpiece Lock Key Proximity Sensor Front Camera Lens Touchscreen Quick Keys - Phone Key - Contacts Key - Messaging Key - Apps Key Menu Key Back Key Home Key Microphone NOTES All screen shots in this guide are simulated. Actual displays may vary. Instructions to perform tasks in this guide are based on the default phone settings and may change depending on the software version on your phone. - Page 18 Do not block the sensor or near the sensor to avoid problems with the touch ● operations. The use of a film cover produced by manufacturers other than LG can cause a ● disturbance in touch operations, the display, etc.
- Page 19 The Basics Rear Camera Lens Use for taking pictures and recording videos. Keep it clean for optimal performance. Back Cover Encloses the battery compartment. Speaker Sound comes from the rear speaker instead of the earpiece (e.g., the speakerphone function, music player function, etc.). Side Views and Top View USB/Charger Port...
-
Page 20: Installing The Battery And Microsd Card
The Basics Installing the Battery and microSD Card NOTE It is important to fully charge the battery before initial use of the phone. Installing the battery The phone comes with a rechargeable battery. Keep the battery charged while not in use in order to maximize talk, use, and standby time. The battery charge level is shown at the top right corner of the screen. - Page 21 The Basics Inserting a microSD card Turn the power off. Remove the battery cover and the battery (as demonstrated in the previous instructions). Locate the microSD card slot (microSD is inscribed near the slot opening). Position the microSD card with the label side facing up and slide it into place until it is fully inserted and locked in place.
-
Page 22: Charging The Phone
Improper handling of the USB/Charger Port, as well as the use of an incompatible charger, may cause damage to your phone and void the warranty. 1. Connect the USB Cable into the Wall/USB Charger. When connecting, as shown below, the LG logo on the USB Cable should face toward you. USB Cable Wall/USB... -
Page 23: Optimizing Battery Life
The Basics 2. Plug the USB Cable (as shown below) into the phone’s USB/Charger Port. NOTE Make sure the 'B' side is facing toward you when inserting the USB Cable into the phone. Charging with USB You can use your computer to charge your phone. To be able to charge with the USB cable, you need to have the necessary USB drivers installed on your PC first. - Page 24 The Basics To check the battery charge level # Touch the Apps Key > Settings > About phone > Battery. The battery status (Charging or Discharging) and level (as a percentage of fully charged) will be displayed at the top of the screen. To monitor and control what uses the battery The Battery use screen allows you to see which applications are consuming the most battery power.
-
Page 25: Turning The Phone On And Off
The Basics Turning the Phone On and Off Turning the phone on # Press and hold the Power/Lock Key for a couple of seconds until the screen turns on. Turning the phone off 1. Press and hold the Power/Lock Key until the Phone options menu appears. -
Page 26: Getting Answers About How To Use Phone
The Basics Setting Up Your Device When you turn on your wireless device for the first time, you have the option to quickly set up various accounts. Simply follow the on-screen instructions to complete the initial setup of your wireless device. To set up your device, follow the steps below: 1. -
Page 27: Setting Up Your Google Account
The Basics Setting up your Google Account 1. At the setup screen, touch Create or Sign in. 2. Enter your username and password or any other necessary information (if creating an account). NOTE Touch the Back Key to close the keyboard. 3. -
Page 28: Phone's Status Icons
The Basics Phone’s Status Icons The Status Bar appears at the top of every screen. It displays icons indicating that you’ve received notifications (on the left) and icons indicating the phone’s status (on the right), along with the current time. Notification icons Status icons If you have more notifications than can fit in the Status Bar, a plus icon... - Page 29 The Basics Network icons 4G network connected Download through 4G network 4G network is in use Upload through 4G network 3G network connected 3G network is in use Downloading data Uploading data Acquiring GPS access No service GPS on Strong network signal Airplane mode is on Weak network signal Location service is on...
-
Page 30: Getting To Know The Home Screen
The Basics Getting to Know the Home Screen The Home screen is your starting point to access all of the features on your phone. It displays application shortcuts, icons, widgets, and other features. Status Bar Shows device status information, including the time, signal strength, battery status, and notification icons. -
Page 31: Touchscreen
The Basics Home Screen Canvas Indicator The dots near the top of the screen indicate which Home screen canvas you are viewing. Pinch in on the Home screen to display the mini canvas view, then touch the Home screen canvas you want to view. Touchscreen Your touchscreen provides an excellent way to interact with and use your Android phone. -
Page 32: Text Input Methods
The Basics Swipe or slide To Move your finger quickly across the surface of the screen, without pausing when you first touch it (so you don’t drag an item instead). For example, you can drag or slide the screen up or down to scroll a list, or browse through the different Home screens by swiping from left to right (and vice versa). -
Page 33: Text Input Settings
The Basics Toggles between different languages. Toggles from 123/SYM mode to ABC mode. Typing tips From the numbers keyboard, touch the Symbols Key . Touch the Numbers Key Enter other characters or the Letters Key to exit from the symbols keyboard. -
Page 34: Applications: How To View, Open And Switch
The Basics Applications: How to View, Open and Switch All of the applications on your phone, including any applications that you downloaded and installed from Android Market or other sources, are grouped together on the Apps screen, which you access from your Home screen. - Page 35 The Basics NOTE The Apps screen closes automatically when you touch an icon to open its application. Dragging an icon onto your Home screen also closes the Apps screen automatically. Customizing the Apps screen The phone includes a wide variety of applications and you can download even more applications to your device.
-
Page 36: Adding A Category
The Basics Adding a category 1. From the Home screen, touch the Apps Key 2. Touch the Menu Key > Manage category > Add. 3. Enter the category name, then touch Save. 4. Touch the applications or services you want to move into your newly created category, then touch Move. - Page 37 The Basics Switching between multiple applications 1. Touch and hold the Home Key . A screen with the icons of applications that you’ve used recently will appear. 2. Touch the application icon you want to open or touch the Back Key to return to the current screen.
-
Page 38: Working With Menus
The Basics Working with Menus There are two kinds of Android menus: Options menus and Context menus. Options menus Options menus contain tools that apply to the activities of the current screen or application, not to any specific item on the screen. To open the available Options menu, touch the Menu Key . -
Page 39: Managing Notifications
The Basics Managing Notifications Notification icons report the arrival of new messages, calendar events, alarms, as well as ongoing events, such as when you are on a call. When you receive a notification, the notification icon will be displayed in the Status Bar. -
Page 40: Searching Your Phone And The Web
The Basics To clear all notifications 1. Open the Notifications panel. 2. Touch the Clear button. All event-based notifications will be cleared; ongoing notifications will remain in the list. To close the Notifications panel Touch and drag the tab at the bottom of the Notifications panel to the top of the screen or just touch the Back Key The panel will also close when you touch a notification. -
Page 41: Locking The Screen
The Basics 2. Enter the text you’re searching for in the Quick Search Box. As you type, search results from your phone, previous search terms, and web search suggestions appear. Touch an item to activate that search result. You can use the Search preferences to configure some aspects of web search (for example, whether it makes suggestions below the Quick Search Box as you type), and what phone features you want to include in searches. - Page 42 The Basics (twice). Draw your pattern (connect at least 4 dots) and touch Continue. Then redraw your pattern and touch Confirm. PIN: Enter a PIN (at least 4 digits) and touch Continue. Reenter your PIN and touch OK to confirm it. Password: Enter a password (at least 4 characters) and touch Continue.
-
Page 43: Customizing The Home Screen
The Basics 1. Turn the power off. 2. Touch and hold the following keys at the same time for 8 seconds: Power/Lock Key + the down Volume Key. 3. Press the Power/Lock Key when you see the pop-up “Permanently Erase User Data &... - Page 44 The Basics To move an item on the Home screen 1. Touch and hold the item. 2. Drag the item to a new location on the screen. Pause at the left or right edge of the screen to drag the item onto the next available Home screen canvas.
-
Page 45: Connecting Quickly With Your Contacts
The Basics To rename a folder 1. Touch the folder icon to open it. 2. Touch and hold the folder window’s title bar. 3. Enter the new folder name. 4. Touch OK. To reposition Home screen canvases 1. Pinch in on the Home screen to display the mini canvas view. 2. -
Page 46: Connecting To Networks And Devices
Connecting to Networks and Devices Connecting to Wi-Fi Networks Wi-Fi is a wireless networking technology that can provide Internet access at distances of up to 100 meters, depending on the Wi-Fi router and your surroundings. To use Wi-Fi on your phone, you must connect to a wireless access point, or “hotspot.”... - Page 47 Connecting to Networks and Devices To show pop-up when new networks are detected If “Notify Me” is selected and Wi-Fi is on, your device will display a pop-up whenever you launch apps and new networks are detected. When Wi-Fi is off and the user launches apps, your device will turn on Wi-Fi and will display a pop-up whenever new networks are detected.
-
Page 48: Usb Autorun
USB Autorun is a feature that allows your phone to connect to a PC using a USB Cable and set it up on that PC without a physical CD-ROM. # Automatically installs the LG USB Modem driver. # Allows the phone to be used as Mass storage when a microSD card is present in the phone. - Page 49 Connecting to Networks and Devices If Autorun doesn't function properly, unplug and plug the USB Cable to set Mass ● storage mode. Autorun automatically installs the USB device driver for every USB mode. Internet connection mode Autorun may automatically use Internet connection mode in certain circumstances.
-
Page 50: Connecting To Networks And Devices
Step 1. Connecting the phone to a PC # Connect your phone to your PC with a compatible USB Cable (supplied). LG Autorun starts automatically. # Click ‘I accept the terms in the agreement’ and ‘Yes’. ® ®... - Page 51 Step 2. Downloading the LG USB Modem Driver. NOTES If a previous version of the LG USB Modem driver is installed in the computer, it will ● automatically be updated to the recent version. If a recent version of the LG USB Modem driver is installed in the computer, LG ●...
-
Page 52: Make Your Device A Mobile Hotspot
Connecting to Networks and Devices # Downloading or running V CAST Media Manager works only in Mass Storage mode when Only when my phone is in V Cast Media Manager Compatible Mode is selected. # Downloading or running V CAST Media Manager will not work if Do not launch V Cast Media Manager when I connect my phone is selected. - Page 53 Connecting to Networks and Devices 2. Touch the Mobile Hotspot checkbox to enable this feature. 3. Read the disclaimers and Help information, then touch OK. Portable Wi-Fi Hotspot is active 4. Your portable Wi-Fi Hotspot is now created. You can use this menu to enable and disable the connection. Once the connection is active, go to the device you want to connect and configure its wireless connection to the Network SSID for your Android device and input the password (if you are using WPA2 PSK).
-
Page 54: Microsd Card
microSD Card microSD Card Unmounting and removing the microSD Card To safely remove the microSD card from your device, you must first unmount it before removing it from the phone. WARNING! On the Android OS 2.2, you can download applications from Android Market and can store them on the microSD card as well as on the device. - Page 55 microSD Card 3. Once released, touch Erase SD card > Erase SD card > Erase everything. Once completely formatted, the card is automatically re-mounted ● (reconnected for use by the device). NOTE The formatting procedure erases all the data on the microSD card, after which the files CANNOT be retrieved.
-
Page 56: Calls
Calls Placing and Ending Calls You place calls using the Phone application. Calls can be manually dialed using the Phone tab. You can also dial from your phone’s memory using the Call log tab, the Contacts tab, or the Groups tab. To open the Phone application # From the Home screen, touch the Phone Key in the Quick Keys... -
Page 57: Answering Or Rejecting Calls
Calls You can use other phone features while the call is underway. If you ● open another application, the Call icon appears in the Status Bar for the duration of the call. Press the Volume Keys to adjust the call volume. ●... - Page 58 Calls Unlocked Screen Locked Screen Touch the Send msg key to send a Touch the quick message Ignore Key to the caller to send the and forward caller directly them to your to your voicemail. voicemail. Touch the Answer Key to answer the call.
-
Page 59: Working With The Call Log
Calls NOTE This feature can only be used to send a message to another mobile phone. It is not applicable to incoming landline calls. Working with the Call Log The Call log is a list of all of the calls you’ve dialed, received, or missed. It offers a convenient way to redial a number, return a call, or add a number to your Contacts. -
Page 60: Calling Your Contacts
Calls To take other actions on a Call log entry # Touch a Call log entry to open a screen from where you can call the contact, send the contact a message, add the number to your Contacts list, and learn more about the original call. # Touch and hold a Call log entry to open a Context menu where you can call the contact, view contact information, edit the number before you redial, and more. -
Page 61: Voice Dialer
Calls 3. Touch the contact’s phone number you want to call. Voice Dialer You can use the Voice Dialer application to place a phone call by speaking the name of a contact or a phone number. To place a call by speaking 1. - Page 62 Calls To mute the microphone during a call # Touch the Mute Key The Mute Key lights up to indicate that the microphone is muted. The Mute icon will appear in the Status Bar to remind you that the microphone is turned off. When viewing the in-call screen, you can unmute the microphone by touching the Mute Key again.
-
Page 63: Managing Multiple Calls
Calls Managing Multiple Calls Contact your wireless service provider to learn whether they support conference calls and how many participants you can include. To switch between current calls # Touch the Swap Key The current call will be placed on hold and you will be connected with the other call. -
Page 64: Listening To Your Voicemail
Calls Listening to Your Voicemail When you have a new voicemail message, the Voicemail notification icon appears in the Status Bar. If you have not set up your voicemail number, or if you need to change it, you can do that in the Call settings. To listen to your Voicemail # Open the Notifications panel and touch New voicemail. -
Page 65: Browser
Browser The Browser application allows you to access the internet from your Verizon Wireless device. Access and selections within this feature are dependent upon your service provider. For specific information on Browser access through your phone, contact your service provider. Internet Learn to access and bookmark your favorite web pages. - Page 66 # To view the list of bookmarks, touch Bookmarks next to the URL field. You can also add, edit, or delete a bookmark from this menu. # To bookmark the current web page, touch Bookmarks > Add. Enter the name for the bookmark and touch OK. # To go to the previous page, touch the Menu Key >...
- Page 67 # To select text on the web page, touch the Menu Key > More > Select text. Use your finger to highlight the text you want to select. Touching the screen displays begin and end markers. Move the markers to highlight the text you want, then tap the highlighted text to copy it.
-
Page 68: Changing Browser Settings
# To copy the web address (URL) of the web page, touch Copy link URL. # To delete the bookmark, touch Delete bookmark. # To use the web page as your Browser homepage, touch Set as homepage. From the Bookmarks screen, touch the Menu Key and use following options: # List view Shows the bookmarks in list format. - Page 69 Open pages in overview Checkmark to open web pages zoomed out, in an overview. Uncheckmark to open web pages at 100% size, displaying the top-left corner of the page. Text encoding Opens a dialog box where you can change the character- encoding standard that the Browser uses when displaying text on a webpage.
- Page 70 Privacy settings Clear cache Allows you to clear locally cached content and databases. Clear history Allows you to clear the Browser history. Accept cookies Checkmark to allow websites to save and read cookie data. Clear all cookie data Allows you to clear all Browser cookie data. Remember form data Checkmark to allow the Browser to remember data entered into forms for later use.
-
Page 71: Maps
Maps To search for a location 1. Touch the Apps Key > Maps 2. Touch the search box at the top of the screen. 3. In the search box, enter the place you’re looking for. You can enter an address, a city, or a type of business or establishment. For example, “theater in New York”. -
Page 72: Checking The Weather
Checking the weather The Weather application provides weather forecasts. You can place a Weather widget on your Home screen for a summary of your local weather. Access the Weather application for more detailed weather information. To get details about the weather Touch the Weather widget on the Home screen to open the Weather application to view summarized and detailed weather information. -
Page 73: Changing Weather Settings
Changing Weather Settings You can configure a number of settings for the Weather application. The location and related settings also affect the display of the Weather widget application. # To open the Weather settings screen, touch the Menu Key > Settings. List Settings City list You can add, edit, or remove a city from your list. -
Page 74: Using Backup Assistant
You can launch Backup Assistant from Applications screen. 1. Touch the Applications Key 2. Touch Backup Assistant Backup Assistant can be accessed directly from the Contacts application. 1. Open the Contacts application. 2. Touch the Menu Key > Back up now. If you’ve already registered your Backup Assistant account, a background backup will be performed. - Page 75 Changing the backup schedule 1. Touch the Apps Key > Settings > Accounts & sync. 2. Touch Backup Assistant 3. Touch Backup time and touch the timeframe you want. For example, Every late night (12am-6am). Settings screen Backup time screen Change your PIN code 1 Touch the Apps Key >...
-
Page 76: Communication
Communication Contacts The Contacts application allows you to store names, phone numbers and other information in your phone’s memory. Using Your Contacts Use the Contacts application to add, view, and communicate with your friends and acquaintances. To open your Contacts application # Touch the Apps Key >... - Page 77 Communication Contacts synced from a social networking application will display their photo albums in the Photo tab. 3. The Contact Info tab displays by default. Touch an icon to call, message, or open other applications. # The Dial icon places a call to the number. # The Message icon starts a message.
-
Page 78: Adding Contacts
Communication Adding Contacts You can add contacts on your phone and synchronize them with the contacts in your Google Account, Microsoft Exchange account, or other accounts that support syncing contacts. Since your contacts can come from a variety of sources, the Contacts application attempts to join new information with existing similar contact entries, to create a single entry. - Page 79 Communication To import contacts from your microSD card You can copy contacts, in vCard format, onto your microSD card then import them into your phone. 1. Insert the memory card (that contains the vCard files) into your phone. 2. Open the Contacts application. 3.
-
Page 80: Adding A Contact To Your Favorites
Communication Adding a Contact to Your Favorites The Favorites tab contains a short list of the contacts you communicate with most often. To add a contact to your favorites list 1. Open the Contacts application. 2. Touch a contact to view its details. 3. -
Page 81: Editing Contact Details
Communication Editing Contact Details You can change or add details saved in your contact entries. You can also set specific ringtones to specific contacts or determine whether calls from specific contacts are diverted to your voicemail. Some contact entries contain information from multiple sources: information that you added manually, information that Contacts joined from multiple accounts to consolidate duplicates, etc. - Page 82 Communication To divert calls from a contact to your voicemail 1. Open the Contacts application. 2. Touch the name of a contact in the list to view its details. 3. Touch the Menu Key > Options. 4. Touch Incoming calls to checkmark the option and enable it. 5.
- Page 83 Communication Communicating with Your Contacts From the Contacts or Groups tab, you can quickly call or send a text (SMS) or multimedia (MMS) message to a contact’s default phone number. You can also open a list of all of the ways you can communicate with that contact. This section describes ways to initiate communication when viewing your list of contacts.
-
Page 84: Selecting Which Contacts Are Displayed
Communication # The Mail icon starts an email. # The Chat icon starts a chat. NOTE Anytime you see the Dial icon next to a number, such as in your Favorites or Call log, just touch it to call that number. To call a contact’s default number 1. -
Page 85: Joining Contacts
Communication To change which groups are displayed 1. Open the Contacts application. 2. Touch the Menu Key > More > Display options. 3. Touch an account to open its list of available groups. 4. Touch each group whose contacts you want to view in your Contacts application. -
Page 86: Email
Communication 5. Touch the contact whose information you want to join with the first contact. The information from the two contacts will be merged and displayed under the name from the first contact. 6. Touch Save to confirm you want to join the entries. The contact information will be displayed in one contact entry. -
Page 87: Reading Your Messages
Communication The first time you open the Email application, a setup wizard opens to help you add an email account. After the initial setup, Email displays the contents of your Inbox. The Accounts screen The Accounts screen lists all your accounts. # Open the Email application. -
Page 88: Visual Voice Mail
Communication To mark a message as unread You can set a message to appear as though it has not been read – for example, to remind yourself to read it again later. # From the Inbox, touch and hold the desired message, then touch Mark as unread in the Context menu that opens. -
Page 89: Gmail
Communication While viewing the voicemail list, you can select an entry (see step 5). For additional options, touch the Menu Key > New, Delete, Save as, Set as Heard, Sort by, or More (Saved messages, Refresh, Settings, Search, Logout). 5. Touch a voicemail entry to listen to it. Then you can touch Call back, Save, or Delete. - Page 90 Communication No indicator indicates that this message was sent to a group that includes you. To open your Inbox when Gmail is running If you are viewing a message or another label, touch the Back Key until you return to your Inbox. # While reading a message, touch the Menu Key >...
- Page 91 Communication To read a message # Touch a conversation that contains the message you want to read. The conversation opens to the first new (unread) message, or to the first starred message, if you’ve previously starred a message in the conversation.
-
Page 92: Composing And Sending A Message
Communication 2. Touch the contact name to open that message. While reading a message you can touch the Menu Key > Mark unread to return a read message to the unread state. For example, to remind yourself to read it again later. Composing and Sending a Message You can compose and send a message to people or groups with Gmail addresses or other email addresses. - Page 93 Communication 3. Touch the Menu Key > Add Cc/Bcc to copy (normal or blind status) recipients, if necessary. 4. Enter a subject for the message in the Subject field. 5. Continue into the next field to enter your email message. 6.
-
Page 94: Working With Conversations In Batches
Communication 3. Touch Send to send your message. Working with Conversations in Batches You can archive, label, delete, or perform other actions on a batch of conversations all at once, in your Inbox or in another label. 1. From the Inbox, or a folder with another label, touch the checkbox for all of the messages you want to include in the batch. -
Page 95: Starring A Message
Communication To label a conversation 1. While reading a conversation’s messages, touch the Menu Key > Change labels. 2. In the dialog box that opens, checkmark the label(s) you want to assign to the conversation and touch OK. To label a batch of conversations at once You can assign or change the label(s) of one or more conversations at once. -
Page 96: Reporting Spam
Communication 2. Touch a label to view a list of conversations with that label. NOTE The conversation list will resemble your Inbox. Most of the options available while using your Inbox will also be available while viewing these lists of labeled messages. Reporting Spam The Gmail service is quite effective at preventing spam (junk mail) from reaching your Inbox. - Page 97 Communication To select which conversations to synchronize 1. Touch the Apps Key > Gmail 2. Touch the Menu Key > More > Settings > choose an account > Sync inboxes and labels. The Synchronization screen opens, displaying a list of your Gmail labels. Below each label is its current synchronization setting: Sync all, Sync last 4 days, or Sync none (If Sync none is selected, the labeled conversation is not synchronized).
-
Page 98: Changing Gmail Settings
Communication 3. Enter a signature or other information. 4. Touch OK. Changing Gmail Settings You can change a number of settings for Gmail. Each Google Account has its own settings, so your changes affect only the current account. Notification volumes and some synchronization settings can also be changed in the Settings application. -
Page 99: Messaging
Communication Batch operations Checkmark this setting to allow batch operations. Sync inboxes and labels Allows you to manage which conversations are synchronized and how often. Notification settings Email notifications Checkmark this setting to receive a notification whenever you receive new email. Labels to notify Allows you to set the notification preferences for synced labels. -
Page 100: Exchanging Messages
Communication Exchanging Messages You can send text messages (SMS) of up to 160 characters to another mobile phone. If you type more than the allotted text amount (up to 7 pages of 160 characters), the message is delivered as a series of messages (EMS). If you keep typing after the limit, your message is delivered as Multimedia messages (MMS). - Page 101 Communication Character counter Displays number of characters entered and amount remaining. If you touch the Back Key while composing a message, it’s saved as a draft in your Messaging application. Touch the message to resume composing it. 4. Touch Send to send the message. Your message is displayed and responses appear in the same window, creating a message thread with that contact.
- Page 102 Communication # If you touch Audio, you’re prompted to select an audio file from your microSD card. # If you touch Record audio, the voice recording function opens and allows you to record an audio message and attach it. # If you touch Slideshow, a menu opens and allows you to assemble photos, audios, videos, texts into a slideshow (up to 10 slides) to at- tach to the message.
-
Page 103: Changing Messaging Settings
Communication To respond to messages you receive If you’re working in a message window, messages that you receive from that contact are displayed. Otherwise, you receive a new message notification and a new message icon appears in the Status Bar. When you touch the new message notification, the Message screen opens where you can reply to the message. - Page 104 Communication Callback number Opens a dialog box to view or edit the callback number sent with your messages. Checkmark appears after dialog box is closed. Text message (SMS) settings Delivery reports Checkmark this setting to allow your phone to receive delivery reports for the messages you send.
- Page 105 How to select the type of keyboard you want 1. Touch and hold a text field. 2. Touch Input method. 3. Choose between LG Keyboard and Swype. You will now be able to enter text using the new keyboard. Swype Keyboard...
- Page 106 Touch Input method Choose the type of composing area keyboard you want. To change the LG keyboard layout 1. Touch and hold . Then touch Keyboard layout. 2. Select the keyboard layout between QWERTY and 3x4 keypad. Touch and hold...
-
Page 107: Using The Swype Keyboard
Communication Using the Swype Keyboard The Swype™ keyboard uses error correcting algorithms and also includes a predictive text system. Swype Text Entry Tips You can access Swype Tips and watch a tutorial on using Swype. You can also use the following Swype text entry tips. # Create a squiggle (like an S shape) to create a double letter (such as pp in apple). -
Page 108: Talk
Communication Talk To open Google Talk and sign in # Touch the Apps Key > Talk When you first open Google Talk, your Friends list will be displayed. This list includes all of the friends you’ve added by using Google Talk on the web or on the phone. -
Page 109: Chatting With Friends
Communication Chatting with Friends To chat with a friend 1. Touch the Apps Key > Talk If you’re already chatting with someone, you can touch the Menu Key > Friends list to return to the Friends list. 2. Touch the friend you want to chat with. 3. - Page 110 Communication To switch between active chats If you have more than one chat going, you can switch between chats. # From the Friends list, touch the name of the person you want to chat with. # From a chat screen, touch the Menu Key >...
-
Page 111: Changing And Monitoring Online Status
Communication Changing and Monitoring Online Status Google Talk allows you to change how you appear to others; you can change your online status and status messages, as well as the picture that appears next to your name on your friends’ list. To change your online status 1. - Page 112 Communication To change your picture 1. Touch your email address the top of your Friends list. 2. Touch your picture at the top left of the screen. 3. Touch Change to change your picture. (Or, touch Remove to simply remove it.) 4.
- Page 113 Communication To view a list of pending invitations to friends # From the Friends list, touch the Menu Key > More > Invites. All the friends to whom you’ve extended invitations to become friends on Google Talk appear in the list until they accept or cancel your invitation. To view all friends or only those most popular with you By default, only the friends that you frequently chat with (the most popular) are shown in the Friends list.
-
Page 114: Changing Google Talk Settings
Communication Changing Google Talk Settings You can configure Google Talk to send you a notification with the contents of each message that you receive in a chat, and also to sound a ringtone or vibrate the phone. You can also configure Google Talk to sign you in automatically when you turn on your phone, and you can set whether the mobile indicator is displayed next to your name in other people’s Friends lists. -
Page 115: The Phone Application
Communication To set Google Talk to change your status 1. From the Friends list, touch the Menu Key > Settings. 2. Checkmark or uncheckmark Automatic away status. When Automatic away status is checkmarked, your status will automatically be changed to Away when the screen is turned off. The Phone application The phone features of your device include many ways to make calls. -
Page 116: Voice Dialer
Communication Groups This tab displays your contacts by group for each account type you have set up, starting with Favorites, followed by a list of recent frequent contact. From here you can call or contact any of the entries based on the saved information or manage your list. -
Page 117: Camera
Entertainment Camera To open the Camera application, touch the Apps Key > Camera Getting to know the viewfinder Brightness – Defines and controls of the amount of light entering the lens. Slide the brightness indicator along the bar, toward “-” for a lower brightness image, or toward “+” for a higher brightness image. - Page 118 Entertainment Auto review: On or Off. ● Tag location: Off or On. ● You can close all the setting icons to give a clearer viewfinder screen. Just touch the center of the viewfinder once. To recall the options, touch the screen again. Using the focus mode You can select from the following focus options: Auto Sets the camera to focus automatically.
- Page 119 Entertainment Touch to view the Gallery of your saved photos. Viewing your saved photos 1. You can access your saved photos from Camera mode. Just touch the Gallery thumbnail at the bottom right corner of the screen, then touch a photo to display it.
-
Page 120: Video Camera
Entertainment Video Camera To open the Video Camera application, touch the Apps Key > Camera . Slide the Camera mode icon down for Video mode. Getting to know the viewfinder Brightness – Defines and controls of the amount of light entering the lens. Slide the brightness indicator along the bar, toward “-”... - Page 121 Entertainment 3. The Video camera’s viewfinder will appear on the screen. 4. Hold the phone horizontally and point the lens toward the subject of the video. 5. Touch the Capture button once to start recording. 6. The record dot at the bottom of the viewfinder turns red and the video length timer begins counting.
-
Page 122: Gallery
Entertainment Your Photos and Videos Adjusting the volume when viewing a video To adjust the volume of a video while it is playing, use the Volume Keys on the left side of the phone. Setting a photo as wallpaper 1. Touch the photo you want to set as wallpaper to open it. 2. -
Page 123: Working With Albums
Entertainment # Touch an album to open it and view its contents. The pictures and videos in the album are displayed in random order (except from Camera). # Touch a picture or video in an album to view it. # Return to the main Gallery screen at any time by touching at the top left of the screen. - Page 124 Entertainment To change how the contents of an album are displayed You can view the images and videos in your albums in a unchronological grid (except from Camera) or in stacks, sorted by the date and the location where they were taken. You can switch album views with the Album View switch at the top right of the screen.
- Page 125 Entertainment You can switch to calendar view from the Main Gallery view by switching the Calendar button to the left To Work with Batches of Pictures or Videos In addition to working with whole albums and with individual pictures, you can select one or more pictures or videos in an album to work on them in batches.
-
Page 126: Working With Pictures
Entertainment dialog box. To delete an album You can delete an album and its contents from your microSD card. 1. Touch the Apps Key > Gallery 2. Touch the Menu Key 3. Checkmark or uncheckmark the album(s) you want to delete. 4. - Page 127 Entertainment # When the picture is zoomed to fit in the window, drag left or right to view the next or previous picture in the album. To watch a slideshow of your pictures # While viewing a picture, touch the screen to view the control buttons then touch Slideshow.
- Page 128 Entertainment To crop a picture You can crop and save pictures that are stored on your microSD card. 1. Touch the picture you want to crop then touch Menu. 2. Touch More. A dialog box opens with tools for working with the picture. 3.
-
Page 129: Working With Videos
Entertainment To share a picture You can share a picture by sending it to friends or posting it in a Picasa web album. 1. Touch the picture you want to share then touch Menu. 2. Touch Share. 3. In the dialog box that opens, touch the application to use to share the selected picture. - Page 130 Entertainment To share a video You can share your videos in a variety of ways, including sending it by email or multimedia message (MMS), or via Smart Share or a Bluetooth device. You even have the option to share your videos publicly by uploading it to the YouTube website.
-
Page 131: Smart Movie Hd
Entertainment Smart Movie HD You can make your own movie using your images/video and music. 1. Touch the Apps Key > Smart Movie HD 2. Select the desired options to create a movie. Add Contents Allows you to add images and/or video to your movie. Delete Contents Allows you to remove the selected images and videos. -
Page 132: Market
Entertainment Market Opening Android Market and Finding Applications Open the Android Market application to browse and search for free and paid applications. To open the Android Market application # Touch the Apps Key > Market or touch the Market icon from the Home screen. - Page 133 Entertainment To browse for applications You can browse applications by category and sort them in different ways. 1. On the Android Market homepage, touch a top-level category. These are displayed as tab buttons near the top of the screen and include Apps, Games, Books, and Movies.
-
Page 134: Downloading And Installing Applications
Entertainment To open a screen with details about an application # At any time while browsing through Android Market, touch an application to open its details screen. The Application details screens include a description, ratings, comments, and related information about the application. From this screen, you can download, install, uninstall, rate the application, and more. - Page 135 Entertainment 2. Touch Download or Install (for free applications) or the Price button (for paid applications). WARNING! Read this screen carefully. Be especially cautious with applications that have access to many functions or to a significant amount of your data. Once you touch OK on this screen, you are responsible for the results of using this item on your phone.
- Page 136 Entertainment If you have another Android phone, you can download a paid application to that phone using the same Android Market account, at no additional charge. To create a Google Checkout account You must have a Google Checkout account associated with your Google Account to purchase items from Android Market.
-
Page 137: Music
Copy audio files from your computer onto the microSD card before you open the Music application. NOTE The LG USB driver needs to be installed on your PC before connecting your phone to transfer music. To copy music files onto the phone’s microSD card 1. - Page 138 Entertainment Opening Music and Working with Your Library After you’ve copied some music onto your microSD card you can open the Music application and view your library of music files, sorted in one of four ways. To open Music and view your music library # Touch the Apps Key >...
-
Page 139: Playing Music
Entertainment To delete a song from the microSD card You can delete music from the storage card. # Touch and hold a song in a Library list. In the Context menu that opens, touch Delete. # On the Playback screen, touch the Menu Key >... - Page 140 Entertainment You can return to the Playback screen from most other screens in the Music application by touching the currently playing song at the bottom of the screen. You can return to the Playback screen from any other application by opening the Notifications panel and touching the ongoing music notification.
- Page 141 Entertainment To control playback volume In addition to the techniques for setting media volume, you can control the volume of music in the Music application. # Press the phone’s up/down Volume Keys. A panel opens to show the current media volume. Some headsets include their own volume controls or ways to pause and resume playback or to skip tracks.
-
Page 142: Working With Playlists
Entertainment Landscape view When holding the phone in landscape orientation, the Music application screen changes to fit the screen as shown below: Flick left or right to view music Volume control Play Album lists To use a song as a ringtone You can use a song as your phone ringtone in place of one of the ringtones that come with the phone. - Page 143 Entertainment You can also add the song that is playing in the Playback screen as the first song in a playlist by touching the Menu Key > Add to playlist or touching Save as playlist to save all the songs in the current playlist as a playlist.
-
Page 144: Smartshare
Entertainment SmartShare SmartShare uses DLNA (Digital Living Network Alliance) technology to share digital content through a wireless network. Both devices must be DLNA certified to support this feature. To turn SmartShare on and allow sharing contents 1. Touch the Apps Key >... - Page 145 Entertainment To share contents from your phone to your renderer device (e.g., TV) NOTE Make sure that your renderer device is properly configured. 1. While browsing your pictures or videos using the Gallery application, touch and hold to select files. Then you will be able to select multiple files to be shared.
-
Page 146: Video Player
Entertainment Video player You can play a wide variety of videos using the Video player. The video player supports the following file formats: 3gp/3g2, mp4/m4v, avi, wmv, mov, mkv, flv, asf, divx (Codec: MPEG4, H.263, Sorenson H.263, H.264, VC-1, DivX/XviD). phone. -
Page 147: Youtube Tm
Entertainment YouTube Opening YouTube and Watching Videos You can browse, search for, view, upload, and rank YouTube videos on your phone with the YouTube application. To open the YouTube application # Touch the Apps Key > YouTube Touch a video to watch it or the Menu Key to take other actions on the video. - Page 148 Entertainment To watch and interact with YouTube videos # Touch a video to play it. # Touch the screen to view the Playback controls. You can pause and play the video or drag the slider to the point in the video you want to watch.
- Page 149 Entertainment To share your videos on YouTube You can record and share a video using the YouTube application. First, you must create a YouTube account and sign into it on your phone. You can also share the videos you record with the Camera application by uploading them to YouTube.
-
Page 150: Voice Recorder
Entertainment Voice Recorder The Voice Recorder application records audible files for you to use in a variety of ways. Use them simply to remind you about something you don’t want to forget (like a grocery list) or record sound effects that you can attach to a message or set as a ringtone for calls. -
Page 151: Calendar
Tools Calendar Viewing Your Calendar and Events Open the Calendar application to view events you’ve created or that others have invited you to. When you first set up your phone, you configured it to use an existing Google Account or you created a new account. The first time you open the Calendar application on your phone, it displays any existing calendar events from your Google Account on the web. -
Page 152: Working In Agenda View
Tools # To view the events of a day in Month view, touch a day. The event will be displayed below the calendar. Touch the event to view its details. Working in Agenda View Agenda view is a list of your events in chronological order. All-day and multi-day events are listed at the start of each day. -
Page 153: Working In Day View
Tools Working in Day View Day view displays a chart of the events of one day, in a table of one-hour rows. The current time will be highlighted. All-day and multi-day events are displayed at the top. Part of the title of each event is displayed in the row that corresponds to when it occurs. -
Page 154: Working In Week View
Tools Working in Week View Week view displays a chart of the events of one week. All-day and multi-day events are displayed at the top. To switch to Week view # Touch the Week tab above the calendar. To learn more about events in Week view # Touch an event to view its details. -
Page 155: Viewing Event Details
Tools Working in Month View Month view displays a chart of the events of the month. Segments of each day with scheduled events are green in the day’s vertical bar. To switch to Month view # Touch the Month tab above the calendar. To view more information about events in Month view # Touch a day to display the events below the calendar. -
Page 156: Creating An Event
Tools Touch the Reminders field to change reminder settings, or touch to add another reminder. If you have permission to change events, you can touch Edit to edit the event, touch Delete to delete the event, or touch Share to share it. Creating an Event You can use the Calendar application on your phone to create events that appear on your phone and in Google Calendar on the web. -
Page 157: Editing Or Deleting An Event
Tools people to whom you send invitations use Google Calendar, they’ll receive an invitation in Calendar and by email. 4. Touch the Menu Key > Show extra options to add details about the event. 5. Touch Save to save the event. The event is added to your calendar. -
Page 158: Setting An Event Reminder
Tools To delete an event There are a number of ways to delete an event. # In Agenda view, touch an event to view its details. Touch Delete > OK. # In Day, Week, or Month view, touch and hold the event > Delete event >... -
Page 159: Calculator
Tools Calculator Allows you to perform simple mathematical calculations. To open and use the Calculator # Touch the Apps Key > Calculator # Enter numbers and arithmetic operators on the Basic panel. # Drag the Basic panel to the left to open the Advanced panel. # Touch and hold the Calculator’s display to open a Context menu where you can copy what you’ve entered and access other tools. -
Page 160: Alarm/Clock
Tools Alarm/Clock You use the Alarm/Clock application to access the Alarm, Timer, World Clock and Stopwatch functions. To open the Clock application # Touch the Apps Key > Alarm/Clock Setting Alarms You can set an alarm by modifying an existing alarm or by adding a new one. To set an alarm 1. -
Page 161: Setting The Timer
Tools 7. Touch Puzzle lock to checkmark the setting, which requires you to wake up enough to solve a simple puzzle to dismiss the alarm. 8. Touch Memo to enter a name for the alarm. 9. When you’re finished, touch Save. Setting the Timer The Timer application can be used to alert you with an audible signal when a set amount of time has passed. -
Page 162: Polaris Office
Tools Polaris Office Polaris Office 3.0 is a professional Mobile Office Solution which enables users to conveniently view or edit various types of office documents including Word, Excel, and PowerPoint file extensions anywhere, anytime, using their mobile device. To access this application, touch the Apps Key , then touch Polaris Office Managing Files... -
Page 163: Settings
Settings Settings The Settings application contains most of the tools for customizing and configuring your phone. All of the settings in the Settings application are described in this section. For settings specific to the Browser application, see the Browser section. To open the Settings application # From the Home screen, touch the Menu Key >... - Page 164 Settings # Wi-Fi networks Add Wi-Fi network Allows you to add a Wi-Fi network by entering its Network SSID (the name it broadcasts) and security type. Wi-Fi Direct settings # Wi-Fi Direct settings Wi-Fi Direct Turns Wi-Fi Direct on and off. Device Name Allows you to edit the name of your device.
- Page 165 Settings Tethering Allows you to configure your phone’s mobile data connection to share it via USB. VPN settings # VPN settings Add VPN Allows you to add different types of Virtual Private Networks (VPNs). # VPNs Displays the list of VPNs that you’ve previously configured. Mobile networks # Mobile networks settings System select Change the CDMA network and roaming mode.
- Page 166 Settings Call settings Use Call settings to configure phone call settings. Voicemail Voicemail service Allows you to select your carrier’s voicemail service or another service, such as Google Voice Voicemail settings If you are using your carrier’s voicemail service, this option allows you to enter the phone number to use for listening to and managing your voicemail.
- Page 167 Settings Sound Use the Sound settings to configure how and at what volume the phone rings and vibrates when the phone rings, you receive a notification, an alarm sounds, or when you play music or other media with audio, as well as other related settings.
- Page 168 Settings Screen lock sounds Checkmark to play a sound when the screen is locked or unlocked. Haptic feedback Checkmark to have the phone vibrate briefly when you touch on-screen buttons and perform other actions. Emergency tone Opens a dialog box where you can configure how the phone reacts when you place an emergency call.
- Page 169 Settings Gesture Text input field Move cursor Tap on any side of the device to move the cursor while typing. Home screen Relocation item Press and hold an item and tilt the device to move to other home screens. Incoming call Mute Flip the device to mute the incoming call.
- Page 170 Settings Standalone GPS Services Checkmark to enable your phone’s standalone global positioning system (GPS) satellite receiver to pinpoint your location to within an accuracy as close as several meters (“street level”). Actual GPS accuracy depends on a clear view of the sky and other factors. Google Location Services Checkmark to use information from Wi-Fi and mobile networks to determine your approximate location, used while searching in Google Maps and other applications.
- Page 171 Settings Install from SD card Touch to install a secure certificate from a microSD card. Set password Opens a dialog box where you can set or change the password for your secure credential storage. Your password must have at least 8 characters. Clear storage Deletes all secure certificates and related credentials and erases the secure storage’s own password, after prompting you to confirm that you want to do this.
- Page 172 Settings # Development screen The Development screen contains settings that are useful for developing Android applications. For full information, including documentation of the Android APIs and development tools, see the Android developer website (http://developer.android.com). USB debugging Checkmark to permit debugging tools on a computer to communicate with your phone via a USB connection.
- Page 173 Settings Manage accounts List of all Google Accounts and other accounts you’ve added to the phone. If you touch an account in this screen, its account screen opens. Storage Use the Storage settings to monitor the used and available space on your phone and on your microSD card, to manage your microSD card, and if necessary, to reset the phone, erasing all of your personal information.
- Page 174 Settings Language & keyboard Use the Language & keyboard settings to select the language for the text on your phone and for configuring the on-screen keyboard, including words that you’ve added to its dictionary. Select language Opens a dialog box to choose a language to use on your phone.
- Page 175 Tutorial Opens a dialog box to view on-screen tutorial help. Version Displays the Swype software version. LG Keyboard The LG Keyboard settings apply to the on-screen keyboard. The correction and capitalization features affect only the English version of the keyboard.
- Page 176 Vibrate feedback Checkmark to enable vibration when keys are touched. LG Keyboard User dictionary Allows you to view and edit your user dictionary. User dictionary Allows you to view, add, and remove words from your user dictionary.
- Page 177 Settings Voice output # Text-to-speech settings You use the Text-to-speech settings to configure the Android text-to- speech synthesizer for applications that can take advantage of it, such as TalkBack. If you don’t have speech synthesizer data installed, only the Install voice data setting is available. Listen to an example Plays a brief sample of the speech synthesizer, using your current settings.
- Page 178 Settings Connectivity # USB connection mode Default connection mode Opens a dialog box to choose the default connection mode when connecting your phone to a PC via USB. Choose from Charge only, Mass storage, or Internet connection. Always ask Checkmark to have the phone ask you to choose which USB connection mode it should connect with to a PC.
- Page 179 Settings About phone About phone includes information about your phone. Software update Allows you to check for Android system software updates. Network Displays current network information including your network carrier, network type and strength, service state, roaming status, mobile network state, and IMS registration status. Phone identity Displays the phone’s identity information including model number, phone number, PRL version, ERI version, IMEI, ICC ID, lifetime call counter, and warranty date code.
-
Page 180: Safety
Safety TIA Safety Information The following is the complete TIA Safety Information for wireless handheld phones. Exposure to Radio Frequency Signal Your wireless handheld portable phone is a low power radio transmitter and receiver. When ON, it receives and sends out Radio Frequency (RF) signals. In August, 1996, the Federal Communications Commissions (FCC) adopted RF exposure guidelines with safety levels for handheld wireless phones. - Page 181 Safety Phone Operation NORMAL POSITION: Hold the phone as you would any other telephone with the antenna pointed up and over your shoulder. Tips on Efficient Operation For your phone to operate most efficiently: Don’t touch the antenna unnecessarily when the phone is in use. Contact with the antenna affects call quality and may cause the phone to operate at a higher power level than otherwise needed.
- Page 182 Safety Persons with pacemakers: Should ALWAYS keep the phone more than six (6) inches from their ● pacemaker when the phone is turned ON; Should not carry the phone in a breast pocket; ● Should use the ear opposite the pacemaker to minimize the potential for ●...
- Page 183 Safety Aircraft FCC regulations prohibit using your phone while in the air. Switch OFF your phone before boarding an aircraft. Blasting Areas To avoid interfering with blasting operations, turn your phone OFF when in a “blasting area” or in areas posted: “Turn off two-way radio”. Obey all signs and instructions.
-
Page 184: Safety Information
Safety Safety Information Please read and observe the following information for safe and proper use of your phone and to prevent damage. Also, keep the user guide in an accessible place at all times after reading it. Violation of the instructions may cause minor or serious damage to the product. - Page 185 ● carrier for recycling. The battery doesn’t need to be empty before recharging. ● Use only LG-approved chargers specific to your phone model since they ● are designed to maximize battery life. Do not disassemble or short-circuit the battery. ●...
- Page 186 Do not use the phone if the antenna is damaged. If a damaged ● antenna contacts skin, it may cause a slight burn. Please contact an LG Authorized Service Center to replace the damaged antenna. Do not immerse your phone in water. If this happens, turn it off...
-
Page 187: Caution: Avoid Potential Hearing Loss
Safety immediately and remove the battery. If the phone does not work, take it to an LG Authorized Service Center. Do not paint your phone. ● The data saved in your phone might be deleted due to careless use, ●... - Page 188 Safety Set the volume in a quiet environment and select the lowest volume at ● which you can hear adequately. When using headphones, turn the volume down if you cannot hear the ● people speaking near you or if the person sitting next to you can hear what you are listening to.
- Page 189 Safety American Academy of Audiology 11730 Plaza American Drive, Suite 300 Reston, VA 20190 Voice: (800) 222-2336 Email: info@audiology.org Internet: www.audiology.org National Institute on Deafness and Other Communication Disorders National Institutes of Health 31 Center Drive, MSC 2320 Bethesda, MD USA 20892-2320 Voice: (301) 496-7243 Email: nidcdinfo@nih.gov Internet: http://www.nidcd.nih.gov/health/hearing...
-
Page 190: Fda Consumer Update
Safety FDA Consumer Update The U.S. Food and Drug Administration’s Center for Devices and Radiological Health Consumer Update on Mobile Phones: 1. Do wireless phones pose a health hazard? The available scientific evidence does not show that any health problems are associated with using wireless phones. - Page 191 Safety Design wireless phones in a way that minimizes any RF exposure to the ● user that is not necessary for device function; and Cooperate in providing users of wireless phones with the best possible ● information on possible effects of wireless phone use on human health. The FDA belongs to an interagency working group of the federal agencies that have responsibility for different aspects of RF safety to ensure coordinated efforts at the federal level.
- Page 192 Safety These RF exposures are limited by FCC safety guidelines that were developed with the advice of the FDA and other federal health and safety agencies. When the phone is located at greater distances from the user, the exposure to RF is drastically lower because a person’s RF exposure decreases rapidly with increasing distance from the source.
- Page 193 Safety A combination of laboratory studies and epidemiological studies of people actually using wireless phones would provide some of the data that are needed. Lifetime animal exposure studies could be completed in a few years. However, very large numbers of animals would be needed to provide reliable proof of a cancer promoting effect, if one exists.
- Page 194 Safety will also include a broad assessment of additional research needs in the context of the latest research developments around the world. 7. How can I find out how much Radio Frequency energy exposure I can get by using my wireless phone? All phones sold in the United States must comply with Federal Communications Commission (FCC) guidelines that limit Radio Frequency (RF) energy exposures.
- Page 195 Safety phone. SAR is the measurement of the amount of energy absorbed in tissue, either by the whole body or a small part of the body. It is measured in watts/kg (or milliwatts/g) of matter. This measurement is used to determine whether a wireless phone complies with safety guidelines.
- Page 196 Safety precautionary; it was not based on scientific evidence that any health hazard exists. 11. What about wireless phone interference with medical equipment? Radio Frequency (RF) energy from wireless phones can interact with some electronic devices. For this reason, the FDA helped develop a detailed test method to measure Electro Magnetic Interference (EMI) of implanted cardiac pacemakers and defibrillators from wireless telephones.
-
Page 197: 10 Driver Safety Tips
Safety International Commission on Nonlonizing Radiation Protection (http://www. icnirp.de) World Health Organization (WHO) International EMF Project (http://www. who.int/emf) Health Protection Agency (http://www.hpa.org.uk/) 10 Driver Safety Tips Your wireless phone gives you the powerful ability to communicate by voice almost anywhere, anytime. An important responsibility accompanies the benefits of wireless phones, one that every user must uphold. - Page 198 Safety reading an address book or business card, or writing a “to-do” list while driving a car, you are not watching where you are going. It is common sense. Do not get caught in a dangerous situation because you are reading or writing and not paying attention to the road or nearby vehicles.
-
Page 199: Consumer Information On Sar
Safety The above tips are meant as general guidelines. Before deciding to use your mobile device while operating a vehicle, it is recommended that you consult your applicable jurisdiction’s local laws or other regulations regarding such use. Such laws or other regulations may prohibit or otherwise restrict the manner in which a driver may use his or her phone while operating a vehicle. - Page 200 Safety antenna, the lower the power output. Before a phone model is available for sale to the public, it must be tested and certified to the FCC that it does not exceed the limit established by the government adopted requirement for safe exposure. The tests are performed in positions and locations (e.g., at the ear and worn on the body) as required by the FCC for each model.
-
Page 201: Fcc Hearing-Aid Compatibility (Hac) Regulations For Wireless Devices
Safety FCC Hearing-Aid Compatibility (HAC) Regulations for Wireless Devices On July 10, 2003, the U.S. Federal Communications Commission (FCC) Report and Order in WT Docket 01-309 modified the exception of wireless phones under the Hearing Aid Compatibility Act of 1988 (HAC Act) to require digital wireless phones be compatible with hearing-aids. - Page 202 Safety In the example to the left, if a hearing aid meets the M2 level rating and the wireless phone meets the M3 level rating, the sum of the two values equal M5. This should provide the hearing aid user with “normal usage” while using their hearing aid with the particular wireless phone.
-
Page 203: Specifications
Specifications DivX Mobile ® ABOUT DIVX VIDEO: DivX is a digital video format created by DivX, LLC, a ® subsidiary of Rovi Corporation. This is an official DivX Certified device that plays DivX video. Visit divx.com for more information and software tools to convert your files into DivX videos. -
Page 204: Faq
Please check to see if any problems you have encountered with your phone are described in this section before taking the phone in for service or calling a service representative. Category Sub-Category Question Answer Connecting to Stereo/Mono Headset, Bluetooth What are the functions Car Kit, FTP server is possible. - Page 205 Category Sub-Category Question Answer What happens when Phone I execute another Your email will automatically be saved as Email Function application while writing a draft. an email? Is there a file size limitation Phone Ringtone for when I want to use an There is no file size limitation.
- Page 206 Category Sub-Category Question Answer You are able to set the phone to require Phone What are the phone’s the entry of an unlock sequence (pattern, Security Function security functions? PIN, or password) before the phone can be accessed or used. After attempting the Unlock Pattern 5 times, Phone Unlock...
- Page 207 Category Sub-Category Question Answer 1. From the Home screen, touch the Menu 2. Touch Settings > Security. 3. Touch Set up screen lock (under the Phone Unlock How do I create the Screen unlock section of the settings). Function Pattern Unlock Pattern? 4.
- Page 208 Category Sub-Category Question Answer Which languages are The Market application supports English and Phone Language supported when using Spanish. Third party applications may not Function Support Android Market? support all languages. VPN access configuration is different according to each company. To configure Phone How do I set up a VPN? VPN access from your phone, you must...
- Page 209 Category Sub-Category Question Answer A microSD card must be inserted in order to My phone’s camera does use the phone’s camera. not take pictures and says Phone Verify that the microSD card is mounted on Camera “No SD Card or SD card is Function the device.
- Page 210 Category Sub-Category Question Answer 1. From the Home screen, touch the Menu 2. Touch Settings > Privacy > Factory data reset. NOTE Touch the checkbox to also erase all contents from your microSD card when the phone is reset. Recovery How do I perform a factory 3.
-
Page 211: Contacts
This is a step-by-step guide for frequently asked questions. If you run into a problem or are having trouble with a feature, take a look at this section before you contact the Customer Information Center. Thank you. Contacts How can I add contacts if I don’t have a microSD card inserted or a Google Account? 1. - Page 212 I have a Google Account and have a Contacts List for my Gmail account. How can I sync the list with my phone? 1. From the Home screen, touch the Contacts Key in the Quick Keys bar. 2. Touch the Menu Key >...
- Page 213 How can I separate the grouped contacts? 1. From the Home screen, touch the Contacts Key in the Quick Keys bar. 2. Locate the contact then touch and hold the contact. The Context menu will open. 3. Touch Edit contact. If multiple contacts are joined under the same name, you can see each contact entry that was joined, listed separately within the Edit screen.
-
Page 214: Email Information
Email Information Why am I unable to access Email on my phone? You may need to manually set up your account as a POP3 or IMAP4 account. Why can’t I open email attachments? To view some file types, you must first download the applications (from the Android Market) that can access those file types. - Page 215 Why do I get a Connection Error message with my Hotmail account? When the Email application is set to check for new email less than every 15 minutes, this has been known to occur. Supported Email Features The chart below details which Email account types (EAS, IMAP4, and POP3) support which features.
-
Page 216: Limited Warranty Statement
(6) The customer shall bear the cost of shipping the product to the Customer Service Department of LG. LG shall bear the cost of shipping the product back to the consumer after the completion of service under this limited warranty. - Page 217 LG may choose at its option to use functionally equivalent re-conditioned, refurbished or new units or parts or any units. In addition, LG will not re-install or back-up any data, applications or software that you have added to your phone. It is therefore recommended that you back-up any such data or information prior to sending the unit to LG to avoid the permanent loss of such information.
- Page 218 LG Electronics Service- Mobile Handsets, P.O. Box 240007, Huntsville, AL 35824 DO NOT RETURN YOUR PRODUCT TO THE ABOVE ADDRESS. Please call or write for the location of the LG authorized service center nearest you and for the procedures for obtaining warranty claims.
-
Page 219: Index
Index Calling Your Contacts 58 Customizing the Home Screen 41 Call log 113 10 Driver Safety Tips 195 Camera 115 Changing and Monitoring Device memory 53 Online Status 109 Adding a Contact to Your Favorites 78 Changing Browser settings Adding application icons to Editing Contact Details 79 the Home screen 35 Changing Gmail Settings 96... - Page 220 Index Important Customer Network icons 27 Reading Your Messages 85, Information 1 Importing 76 Rear View 16 Open an Application using Installing the Battery and Replying to or Forwarding a Voice Dialer 114 microSD Card 18 Message 91 Open and Switch 32 Internet 63 Reporting Spam 94 Opening and Closing the...
- Page 221 Index Starring a Message 93 change the settings 48 Synchronizing Your Using the Stopwatch 159 Your Photos and Videos 120 Messages 94 Using the Swype Keyboard YouTube System icons 27 Table of Contents 7 Video Camera 118 Talk 106 Video player 144 Technical Details 10 Viewing Conversations by Label 93...
Need help?
Do you have a question about the Spectrum and is the answer not in the manual?
Questions and answers