Aiwa AM-HX30 Operating Instructions Manual
Minidisc player
Hide thumbs
Also See for AM-HX30:
- Operating instructions manual (40 pages) ,
- Service manual (7 pages) ,
- Service manual (7 pages)

Related Manuals for Aiwa AM-HX30


Summary of Contents for Aiwa AM-HX30
- Page 1 MINIDISC PLAYER AM-HX30 OPERATING INSTRUCTIONS BEDIENUNGSANLEITUNG MODE D’EMPLOI WARNING TO REDUCE THE RISK OF FIRE OR ELECTRIC SHOCK, DO NOT EXPOSE THIS APPLIANCE TO RAIN OR MOISTURE.
- Page 2 English CAUTION Use of controls or adjustments or performance of procedures other than those specified herein may result in hazardous radiation exposure. This minidisc player is classified as a CLASS 1 LASER product. The CLASS 1 LASER PRODUCT label is located on the exterior. CAUTION! Invisible laser radiation when open and interlocks defeated.
-
Page 3: Table Of Contents
TABLE OF CONTENTS English PRECAUTIONS ........4 USING ON THE RECHARGEABLE BATTERY ......... 10 USING ON AC HOUSE CURRENT ..12 USING ON DRY CELL BATTERY ..14 PREPARATIONS ........ 16 PLAYBACK Basic operation ........18 Other playback modes ......20 Programmed play ........ -
Page 4: Precautions
English PRECAUTIONS For safety • Do not attempt to disassemble the unit. Laser rays from the optical pickup are dangerous to the eyes. • Make sure that pins or other foreign objects do not get inside the unit. • Take care not to drop the unit or subject it to strong shocks. - Page 5 English PRECAUTIONS Note on condensation If the unit is suddenly moved from a cold place to a warm one, it may result in condensation on the pickup lens causing malfunction or playback difficulties. Should this occur, leave the unit for a few hours, then try playback again.
-
Page 6: Using On The Rechargeable Battery
USING ON THE English RECHARGEABLE BATTERY When using the rechargeable battery for the first time, charge it for about 8 hours. 1 Insert the rechargeable battery into the battery charger. 2 Recharge the battery. Plug the battery charger into a wall outlet. Recharging fully used battery takes about 8 hours. -
Page 7: Using On Ac House Current
• The supplied rechargeable battery can be recharged approximately 300 times. USING ON AC HOUSE CURRENT Contact your Aiwa dealer and purchase an AC adaptor. Connect the plug of AC adaptor to the DC 1.5 V jack on the battery case and connect... -
Page 8: Using On Dry Cell Battery
USING ON DRY CELL English BATTERY 1 Attach the battery case. 2 Insert an LR6 (size AA) alkaline battery with the 4 and 5 marks correctly aligned. Battery replacement The battery indicator changes from based on the remaining power of the battery. Replace the battery when the lights. -
Page 9: Preparations
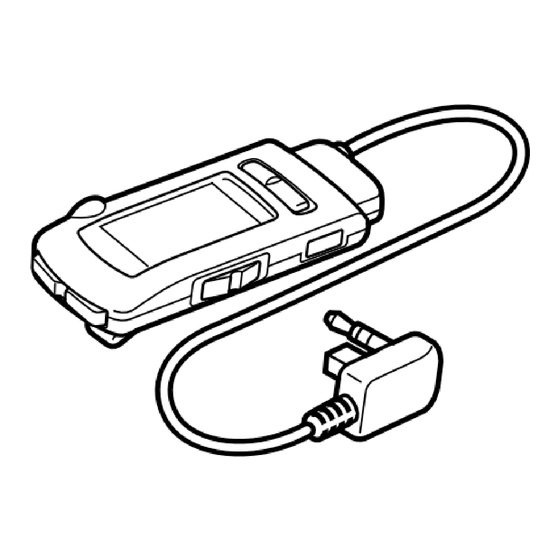
PREPARATIONS English Connecting the headphones → A Connect the supplied headphones to the remote control and connect the remote control to the ! REMOTE jack of the main unit. • To turn on the backlight of the display on the remote control, press DISP/SEARCH. HOLD switches →... -
Page 10: Playback Basic Operation
PLAYBACK English Basic operation 1 Insert a disc with the label side a up and in the direction of the arrow b. 2 Press `. 3 Adjust the volume. To stop playback, press a. When playing the disc the next time, playback will start from that point. -
Page 11: Other Playback Modes
English PLAYBACK Other playback modes This unit has 4 play modes other than normal play. Press MODE repeatedly during playback to select the desired play mode. MODE Each time the button is pressed, the play mode changes in the following order. a All-repeat play All tracks are played repeatedly. -
Page 12: Programmed Play
English PLAYBACK Programmed play • You can memorize up to 25 tracks in a desired order. Operate during playback or in playback pause mode. 1 Press MODE repeatedly until “PRGM” is displayed. 2 Press g or h to select a track. 3 Press DSL/ENTER to program the track. -
Page 13: To Change The Display
English PLAYBACK To change the display Press DISP/SEARCH repeatedly during playback. Each time the button is pressed, the display changes in the following order. a Title of current track DISP/ b Remaining time of current track SEARCH c Disc name d Elapsed time of the current track Note •... -
Page 14: Title Search Function
English PLAYBACK Title search function • You can search for a desired track confirming the title during playback. Operate during playback. 1 Keep DISP/SEARCH pressed for 3 seconds. 2 While the track number flashes, press g or h repeatedly until the desired track title is displayed. -
Page 15: Other Settings
OTHER SETTINGS English To cancel the beep sound (Signal sound function) → A Beep sounds are heard when you press an operation button. You can cancel this beep sound. Operate in stop mode. 1 Keep DISP/SEARCH pressed for about 5 seconds. “BEEP ON”... -
Page 16: To Adjust The Contrast Of The Display
English OTHER SETTINGS To adjust the contrast of the display → C You can set the contrast of the display from 0 to 15. Operate in stop mode. 1 Keep DISP/SEARCH pressed for 5 seconds. “BEEP ON” is displayed. 2 Press MODE twice. “CONTRAST”... -
Page 17: Md Guide Messages
MD GUIDE MESSAGES English BLANK DISC • Nothing is recorded on the disc. DISC ERROR • The disc is damaged by scratches. • The TOC (Table of contents) data is not registered correctly. EAR GUARD ! • You cannot increase the volume anymore by the EAR GUARD function. -
Page 18: Troubleshooting Guide
TROUBLESHOOTING English GUIDE If the unit sails to perform as described in these Operating Instructions, check the following guide. Power does not turn on. • Insert the batteries correctly. • Recharge the rechargeable battery or replace the dry cell battery. Operation does not start. -
Page 19: Specifications
SPECIFICATIONS English Main unit Dimensions Approx. 86.8 (W) × 16.3 (H) × Playback system 77.6 (D) mm MiniDisc digital audio system × × 3 in.) Laser pickup Weight Approx. 132 g, 6.5 oz Semiconductor laser including the rechargeable Sampling Frequency battery 44.1 kHz Number of channels... - Page 20 8Z-HM4-907-01 981210AYO-O-U0...
Need help?
Do you have a question about the AM-HX30 and is the answer not in the manual?
Questions and answers