Table of Contents
Advertisement
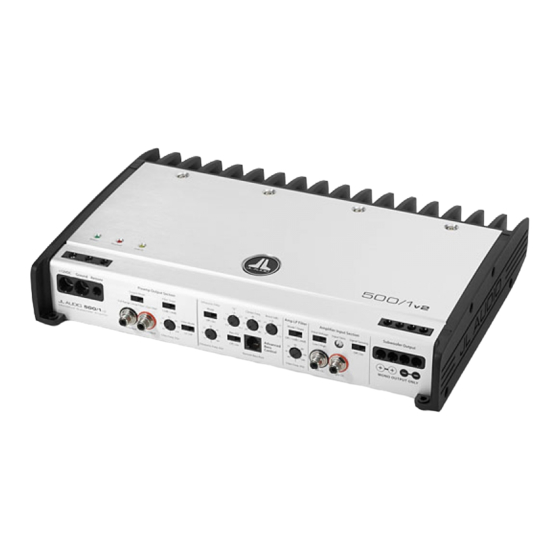
owner's manual
monoblock subwoofer amplifier
Thank you for purchasing a JL Audio amplifier for
your automotive sound system.
Your amplifier has been designed and manufactured to exacting
standards in order to ensure years of musical enjoyment in your vehicle.
For maximum performance and extended warranty
coverage, we highly recommend that you have your new amplifier
installed by an authorized JL Audio dealer. Your authorized
dealer has the training, expertise and installation equipment to ensure
optimum performance from this product. Should you
decide to install the amplifier yourself, please take the time
to read this manual thoroughly so as to familiarize yourself
with its installation requirements and setup procedures.
If you have any questions regarding the instructions in this
manual or any aspect of your amplifier's operation, please contact your
authorized JL Audio dealer for assistance. If you need further assistance,
please call the JL Audio Technical Support Department
at (954) 443-1100 during business hours.
Advertisement
Table of Contents

Related Manuals for JL Audio 500/1 v2


Summary of Contents for JL Audio 500/1 v2
- Page 1 If you have any questions regarding the instructions in this manual or any aspect of your amplifier’s operation, please contact your authorized JL Audio dealer for assistance. If you need further assistance, please call the JL Audio Technical Support Department...
- Page 2 The serial number can be found on the bottom panel of the amplifier and on the amplifier packaging. Serial Number: 2 | JL Audio - 500/1 Owner’s Manual Cooling efficiency Considerations: If mounting the amplifier under a seat, Your JL Audio amplifier employs an make sure there is at least 1 inch (2.5 cm) of...
- Page 3 2 AWG is smaller, then 4 AWG, then equipment being run from that power wire. 8 AWG, etc.). If only the 500/1v2 is being run from that power wire, we recommend a 50A fuse be used. AGU To connect the power wires to the amplifier, (big glass fuse) or MaxiFuse™...
- Page 4 The 500/1v2 can be turned on and off using 2) Signal Sensing Turn-On Method: A valuable two different methods: feature of the 500/1v2 is its ability to be turned on and off by the presence or lack of signal at 1) A conventional +12V remote turn-on lead.
- Page 5 MONO OUTPUT ONLY Filter Freq. (Hz) Left Ch. Right Ch. 500/1v2 is fully variable between 40 Hz and 200 Hz via the “Filter Freq.” control knob and features the ability to select between a moderate “12dB” per octave or a steep “24dB”...
- Page 6 If you connect a load higher than 4Ω nominal Bass Control” features, set the “Amp LP Filter” to the 500/1v2, power will drop by half with switch on “12dB” and rotate the frequency every doubling of impedance above 4Ω. If you selection knob fully clockwise to the “200 Hz”...
- Page 7 Do not chassis ground any speakers connected impedance of the speaker load connected to this or any other JL Audio amplifier. Doing so to the amplifier is lower than the optimum will cause the amplifier to go into protection and impedance load range for the amplifier.
- Page 8 11 - 14.5V. This appropriate sine wave (within the frequency design is beneficial for many reasons. One of range to be amplified by the 500/1v2) at 3/4 these reasons is ease of setup. Because each source unit volume.
- Page 9 39 ......198 Full-clockwise : 198 16 | JL Audio - 500/1 Owner’s Manual...
- Page 10 “Master/Slave” configuration: processing incorporated into the 500/1v2, it 1) Set the “Master” amplifier’s “Output Mode” is possible to connect multiple 500/1v2’s in a “Master/Slave” configuration, with each amplifier switch to the center “Amp Filter” position. driving its own speaker system but controlled by This will send a parallel, mono-summed signal the processing and filtering of only one amplifier.
- Page 11 Check the nominal load impedance to verify that the amplifier is driving a load between 1.5 - 4Ω. JL Audio monoblock amplifiers have two “+” positive connections and two “–”...
-
Page 12: Installation Notes
Preamp Output Section Output Mode Full Range | Amp Filter | Out Filter 500 /1 Monoblock Subwoofer Amplifier Left Output Right Output 22 | JL Audio - 500/1 Owner’s Manual Infrasonic Filter “Q” Center Freq. Boost (dB) Filter Slope Mode... - Page 13 - amPliFiers (usa) JL AUDIO warrants this product to be free of defects in materials and workmanship for a period of ninety (90) days from the original date of purchase. The warranty term is extended to two (2) years if installation is performed or approved by an authorized JL AUDIO dealer (proof of installation or approval required on purchase receipt).
Need help?
Do you have a question about the 500/1 v2 and is the answer not in the manual?
Questions and answers