Table of Contents
Advertisement
Advertisement
Table of Contents

Subscribe to Our Youtube Channel
Summary of Contents for Carina ST-503
- Page 1 IT EN INSTRUCTION BOOK MANUALE DI ISTRUZIONI Please read this Instruction Manual and the safety instructions before operating the appliance! Leggere e conservare con cura queste istruzioni prima di utilizzare all’apparecchio. Capsule espresso maker Model No: ST-503, Model name: Carina...
- Page 2 IT EN Service contact: Service contact: Contatto di servizio: Contatto di servizio: GAP-MAC Srl Tel +393669044560 Fax +393669052697 info@gap-mac.it www.gap-mac.it index Indice Safety precautions Avvertenze di sicurezza Notes on this manual Leggere attentamente queste istruzioni Unpacking Disimballo Starting up operaioni preliminari.. –...
- Page 3 IT EN The appliance has been manufactured using high L’apparecchio è costruito con materiali di alta qualità quality materials that can be reused or recycled. che possono essere riutilizzati o riciclati. Smaltire Dispose of the appliance in a suitable waste collection l’apparecchio in un apposito centro di raccolta.
- Page 4 IT EN Notes Osservazioni This operating manual cannot cover all possible Questo manuale non comprende tutte le possibili circumstances. For further information or in case cause di lavoro. Per ulteriori informazioni in caso of problems not adequately covered in this di problemi non sufficientemente spiegati in operating manual, please contact the service and questo manuale bisogna di contattare il servizio di...
-
Page 5: Safety Warnings
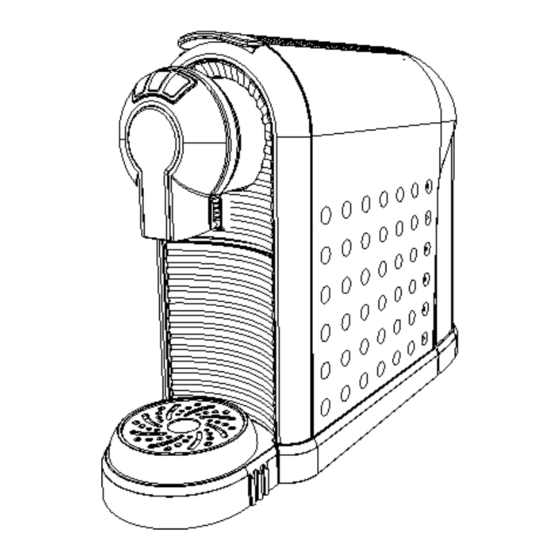
IT EN Safety warnings Avvertenze di sicurezza After use, the hot water/steam wand is very hot. Do Dopo l’uso, il tubo erogatore di acqua calda/vapore è not touch! Risk of burns! molto caldo. Non toccare! Rischio di scottature! Always close the lever. Never open the lever while the Richiudere sempre la leva. - Page 6 IT EN Overview of machine parts Short espresso button Tasto espresso Normal espresso button Lungo Espresso button Tasto Espresso Lungo Tasto Tisana Adjustable dispenser spout (2 positions) Erogatore regolabile (2 posizioni) Name (EN) Nome (IT) Handle Leva Buttons Tasti Dispenser Erogatore Drip tray set Assieme Vasca raccogligocce...
- Page 7 Fill/refill water. There are two ways to fill the water tank: directly into the machine, by using for example a jug, or by removing the water tank. Filling without removing the tank – raise the water tank lid – Fill the tank up to the “MAX” mark with cold fresh water (the maximum capacity is 0.8 litre), or at least the “Min”...
-
Page 8: Riempimento Serbatoio Acqua
Riempimento serbatoio acqua. Ci sono 2 modi per riempire il serbatoio acqua. A. Riempire con acqua direttomente ; B. prendere il serbatoio e riempire di acqua sotto il rubinetto. – sollevare il Sportello di serbatoio acqua. –Riempire il serbatoio con acqua fresca (non gasata) a Maximum, oppure Minimum almeno. - Page 9 Heating up. The machine starts to heat up automatically when detected water in circuit with 3 buttons blinking. The lights on buttons become steady when the machine is heated up, heating up time is 40 seconds approximately. Definition of lighting. name status function...
- Page 10 Riscaldamento. L’apparecchio comincia riscaldamento quando sente che l' acqua è entrata nei circuiti interni e segnala il riscaldamento con il lampeggio dei tasti erogazione, fino che i tasti lampeggianti non diventano a luce fissa. Il tempo di riscaldamento e 40 secondi circa. Significato delle luci Nome stati...
-
Page 11: Brewing Coffee
Brewing coffee – Place an empty cup under the dispenser. For small cups, low down the dispensing spout. 1. Move the handle back completely Insert a capsule to fall straight into the compartment correctly. Close the handle firmly to load the capsule . Press the desired coffee button only once The selected button will blink and the machine is brewing coffee, dispensing will stop automatically when reaching the default... -
Page 12: Erogazione Caffe
Erogazione caffe -Inserire un contenitore capiente sotto all’erogatore. -Per l'utilizzo delle tazzine, si deve spostare manualmente la parte terminale dell'erogatore. -Inserire la capsula spingendola all’interno vano con una legera pressione. -Chiudere la leva con decisione. -Premere una volta sola il tasto del caffe desiderato. -Il tasto del caffe selezionato lampeggia. -
Page 13: Energy Saving Mode
Programming the coffee volume. Be sure there is enough water in the tank before programming coffee volume. Place an empty cup under the dispenser. For small cups, low down the dispensing spout. 1. Raise the handle back completely Insert a capsule into the compartment gently. Close the handle firmly to load the capsule . -
Page 14: Risparmio Energia
Programmazione quantità caffe in tazza -Inserire un contenitore capiente sotto all’erogatore. -Inserire la capsula spingendola all’interno vano con una legera pressione. -Chiudere la leva con decisione. -Premere e mantenerlo premuto il tasto del caffe desiderato (8 secondi e minimo.) -Il tasto del caffe selezionato lampeggia. Quando avete raggiunto la quantita di caffe desiderata in tazza, rilasciare il tasto. - Page 15 Cleaning Emptying the capsule container and drip tray The capsule container holds around 10 used capsules. we recommend emptying the used capsule container and the drip tray every day, you can see if the used capsule container is full or not while the blue light is on in the used capsule container.
-
Page 16: Pulizia Giornaliera
Pulizia giornaliera I componenti Sollevare la leva per espellare capsula nel vano. Sollevare l'erogatore se lasciato nella posizione di massima estensione. Estrarre la vasca raccogligocce gruppo, vuotarlo e risciacquarlo. Rimuovere la griglia e ilcassetto per risciacquale con acqua fresca. Rimuovere il serbatoio acqua, svotare e risciacquare il serbatoio. Nessun componente deve essere lavato in lavastovglie. -
Page 17: Factory Reset
Factory reset In case you want to have the default setting of the machine, please follow below instruction a. Turn off the machine. b. Press the lungo button and keep the button pressed, c. switch on the machine while the lungo button is pressed, release the button after 3 seconds or when you hear 2 beeps, the reset is done. -
Page 18: Svuotare L'apparecchio
RESET Ripristino impostazioni di Fabbrica Per reimpostare la macchina alle impostazioni di fabbrica Spegnere l’apparecchio. Mantere premuto il tasto TISANA e contemporaneamente Accendere la macchina premendo l’interruttore generale La spia lampeggia 2 volte con segnale acustico. Dopo l’operazione reimposta, i seguenti parametri vengono riportati: 1. -
Page 19: Pre-Brewing Option
Pre-Brewing option Pre-brewing is a great function to brew coffee espresso with better temperature and extraction. you can turn it off if desired or choose different pre-brewing mode. To enter pre-brew setting mode, please follow below instruction: a. Turn off the machine. b. - Page 20 Opzione Pre Infusione La funzione Pre Infusione serve per migliorae l'estrazione del caffè e aumentare la temperatura di erogazione del primo caffè Spegnere l’apparecchio. Mantere premuto il tasto LUNGO e contemporaneamente accendere la macchina premendo l’interruttore generale. Premere il tasto LUNGO per scegliere di impostare la funzione Pre infusione come segue Stati Descrizione...
- Page 21 Decalcification Decalcification / Maintenance Drinking water varies according to region. The lime particles in hard drinking water are deposited as residues in the machine and can block the piping and cause damage. To prevent this, be sure to decalcify the machine at the very least after making 300 to 400 cups of coffee or, in any case if the output falls significantly or, after one or two months.
- Page 22 Decalcificazione Il calcare presente nell'acuqa viene depositato nei circuiti interni e può provacare danni all’apparecchio. Per evitare questo, assicurarsi di decalcificare dopo aver fatto da 300 a 400 tazze di caffè oppure dopo uno o due mesi di utilizzo della macchina Leggere con attenzione le precauzioni d’uso presenti sulla confezione del decalcificante, evitare il contatto con gli occhi, la pelle e le superfici della macchina.
-
Page 23: Technical Data
PROBLEM CAUSE SOLUTION No coffee is brewed. The water tank is empty. Fill water in the water tank. The coffee is not hot -the Cold cups / mugs. Preheat cup / mug. enough. - Scale build-up in machine. - Descale. - For cold machine, brewing a cup of water to warm up the circuit. -
Page 24: Dati Tecnici
PROBLEMA CAUSA SOLUZIONE Non esce caffe Il serbatoio acqua è vuoto, la Riempire il serbatoio con acqua fresca. spia allarme è di colore rosso. Premere il tasto del caffe desiderato. Il caffe non è sufficientemente -Tazze/Tazzine fredde Preriscaldare la tazza. caldo.
Need help?
Do you have a question about the ST-503 and is the answer not in the manual?
Questions and answers