Table of Contents
Advertisement
Available languages
Available languages
Advertisement
Table of Contents

Related Manuals for Bushnell 119435


Summary of Contents for Bushnell 119435
- Page 1 Инструкция Bushnell Trophy Cam 119455 Перейти в карточку товара 8 800 775 98 98...
- Page 2 ™ ROPHY I N S T R U C T I O N M A N U A L Model#s: 119435 / 119445 / 119455 Lit# 98-1559 / 1-10...
- Page 4 TABLE OF CONTENTS PAGE # ENGLISH 5-31 FRANÇAIS 32-64 ESPAÑOL 65-97 DEUTSCH 98-133 ITALIANO 134-166 PORTUGUÊS 167-199...
-
Page 5: Important Note
IMPORTANT NOTE Congratulations on your purchase of one of the best trail cameras on the market! Bushnell is very proud of this little unit and we are sure you will be pleased with it as well. We appreciate your business and want to earn your trust. Please refer to the notes below and the instructions in this manual to ensure that you are completely satisfied with this product. -
Page 6: Parts And Controls
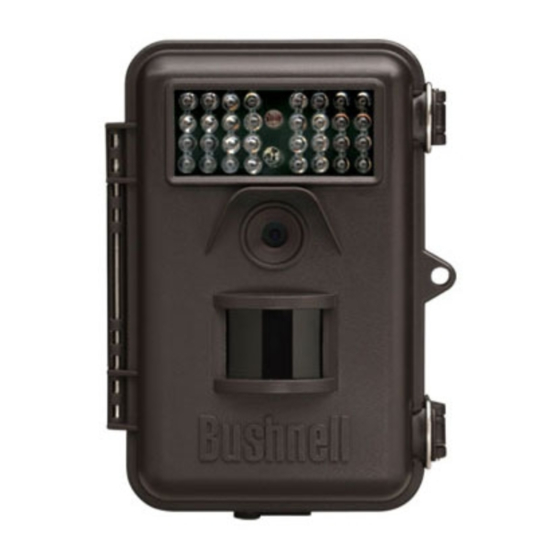
INTRODUCTION About the Trophy Cam The Bushnell Trophy Cam is a digital scouting camera. It can be triggered by any movement of game in a location, detected by a highly sensitive Passive Infra-Red (PIR) motion sensor, and then take high quality pictures (up to 8MP still photos), or video clips. - Page 7 to their main function: The DOWN key can be used to set the camera to Photo mode (still camera icon), and the UP key can set the camera to Video mode (movie camera icon). The RIGHT key also serves as the manual shutter (“SHOT”) button of the camera and the OK key switches the camera to the Playback (“REPLAY”) mode.
-
Page 8: Installing The Batteries And Sd Card
(negative or “flat” end against the long spring of each battery slot). Bushnell recommends using eight new lithium AA (Energizer® brand) or alkaline AA batteries. NiMh Rechargeable batteries can also be used, but they might have a shorter life span due to their reduced efficiency over time and at low temperature. - Page 9 cable (not provided) to connect the external DC power source with the power input jack of the Trophy Cam, making sure that the polarity is correct. Note: The power connector is a 4.0x1.7mm coaxial DC power plug with positive “tip” (inside pin) polarity (Radio Shack P/N 274-1532 or equivalent). If both an external power source is connected and batteries are installed, the Trophy Cam will be powered by the external power source.
-
Page 10: Using The Trophy Cam
(see “Changing Menu Parameter Settings” for details). in the card (do not try to pull it out without pushing in first). The card is released from the slot and ready to be removed when you hear the click. WARNING Be sure the camera’s power is switched OFF before inserting or removing SD cards or batteries. -
Page 11: Setup Mode
use OFF mode if you connect the camera to a computer’s USB port later to download your photos/videos. And of course, when you are storing or not using the camera, you will switch it to OFF. Please note that even in the OFF mode the Trophy Cam still consumes power at a very low level. - Page 12 Fig. 3: SETUP Information Screen (standard display model shown) Image Size SD Card Status Battery Level Camera Mode TV Status Time Stamp Date:Month-Day-Year Time Hour:Minute:Second Number of Images Available Space SETUP Mode Shortcut Keys/Functions As mentioned earlier in “Parts & Controls”, four of the keys below the LCD have secondary, “shortcut”...
- Page 13 Using the SETUP Menu to Change Settings The main purpose of the SETUP mode is to allow you to change the settings of the camera’s parameters (12-13 different ones are available) so your Trophy Cam operates exactly the way you want it to. You will do this by entering the SETUP Menu and pressing the keys below the LCD display, which will show you each parameter and its setting.
- Page 14 to the current setting (Fig. 4a). To change the setting, first use the UP/ DOWN keys to highlight (select) the new setting you want (Fig. 4b), then press OK to “Execute” the actual change to the selected setting. The checkmark will appear next to your new setting to confirm this (Fig. 4c). one setting is displayed at a time, starting with the current setting for the parameter when it is first selected (Fig.
- Page 15 EXAMPLES-Changing the Settings of Some Common Parameters Following this page, you will find tables listing all of the parameters found in the SETUP Menu, along with their possible settings (or range of settings), and a detailed description of what the parameter controls and what the settings do.
- Page 16 The SETUP Menu – Parameters and Settings List w/Descriptions Parameter Description Settings (Bold=default) Mode Selects whether still photos or Camera or video clips are captured when the Video camera is triggered. Image Size Selects resolution for still photos 5M Pixel, 8M from 3 to 8 megapixels.
- Page 17 Parameter Description Settings (Bold=default) Interval Selects the length of time that the 10S (second) camera will “wait” until it responds default, to any additional triggers from the with a 60M PIR after an animal is first detected (minute) to1S and remains within the sensor’s (second) range range.
- Page 18 Parameter Description Settings (Bold=default) Format Execute Deletes (erases) all files stored on a card to prepare it for reuse. (followed by an Always format a card that has been additional No/ previously used in other devices. Yes step on color Caution! Make sure you have viewer models downloaded and backed up any...
- Page 19 Parameter Description Settings (Bold=default) Default Set Cancel, Select “Execute” and press OK Execute to restore all parameters to the original factory default settings. If the camera is behaving oddly and you think you may have changed the setting for something accidently (but aren’t sure which one), this will reset all parameters to their most commonly used or “generic”...
-
Page 20: Mounting And Positioning The Trophy Cam
MOUNTING AND POSITIONING THE TROPHY CAM Mounting After you’ve set up the camera’s parameters to your personal preferences at home or in your truck, you’re ready to take it outside and slide the power switch to “ON”. When setting up the Trophy Cam for scouting game or other outdoor applications, you must be sure to mount it in place correctly and securely. - Page 21 Two optional mounting accessories, a “Bear Safe” metal camera box (model # 19653C) and Deluxe Tree Bracket (model# 119652C) are also available-please see your Bushnell dealer or website for more details. Sensing Angle and Distance Test To test whether the Trophy Cam can effectively monitor the area you choose, this test is recommended to check the sensing angle and monitoring distance of the Trophy Cam.
-
Page 22: Playing Back/Deleting The Photos/Videos
Please note, the PIR is strongly sensitive to ambient temperature. The greater the temperature difference between the environment and your subject, the farther the possible sensing distance. The average sensing distance is about 45 ft. Before leaving the camera unattended, please check for the following: Are the batteries or DC power supply inserted/connected with correct polarity and is the power level is sufficient? Does the SD card have sufficient available space and is its write-... - Page 23 on the video monitor. For video clips, press the SHOT (RIGHT) key to start playing, press again to stop. Press the UP key for the previous photo or video and the DOWN key for the next one. When viewing images, the total number of all images in the SD card and the index of the displaying image are shown in the center of LCD and at the bottom of the video monitor respectively.
- Page 24 camera and taking it to your computer isn’t very convenient, you may find it easier to just take the card out. By removing the SD card (swapping it for a new empty card if you like) and taking it to your home or campsite to view the images by using an SD card “reader”...
-
Page 25: Downloading The Photos/Videos
DOWNLOADING THE PHOTOS/VIDEOS To download your photos/videos to a PC or Mac*, first make sure the Trophy Cam power switch is in the OFF position. Connect the supplied cable to the camera’s USB port, then directly to a main USB port on your computer-do not use front panel/keyboard USB ports or unpowered “hubs”. -
Page 26: Troubleshooting (Faq)
Typically, the Trophy Cam will be able to capture several thousand images before the batteries die. Check to make sure you have used new alkaline or lithium batteries. Bushnell recommends using 8 Energizer Lithium AA batteries ®... - Page 27 Make sure that you have installed at least 4 batteries (the required minimum #) in the battery compartment, starting at the top, filling battery spaces 1-4 with no “gaps”. Bushnell recommends using 8 Energizer Lithium AA batteries ® in all Trophy Cams.
- Page 28 If this is seen on a consistent basis, then the sensor may need servicing. Please contact Bushnell customer service. 7. Short video clips—not recording to the length set a. Check to make sure that the SD card is not full.
- Page 29 Try to avoid setting the camera up on small trees that are prone to being moved by strong winds. Remove any limbs which are right in front of the camera lens. PIR Sensor LED Flashes/Doesn’t Flash When the camera is in the “Setup” mode, a special LED on the front of the camera will flash when it senses motion.
-
Page 30: Technical Specifications
TECHNICAL SPECIFICATIONS 5 Megapixel Color CMOS Image Sensor Maximum Pixel Size 3264x2448 (8MP) F=3.1; FOV=50°; Auto IR-Cut-Remove (at night) Lens 36’-45’ (12m-15m) IR-Flash Range Std B&W Display: 24x32mm(1.5”) ; Color Display: Display Screen 32x42mm (2”) SD or SDHC Card, Maximum capacity 16GB Memory Card Internal RAM 32MB... -
Page 31: Two-Year Limited Warranty
This warranty does not cover damages caused by misuse, improper handling, installation, or maintenance provided by someone other than a Bushnell Authorized Service Department. Any return made under this warranty must be accompanied by the items listed below: 1) A check/money order in the amount of $10.00 to cover the cost of postage... -
Page 32: Fcc Compliance Statement
· Consult the dealer or an experienced radio/TV technician for help. The device does not contain any user-serviceable parts. Repairs should only be made by an Authorized Bushnell repair center. Unauthorized repairs or modifications could result in permanent damage to the equipment, and will void your warranty and your authority to operate this device under Part 15 regulations. - Page 33 ™ ROPHY N O T I C E D ’ U T I L I S AT I O N Nos de modèle: 119435 / 119445 / 119455 Lit No 98-1517 / 1-10 FRANÇAIS...
-
Page 34: Remarques Importantes
Si votre Trophy Cam Bushnell ne semble pas fonctionner correctement, ou si vous avez des problèmes de qualité avec les photos/vidéos, veuillez consulter la section Diagnostic / Questions Fréquemment Posées aux pages 57 à... - Page 35 INTRODUCTION À propos du Trophy Cam Le Trophy Cam de Bushnell est un appareil photo de surveillance numérique. Il peut être déclenché par tout mouvement de gibier dans un endroit donné – repéré par un détecteur de mouvement ultra sensible à...
- Page 36 L’interface de contrôle à six touches sert principalement en mode CONFIGURATION (SETUP) à sélectionner les fonctions et paramètres opérationnels. Selon indiqué à la , ces touches sont : HAUT, BAS, Fig. 2 GAUCHE, DROITE, OK et MENU. Quatre de ces touches peuvent également servir pour une seconde fonction (raccourci opérations en mode SETUP (CONFIGURATION) en plus de leur fonction principale : La touche BAS peut servir à...
-
Page 37: Installation Des Piles Et De La Carte Sd
Câble vers le compartiment des piles Écran LCD HAUT/Vidéo BAS/Photo GAUCHE MENU OK/Lecture (REPLAY) MARCHE Commutateur CONFIGURATION Marche/ DROITE/Déclencheur Configuration ARRÊT Manuel (SHOT) Fig. 2: Commutateur d’alimentation et interface de contrôle à six touches INSTALLATION DES PILES ET DE LA CARTE SD Avant de pouvoir utiliser votre Trophy Cam, vous devrez d’abord installer des piles et insérer une carte SD. - Page 38 à insérer chaque pile en respectant la polarité (pole négatif ou « plat » en contact avec le long ressort de chaque emplacement de pile). Bushnell recommande d’utiliser huit piles AA au lithium neuves (de la marque Energizer®) ou des piles AA alcalines. Les piles NiMh rechargeables peuvent également être utilisées, mais sachez qu’elles ont une durée de vie...
- Page 39 des essais et pour se familiariser avec l’appareil, mais vous voudrez sans doute laisser celui-ci seul pendant plusieurs jours, par conséquent l’emploi d’une carte SD est recommandé. Insérez la carte SD avant de commencer à utiliser l’appareil (le commutateur d’alimentation de l’appareil photo étant en position OFF (ARRÊT)) avant de commencer à...
- Page 40 UTILISATION DU TROPHY CAM Une fois que vous avez préparé votre Trophy Cam en installant correctement les piles et une carte SD, vous pouvez simplement sortir, l’attacher à un arbre, l’allumer et vous en allez - et il se peut que vous obteniez des photos superbes qui correspondent exactement à...
-
Page 41: Mode Configuration (Setup)
Mode MARCHE (ON) À n’importe quel moment après que les piles et la carte SD aient été insérées vous pouvez allumer l’appareil. Lorsque le commutateur d’alimentation sera placé en position haute, l’appareil sera en mode MARCHE. L’indicateur LED de mouvements (p.6, « Vue de face ») clignotera en rouge pendant environ 10 secondes. - Page 42 Fig. 3 : Écran d’information du mode CONFIGURATION (SETUP) - modèle à affichage standard présenté. Résolution Statut de la carte SD Niveau de charg des piles Mode Photo Raccordement TV Impression de la date et de l’heure Date: Mois-Jour-Année sur les photos Heure Heures:Minutes:Secondes Nombre de photos Mémoire disponible...
- Page 43 Appuyez sur la touche OK pour visionner les photos/vidéos sur l’écran LCD (modèles avec écran couleur intégré uniquement), ou un moniteur de télévision connecté. Voir page 53 pour de plus plus d’informations. Utilisation du Menu CONFIGURATION (SETUP) pour changer les réglages Le but principal du mode CONFIGURATION est de vous permettre de changer les réglages des paramètres de l’appareil pour que votre Trophy Cam fonctionne exactement comme vous le désirez.
- Page 44 des vidéos. Aucune photo ne sera prise si le commutateur reste en position SETUP (CONFIGURATION) à moins que vous n’appuyiez sur la touche DROITE/SHOT (Photo) après être sorti du menu. L’appareil s’éteindra automatiquement après quelques secondes si vous n’appuyez sur aucune touche Modèle avec affichage en couleur VS modèle avec affichage standard Il y a une légère différence dans la manière d’afficher les réglages d’un...
- Page 45 Fig. 4: Sélection des réglages des paramètres AFFICHAGE STANDARD AFFICHAGE EN COULEUR Appuyez sur MENU (4d) (4a) Appuyez sur BAS (4b) (4e) Appuyez sur OK (4c) EXEMPLES - Changer les réglages de certains paramètres courants Dans les pages suivantes, vous trouverez des tableaux listant tous les paramètres existant du Menu SETUP (CONFIGURATION), ainsi que leurs réglages possibles (ou plage de réglages), une description détaillée de ce que contrôle le paramètre et le but des réglages.
- Page 46 Pour changer le réglage de n’importe quel paramètre, commencez toujours en vous assurant que le commutateur est en position SETUP (CONFIGURATION). Une fois que l’écran LCD s’allume, appuyez sur la touche MENU. Le premier paramètre que vous verrez lorsque vous entrez dans le Menu SETUP est «...
- Page 47 Liste des paramètres et réglages du Menu CONFIGURATION (SETUP) avec descriptions Paramètre Description Réglages (Gras=défaut) Mode Sélectionne si des photos ou des Camera vidéos sont prises lorsque l’appareil se (photos) ou déclenche. Video Image Size Sélectionne la résolution pour les photos 5M Pixel, 8M de 3 à...
- Page 48 Paramètre Description Réglages (Gras=défaut) Video Fixe la durée de chaque séquence vidéo 10S (seconde) prise. Les réglages commencent à 10 par défaut, Length secondes par défaut lorsque le paramètre avec une plage (Durée est sélectionné pour la première fois. possible de 1 s vidéo) Après être descendus à...
- Page 49 Paramètre Description Réglages (Gras=défaut) Sensor Sélectionne la sensibilité du capteur Normal, High Level infrarouge passif. Le réglage « High » (élevée), Low (Sensibilité rendra l’appareil plus sensible (faible) du Capteur aux infrarouges (chaleur) et il sera infrarouge) plus facilement déclenché par les mouvements, et le réglage «...
- Page 50 Paramètre Description Réglages (Gras=défaut) TV Out Sélectionne le standard/format vidéo NTSC, PAL pour le jack de « sortie TV ». Le standard (Sortie TV) vidéo est NTSC pour les États-Unis, Canada, le Mexique, l’Asie et l’Amérique du Sud. PAL est utilisé principalement en Europe.
- Page 51 ¼-20 standard. Deux accessoires de montage optionnels, un boîtier de sécurité en métal (modèle No 119653) et un support pour montage sur arbre (modèle 119652) sont également disponibles-veuillez consulter votre revendeur Bushnell ou notre site Internet pour de plus amples renseignements.
- Page 52 Fig. 5: Fixation de la sangle Angle de détection et test de distance Pour tester si le Trophy Cam peut effectivement surveiller la zone que vous avez choisi, le test suivant est recommandé pour vérifier l’angle de détection et la distance de surveillance du Trophy Cam. Pour faire un essai : Mettez le Trophy Cam en mode SETUP (CONFIGURATION).
- Page 53 du Trophy Cam et sortir de la zone. Pendant ce temps, le voyant LED de l’indicateur de mouvements clignotera au rouge continuellement. Après qu’il se soit arrêté de clignoter, l’infrarouge passif est activé, et tout mouvement qu’il détectera déclenchera la prise de photos ou de vidéos la programmation faite dans le menu SETUP (CONFIGURATION).
- Page 54 vidéos. Le coin droit de l’affichage indiquera « JPG » pour les photos, et une icône film pour les fichiers vidéo. Appuyez sur la touche DROITE (SHOT) pour regarder une vidéo. Appuyez sur MENU pour effacer une image. Le mode Effacer image fonctionne selon indiqué...
- Page 55 premier écran « Delete » (effacer), qui vous donne le choix d’effacer seulement la photo/vidéo actuellement à l’écran, ou toutes les photos/ vidéos (voir ci-dessous). Mettez en surbrillance le choix « Delete Current » (effacer la photo/ vidéo en cours) ou « Delete All » (effacer toutes les photos/vidéos), puis appuyez sur OK.
- Page 56 Lorsque vous utiliser un PC (ou Mac*) pour visionner des photos (ou des séquences vidéo*), branchez d’abord l’appareil à l’ordinateur avec le câble USB fourni. Puis, utilisez un logiciel de visualisation d’images disponible dans le commerce, ou le navigateur inclus avec le système d’exploitation du PC pour visionner les images sauvegardées sur la carte SD dans le dossier \ DCIM\100EK113.
- Page 57 le connecterez). Si vous préférez laissez votre appareil dans les bois et simplement retirer sa carte SD, un lecteur de carte SD fonctionne comme il a été décrit dans cette section une fois que la carte est insérée et le lecteur branché...
-
Page 58: Diagnostic / Questions Fréquemment Posées
Trophy Cam sera capable de prendre plusieurs milliers de photos avant que les piles ne soient déchargées. Vérifiez que vous avez utilisé des piles alcalines ou au lithium neuves. Bushnell recommande d’utiliser 8 piles AA au lithium Energizer dans tous les Trophy Cams pour obtenir une ®... - Page 59 à piles, en commençant par le haut et en remplissant les emplacements 1-4 sans laisser d’« espaces ». Bushnell recommande d’utiliser 8 piles AA au lithium Energizer® dans tous les Trophy Cams. Assurez-vous d’avoir installé les piles correctement, en respectant la polarité.
- Page 60 Si cela se produit régulièrement, il se peut que le détecteur soit défectueux. Dans ce cas, veuillez contacter votre revendeur Bushnell.
- Page 61 7. Séquences vidéos courtes–n’enregistre pas pendant la durée fixée a. Vérifiez que la carte SD n’est pas pleine. b. Assurez-vous que les piles sont suffisamment chargées. Vers la fin de la durée de vie des piles, l’appareil peut choisir d’enregistrer des séquences vidéo plus courtes pour pour préserver la charge restante des piles.
- Page 62 Problèmes d’écran LCD 1. L’écran LCD s’allume mais il n’y a pas de texte. a. Après avoir mis le commutateur d’OFF (ARRÊT) sur SETUP (CONFIGURATION) (MARCHE), vérifiez commutateur est sur la bonne position afin que le mode choisi soit bien sélectionné (évitez les positions « entre » deux modes). b.
-
Page 63: Caractéristiques Techniques
CARACTÉRISTIQUES TECHNIQUES Capteur d’images 5 Mégapixels couleur CMOS Résolution Maximale 3264x2448 (8 MP) Focale = 3,1 ; Champ de Vision = 50 ° ; Infrarouge à Objectif activation automatique Portée du flash 12-15 mètres infrarouge Affichage noir et blanc standard : 24x32 mm(1.5 Écran d’affichage pouces) ;... -
Page 64: Garantie Limitée De Deux Ans
Cette garantie ne couvre pas les dommages causés par une mauvaise utilisation, une mauvaise manipulation, une mauvaise installation, ou un entretien incorrect effectué par une personne autre que le Centre de Réparation agréé par Bushnell. Tout retour effectué dans le cadre de la présente garantie doit être accompagné... -
Page 65: Déclaration De Conformité Fcc
Le dispositif ne contient aucune pièce pouvant être réparée par l’utilisateur. Les réparations doivent être confiées à un centre autorisé de dépannage de Bushnell. Les réparations ou les modifications non autorisées peuvent entraîner des dommages permanents du matériel, en rendant nulle votre garantie et votre autorité pour faire fonctionner ce dispositif aux termes des règlements de la Partie 15. - Page 66 Bushnell Trophy Cam 119455 Описание Характеристики...
Need help?
Do you have a question about the 119435 and is the answer not in the manual?
Questions and answers