
Summary of Contents for Eon Millennium
- Page 1 Converged Communications Platform Telephone Operating Instructions Section 32-112-460 Issue 5, July 2008...
- Page 2 © eOn Communications Corporation, 1998, 200 8. All rights reserved. 185 Martinvale Lane San Jose, CA 95119 (800) 955-5321 • Fax (408) 694-9600 ••••• www.eoncommunications.com ••••• This document is for use by authorized eOn customers only and may not be reproduced in any manner without specific written permission.
-
Page 3: Table Of Contents
Feature Access ..................5 Audible Call Indications ................5 Resource Queuing ................6 Line Selection .................... 6 Telephone Descriptions ............... 9 Millennium Digital Telephones ...............9 Pushbutton Dial ..................9 Feature Buttons ..................9 Display Module ..................9 Button Expansion Module ..............16 Recorder Jack .................. - Page 4 Feature Operating Instructions ............29 Alarm Clock ..................... 29 Remote ....................29 Local ...................... 29 Answer ...................... 30 Auto Answer .................... 31 Auto Transfer .................... 31 Busy Prime Line Indication ..............31 Button Change ..................32 Call Announce ..................32 All Call Announce ...................
- Page 5 Night Service ................... 56 Night Answer ..................56 Night Transfer ..................56 Paging ...................... 57 Park to Station ..................57 Personal Repertory Dialing..............58 Plan Override................... 60 Privacy ...................... 61 Problem Circuit Tagging................. 62 Remote Call Pickup ................62 General Remote Call Pickup ..............62 Ring Again ....................
-
Page 6: Introduction
Introduction This document describes the telephones that can be used with the Millennium Conv- erged Communications Platform and provides instructions for placing / answering calls and accessing the features available with the system. The instructions in this document apply to the Millennium-style digital, 3100 electronic, and single-line telephones. -
Page 7: General Operating Information
General Operating Information The following paragraphs provide general information concerning terminology, system timeouts, user programmable features, and basic telephone operating procedures. The following terms apply to the telephone operating procedures in this section. Common Terms Extension: This refers to an extension number and may correspond to a single-line telephone, or a button on a digital telephone or Type 3100 telephone. -
Page 8: Resource Queuing
When an outside call is originated, or a feature that returns dial tone or confirmation tone Resource Queuing is accessed, all the required system resources may not be available. If a resource is not available, the extension is queued on that resource, and the system returns an alerting tone repeated at intervals. - Page 9 µ - µ µ l a i t s i v i t l a i , f f l a i , f f t s i v i t , f f r i f , f f , f f l l a l l a...
- Page 10 Telephone Operating Instructions...
-
Page 11: Telephone Descriptions
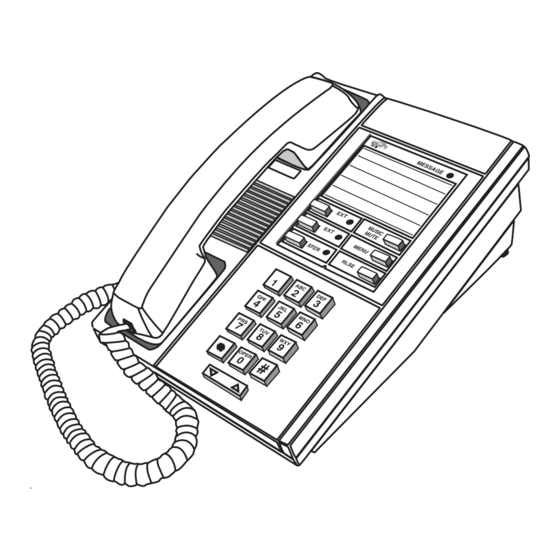
Both telephones support off-hook call announce; the announce- ment is mixed in the receiver with the existing call. The pushbutton dial on all models of Millennium digital phones is programmed for hot keypad Pushbutton Dial operation. Any time the telephone is off-hook, the 12 keypad buttons can be used to send tones (DTMF signals) to the system or to a distant office. - Page 12 Figure 1: Millennium 6-Button Digital Telephone Telephone Operating Instructions...
- Page 13 Figure 2: Millennium 12-Button Digital Telephone Telephone Operating Instructions...
- Page 14 CALL MEMORY MENU SEND MUSIC MUTE SPKR HOLD XFER CONF PARK PAGE ✱ OPER RLSE awc2-320 FIgure 3: Millennium 18-Button Digital Telephone Telephone Operating Instructions...
- Page 15 CALL MEMORY MENU SEND MUSIC MUTE SPKR HOLD XFER CONF PARK PAGE OPER ✱ RLSE awc92-321 Figure 4: Millennium 30-Button Digital Telephone Telephone Operating Instructions...
- Page 16 T-HOLD changing at 0.5-second intervals. Alternating open triangle and closed circle; ATTENTION changing at 0.2-second intervals. STATION Closed circle displayed 0.8 second on, BUSY 0.2 second off. TIME IN SECONDS awc91-80 TABLE D MILLENNIUM DIGITAL PHONE DISPLAY Telephone Operating Instructions...
- Page 17 TABLE E FORTHCOMING DIGITAL TELEPHONE DISPLAY Telephone Operating Instructions...
-
Page 18: Button Expansion Module
The Button Expansion Module (BEM) (see Figure 5) connects directly to a digital Button Expansion Module telephone or another BEM. It contains 48 programmable buttons arranged in four groups of twelve. Up to four BEMs can be connected in series to provide a total of 192 programmable buttons, resulting in a 210-button station when associated with an 18- button telephone, or a 222-button station when associated with a 30-button telephone. - Page 19 AWC2-195 Figure 5: Button Expansion Module Telephone Operating Instructions...
-
Page 20: Personal Preferences Setup
The following items can be programmed at each telephone: Personal Preferences Setup ❖ Background music source and volume level. ❖ Ringer volume level and ring type. ❖ Display module contrast. ❖ Handset receiver volume level. ❖ Speaker volume level (handsfree and call announce). ❖... -
Page 21: Display Contrast Adjustment
❖ When you hear the ring type you want, press the MENU button or wait for the 10- second timeout to save the choice and exit the ring type select mode. The ringer is silenced and the UP ARROW and DOWN ARROW button indicators change to IDLE. -
Page 22: Sidetone Level Adjustment
Each time you press the UP or DOWN ARROW button, the indicators of both buttons light momentarily to indicate if the minimum or minimum limit has been reached. To adjust the amount of sidetone (the portion of the transmitted signal that is fed back to Sidetone Level Adjustment the receiver to make conversation more normal) that you prefer: ❖... -
Page 23: Handsfree Operation
There are four models of Multibutton Electronic Telephones (Type 3100 telephones) that Multibutton Electronic can be used with the Millennium: the Basic 8- and 16-button sets; and the Executive 8- Telephones and 16-button sets. All models are available with or without a display module. Figure 6 shows a 16-button Executive model telephone with a display module. -
Page 24: Display Module
The fixed part may come before or after the variable part, depending on the nature of the message. Millennium display messages may be up to 24 characters long. Only the first 16 characters are displayed on a Type 3100 displayphone. - Page 25 Figure 6: Multibutton Electronic Telephone with Display Module Telephone Operating Instructions...
-
Page 26: Single-Line Telephones
Dial access codes are generally used to access available features at single-line Single-Line Telephones telephones, but up to 255 logical line and feature access buttons can be programmed on Feature Access a single-line telephone. Any button may be assigned any of the allowable features or line access types. -
Page 27: Basic Operating Procedures
Basic Operating Procedures There are three ways to originate a call with a digital or Type 3100 telephone: manual line Originating a Call selection, automatic line selection, and preselection. Programming determines how each telephone functions and which method to use to originate a call. With single-line telephones, line selection is always automatic. -
Page 28: Making Inside Calls
To answer a call using preselection: ❖ Press the button next to the indicator showing the calling symbol. ❖ Lift the handset. ❖ You are connected with the caller. The indicator changes to ACTIVE. The following operations assume that your telephone is programmed for Making Inside Calls automatic call pickup. -
Page 29: Handsfree Operation
To make an outside call using a trunk route button with the Sender-Receiver option programmed: ❖ Lift the handset. ❖ Press an idle TRA button. You do not hear CO dial tone. Depending on programming, you may or may not hear system dial tone. ❖... -
Page 30: Data Port Dialing
To answer calls in the headset operating mode, press the ANSWER button or the calling button. To originate calls in the headset operating mode, press an idle button or dial a number. Handsfree operation will not be invoked as long as the handset is in the cradle. To put the telephone in the group listen mode during a headset call, press the SPEAKER button. -
Page 31: Feature Operating Instructions
Feature Operating Instructions To set the alarm clock from the telephone where the alarm will ring: Alarm Clock Local ❖ Press the ALARM CLOCK button or dial the Alarm Clock access code. You hear system dial tone. The SPEAKER button indicator changes to BUSY; if you used an ALARM CLOCK button, the indicator changes to ACTIVE. -
Page 32: Answer
❖ Dial the time as described for Local Alarm Set. If you dial an invalid digit, you hear reorder tone. ❖ When you hear dial tone again, dial the number (0-9) of the alarm clock message you want. ❖ When you hear dial tone again, dial the extension number that the alarm will ring. Listen for dial tone. -
Page 33: Auto Answer
To automatically answer a call in either the handset or headset mode: Auto Answer ❖ Press the AUTO ANSWER button. The button indicator changes to ACTIVE. ❖ Calls directed to your telephone when it is idle will ring for the programmed delay time (0-15 seconds), or, if no delay time is programmed, for the 4-second default delay time. -
Page 34: Button Change
❖ Dial a prime extension number. If the telephone with the prime appearance of the extension number is on-hook, all appearances of the extension number ring as usual. If the telephone is off-hook on another button, the BUSY PRIME button indicator changes to ATTENTION;... - Page 35 ❖ Press the SPEAKER button. The SPEAKER button indicator and, if applicable, the EXT button indicator change to IDLE. The CALL ANNOUNCE button indicator continues to show BUSY. To return the telephone from the call announce operating mode to the normal operating mode: ❖...
-
Page 36: All Call Announce
❖ Dial the extension number of the telephone you want to call. The EXT button indicator changes to ACTIVE. If call announce is allowed, you hear confirmation tone. Both you and the called station hear warning tone. A two-way call announce communication path is established. -
Page 37: Call Forward
❖ Press the DIRECTED CALL PICKUP button or dial the Directed Call Pickup access code. The DIRECTED CALL PICKUP button indicator changes to BUSY; the EXT button indicator changes to ACTIVE. You hear system dial tone. ❖ Dial the All Call Announce access code plus the zone number. The DIRECTED CALL PICKUP button indicator changes to IDLE;... -
Page 38: Remote Call Forward
You hear confirmation tone. The selected CALL FORWARD button indicator changes to BUSY. ❖ Hang up. To cancel call forward: ❖ Lift the handset. ❖ Press the busy CALL FORWARD feature button, or dial the Local Call Forward access code followed by the digit 0. The CALL FORWARD feature button indicator changes to idle. -
Page 39: Call Intrusion
❖ To keep CFOS active for a specific time, dial a two-digit number (01 to 60) representing the time in hours, listen for confirmation tone, and then hang up. To change a telephone’s call forward mode from another telephone: ❖ Lift the handset. ❖... -
Page 40: Override
If break-in is denied, you hear reorder tone. To put your telephone in the override operating mode: Override ❖ Press the OVERRIDE button. ❖ The OVERRIDE button indicator changes to BUSY. To put your telephone in the override operating mode using the dial access code: ❖... -
Page 41: Call Park
To override a busy station, trunk, or conference in the override mode: ❖ Lift the handset. ❖ Press the busy DES button or dial the busy extension number. The DES button indicator or EXT button indicator changes to ACTIVE. You and the busy parties may hear a warning tone. -
Page 42: Call Transfer
To determine the identity of a parked caller: ❖ Lift the handset. ❖ Dial the Call Park Query access code plus the number of the park zone. The display shows the identity of the parked caller, if available. ❖ Dial # to answer the call, or hang up to disregard the call, or use the UP and DOWN arrow keys to scroll through a directory of parked calls. -
Page 43: Camp-On
To camp on a busy extension: Camp-On Station Camp-On ❖ When you hear busy tone, press the CAMP-ON button. The CAMP-ON button indicator changes to BUSY. Or, press the TRANSFER HOLD or CONFERENCE HOLD button, and when you hear second dial tone, dial the Camp-On access code. -
Page 44: Automatic Callback
To set up an automatic callback: Automatic Callback ❖ Camp on a busy extension or trunk route. ❖ Hang up. The CAMP-ON button indicator changes to BUSY. The extension button indicator changes to IDLE; a trunk button indicator changes to BUSY. You can make and answer other calls while you are camped on. -
Page 45: Clock Set
To set the hours and minutes: Clock Set Hours and Minutes ❖ Lift the handset. ❖ Press the SYSTEM CLOCK button. You hear system dial tone, and the SYSTEM CLOCK button indicator changes to ACTIVE. ❖ If the system is programmed for a 24-hour clock, dial four digits to set the time. The first two digits represent the hour, while the second two digits represent the minutes (for example, 11:15 PM = 2315;... - Page 46 If no other conference is currently in effect, as many as 32 parties can be included in a conference. Otherwise, only enough parties can be added to reach the 32-party system limit. For example, if conferences in effect involve 28 parties, this conference can only support 4 parties (32 minus 28).
-
Page 47: Broker's Hold
To establish a private two-way conversation with the member displayed on your telephone: ❖ Press the ISOLATE CONFERENCE button. ❖ You and the selected member are temporarily dropped from the conference and a two-way connection is established. ❖ To rejoin the conference, press the ISOLATE CONFERENCE button again. To leave a conference: ❖... -
Page 48: Directed Call Pickup
❖ When the call is finished or you no longer need the feature, hang up. The original COS is restored. To change a telephone's COS for more than one call: ❖ Dial the COS Change access code, followed by the digit 2. ❖... -
Page 49: Direct Extension Selection
❖ When you hear system dial tone, dial the Paging access code for the active paging zone. The DIRECTED CALL PICKUP button indicator changes to IDLE. The paging equipment is released and you are connected with the paging party. To answer a call to an unattended ringing telephone: ❖... - Page 50 ❖ To complete the transfer, press the RELEASE button or hang up either before or after the call is answered. The button indicator associated with the held call changes to BUSY or IDLE. The DES button indicator changes to BUSY. ❖...
-
Page 51: Direct Ring Prime
❖ Press the busy DES button. You hear confirmation tone and a conference is established with the busy extension and any associated station or trunk parties. The DES button indicator changes from BUSY to ACTIVE. You and all stations and trunks involved in the call may hear a warning tone followed by interrupted override tone. -
Page 52: Do-Not-Disturb
To return a telephone to the normal operating mode using the dial access code: ❖ Lift the handset. ❖ Dial the Direct Ring Prime access code. The DIRECT RING PRIME button indicator changes to IDLE. The EXT button indicator changes to ACTIVE. You hear system dial tone. -
Page 53: Ground Recall/Hookswitch Flash
❖ If internal calls are denied, anyone calling from a local telephone will hear Do-Not- Disturb tone. If the calling telephone has a display, the calling party will seeDo-Not- Disturb message 0 or the message you selected. To put a telephone in the Do-Not-Disturb operating mode during a call: ❖... -
Page 54: Hot Line
To originate a hot line call: Hot Line ❖ Lift the handset. ❖ Press the HOT LINE button. You hear ringback tone; the HOT LINE button indicator changes to ACTIVE. All telephones in the intercom network ring at the programmed ring rate. ❖... -
Page 55: Meet Me Conference
❖ When you hear system dial tone, dial the digits for the date and day type in the following order: month (00-12), start day (01-31), end day (01-31), and day type (0-3). ❖ When you hear confirmation tone, hang up. The LCR SPECIAL DAY button indicator changes to IDLE. -
Page 56: Message Center Operation
To turn on the message waiting indicator at a selected telephone: ❖ Lift the handset. ❖ Dial the prime extension number of the target telephone. ❖ When you hear ringback tone or busy tone, press the MESSAGE SEND button. The MESSAGE SEND button indicator changes to ATTENTION. On the target telephone, the message waiting indicator lights. -
Page 57: Voice Mail Service
❖ Exit the mailbox as instructed. ❖ Hang up. When several Millennium systems are networked, the systems can be programmed to allow a call to a station in a remote system to be redirected to a voice mailbox in one of the other systems by using call forward, DND/ busy intercept routing, or no answer routing. -
Page 58: Music-On-Page
❖ To talk to the monitored parties, press the MUSIC/MUTE button. The MUSIC/ MUTE button indicator changes to IDLE. ❖ Hang up when finished. The MONITOR button indicator changes to IDLE. To turn paging background music on: Music-On-Page ❖ Lift the handset. ❖... -
Page 59: Paging
To take your telephone out of night transfer mode: ❖ Press the NIGHT ZONE button. ❖ The NIGHT ZONE button indicator changes to IDLE and the programmed night transfer message is removed from the display. To page in a specific zone or zones: Paging ❖... -
Page 60: Personal Repertory Dialing
❖ When you hear dial tone, dial the destination extension. The incoming call will be transferred immediately and parked at the destination station. ❖ Page the destination party to inform them of the call parked at their station. To park a call to a station if the destination party choose not to take the call immediately: ❖... - Page 61 l l a l l i e i f n i t i f i t i g l l i s t i P " " r i t c n i l s t i l l i n i t o i t n i l...
-
Page 62: Plan Override
To make a personal repertory call using a PERSONAL REPERTORY button: ❖ Lift the handset. ❖ Press the PERSONAL REPERTORY button. The associated button indicator changes to ACTIVE. You hear system dial tone. If the number is valid, you hear confirmation tone;... -
Page 63: Privacy
To put one or more plans into override mode: ❖ Lift the handset. ❖ Dial the Plan Override access code followed by the digit 1. ❖ When you hear dial tone, dial the number of the plan to be put into override mode. When you hear dial tone again, dial the number of a second plan, if any, to be put into override mode. -
Page 64: Problem Circuit Tagging
The Problem Tagging access code is used to mark a location that is suspected of failure. Problem Circuit Tagging Use of the code is not restricted and can be dialed from any station. To tag a problem location: ❖ Press the TRANSFER HOLD button to put the station or trunk on hold. The TRANSFER HOLD button indicator changes to ACTIVE;... -
Page 65: Secretarial Intercom
To redial the saved number: ❖ Lift the handset. ❖ Press the RERING button or dial the Ring Again dial access code plus the digit 1. The RERING button indicator briefly changes to ACTIVE while the saved number is automatically dialed. Secretarial intercom allows telephones to signal a secretarial position and the secretarial Secretarial Intercom position to signal back. -
Page 66: Account Code
❖ Digit 0 revokes a previously stored PIN. ❖ Digit 1 applies the PIN to the next trunk accessed or reaccepted. The PIN will be revoked at end of call. ❖ Digit 2 applies the PIN to the next trunk accessed or reaccepted. The PIN is permanently stored for use on all later trunk calls. -
Page 67: Account/Authorization Code
If both an account code and an authorization code must be entered, use the combined Account/Authorization Code Account and Authorization access code, as follows: ❖ Lift the handset. ❖ Dial the combined Account and Authorization access code. ❖ When you hear system dial tone, dial the account number, followed by the authorization number. - Page 68 ❖ When you hear CO dial tone, press the button for the repertory number you want to call; or press the REPERTORY feature access button and dial the repertory store number; or press the TRANSFER HOLD button, and you hear transfer dial tone, dial the Repertory Dialing access code plus the repertory store number.
Need help?
Do you have a question about the Millennium and is the answer not in the manual?
Questions and answers