Table of Contents
Advertisement
Available languages
Available languages
USER MANUAL
H.264 Digital Video Recorder
4 CH/ 8 CH/ 16CH
ภาษาไทย
เพื ่ อ สามารถใช้ เ ครื ่ อ งบั น ทั ก นี ้ อ ย่ า งถู ก ต้ อ งและปลอดภั ย
ควรมั ่ น ใจว่ า ท่ า นได้ ศ ึ ก ษาคู ่ ม ื อ การใช้ ง านตามคำแนะนำอย่ า งถู ก ต้ อ ง
ENGLISH
To use this DVR correctly and safely, be sure to read these
operation instruction before use.
FK-HM3004, FK-HM3008,FK-HM3016
HM3K VER.01 12/09
Advertisement
Chapters
Table of Contents

Related Manuals for Fujiko FK-HM3004, FK-HM3008,FK-HM3016

Summary of Contents for Fujiko FK-HM3004, FK-HM3008,FK-HM3016
-
Page 1: User Manual
ควรมั ่ น ใจว่ า ท่ า นได้ ศ ึ ก ษาคู ่ ม ื อ การใช้ ง านตามคำแนะนำอย่ า งถู ก ต้ อ ง ENGLISH To use this DVR correctly and safely, be sure to read these operation instruction before use. FK-HM3004, FK-HM3008,FK-HM3016 HM3K VER.01 12/09... - Page 3 ควรมั ่ น ใจว่ า ท่ า นได้ ศ ึ ก ษาคู ่ ม ื อ การใช้ ง านตามคำแนะนำอย่ า งถู ก ต้ อ ง ENGLISH To use this DVR correctly and safely, be sure to read these operation instruction before use. FK-HM3004, FK-HM3008,FK-HM3016 HM3K VER.01 12/09...
-
Page 4: ข้ อ แนะนำเพื ่ อ ความปลอดภั ย
ข้ อ แนะนำเพื ่ อ ความปลอดภั ย เพื ่ อ ความปลอยภั ย โปรดอ่ า นข้ อ แนะนำ ก่ อ นการติ ด ตั ้ ง หรื อ ใช้ ง านเครื ่ อ งบั น ทึ ก คำเตื อ น RISK OF ELECTRIC SHOCK DO NOT OPEN ข้... -
Page 5: Table Of Contents
สารบั ญ ข้ อ แนะนำเพื ่ อ ความปลอดภั ย คำอธิ บ ายสั ญ ลั ก ษณ์ คำเตื อ น! คำแนะนำเพื ่ อ ความปลอดภั ย 1.ชุ ด อุ ป กรณ์ แ ละแผงควบคุ ม ................TH_1 1.1 ชุ ด อุ ป กรณ์ ......................TH_1 1.2 ด้... - Page 6 8.4 วิ ธ ี ด ู ภ าพจากข้ อ มู ล ที ่ ถ ่ า ยโอนด้ ว ย USB Memory Stick..........TH_59 8.5 การกำหนดช่ ว งเวลาที ่ ต ้ อ งการถ่ า ยโอน..............TH_59 9. Client Software (CMS)................TH_ 60 9.1 แนะนำโปรแกรม DVR PLAYER................TH_60 9.2 การใช้...
-
Page 7: ชุ ด อุ ป กรณ์ แ ละแผงควบคุ ม
1.ชุ ด อุ ป กรณ์ แ ละแผงควบคุ ม 1.1 ชุ ด อุ ป กรณ์ โปรดตรวจสอบอุ ป กรณ์ ต ่ า งๆ ก่ อ นการติ ด ตั ้ ง ถ้ า อุ ป กรณ์ ช ิ ้ น ใดชิ ้ น หนึ ่ ง สู ญ หาย หรื อ ไม่ ค วบจำนวน กรุ... -
Page 8: ด้ า นหน้ า เครื ่ อ ง
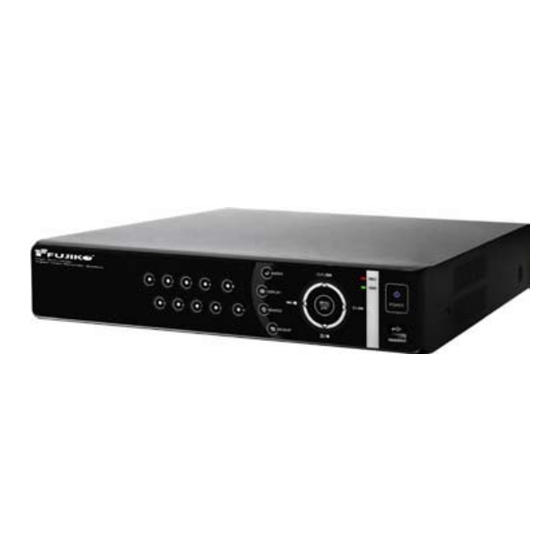
1.2 ด้ า นหน้ า เครื ่ อ ง FK-HM3004 FK-HM3008 FK-HM3016 1. ไฟสถานะ: ไฟ LED 3 ดวงแสดงสถานะเครื ่ อ งบั น ทึ ก เปิ ด เครื ่ อ ง (น้ ำ เงิ น ), บั น ทึ ก (แดง), ฮาร์ ด ดิ ส ก์ (เขี ย ว) 2. - Page 9 - ดู ถ อยหลั ง ที ล ะภาพ : กดปุ ่ ม นี ้ เ พื ่ อ ดู ย ้ อ นหลั ง แบบถอยหลั ง ที ล ะภาพ เมื ่ อ ค้ า งภาพไว้ - ถอยหลั ง อย่ า งเร็ ว : กดปุ ่ ม นี ้ เ พื ่ อ ดู ย ้ อ นหลั ง แบบถอยหลั ง อย่ า งเร็ ว - บั...
-
Page 10: ด้ า นหลั ง เครื ่ อ ง
1.3 ด้ า นหลั ง เครื ่ อ ง FK-HM3004, FK-HM3008, FK-HM3016 CAMERA INPUTS : หั ว ต่ อ BNC (เฉพาะ FK-HM3016 เป็ น หั ว ต่ อ แบบ D-Type 25 พิ น ) MONITOR (Composite Output) : หั ว ต่ อ BNC (ต่ อ จอภาพหลั ก ) Spot: หั... -
Page 11: รี โ มทคอนโทรล
1.4 รี โ มทคอนโทรล ยกเลิ ก / ESC เปิ ด /ปิ ด เครื ่ อ ง ปุ ่ ม + ปุ ่ ม เมนู ปุ ่ ม - แบ่ ง สั ญ ญาณกล้ อ ง ปุ ่ ม บั น ทึ ก ปุ... -
Page 12: ไอคอนสำหรั บ ใช้ เ มาส์ ค วบคุ ม
1.5 ไอคอนสำหรั บ ใช้ เ มาส์ ค วบคุ ม สลั บ ตำแหน่ ง กล้ อ ง ค้ น หาตามวั น เวลา ข้ อ มู ล บั น ทึ ก เหตุ ก ารณ์ แสดงจอภาพรอง ถ่ า ยโอนข้ อ มู ล รายละเอี ย ดของระบบ ควบคุ... -
Page 13: การติ ด ตั ้ ง และเชื ่ อ มต่ อ อุ ป กรณ
2.การติ ด ตั ้ ง และเชื ่ อ มต่ อ อุ ป กรณ์ 2.1 กล้ อ ง, จอมอนิ เ ตอร์ , ไมโครโฟน, เซ็ น เซอร์ , สายไฟ 1. แผนผั ง โครงสร้ า งระบบ โครงสร้ า งด้ า นล่ า งแสดงให้ เ ห็ น ระบบที ่ ม ี ก ารติ ด ตั ้ ง อย่ า งสมบู ร ณ์ TH_7 H.264 DVR... - Page 14 2. กล้ อ ง FK-HM3004 และ FK-HM3008 สามารถติ ด ตั ้ ง กล้ อ งได้ 4~8 ตั ว เชื ่ อ มต่ อ กล้ อ งที ่ ช ่ อ งสั ญ ญาณวิ ด ี โ อเข้ า (หั ว ต่ อ BNC) ที ่ ด ้ า นหลั ง เครื ่ อ ง การเชื...
- Page 15 3. เสี ย ง ระบบรองรั บ สั ญ ญาณเสี ย งเข้ า 1 ช่ อ งและสั ญ ญาณเสี ย งออก 1 ช่ อ ง ถ้ า ต้ อ งการบั น ทึ ก เสี ย ง ให้ เ ชื ่ อ มต่ อ ไมโครโฟนที...
-
Page 16: ความต้ อ งการระบบของเครื ่ อ งคอมพิ ว เตอร์ ส ำหรั บ เชื ่ อ มต่ อ เครื อ ข่ า ย
2.2 ความต้ อ งการระบบของเครื ่ อ งคอมพิ ว เตอร์ ส ำหรั บ เชื ่ อ มต่ อ เครื อ ข่ า ย ก. ซี พ ี ย ู : Pentium-4 2.0GHz หรื อ สู ง กว่ า ข. หน่ ว ยความจำ (RAM) : 256 เมกกะไบต์ ค. -
Page 17: ตั ้ ง ค่ า รวดเร็ ว
3. ตั ้ ง ค่ า รวดเร็ ว เปิ ด เครื ่ อ งบั น ทึ ก ให้ ก ดปุ ่ ม POWER ที ่ ห น้ า เครื ่ อ งหรื อ ที ่ ร ี โ มทคอนโทรล เมื ่ อ เครื ่ อ งเปิ ด แล้ ว จะแสดงหน้ า จอ ภาพสดในเวลาประมาณ... - Page 18 1. เวลา ทุ ก ครั ้ ง เมื ่ อ เปิ ด เครื ่ อ งบั น ทึ ก ครั ้ ง แรก จะต้ อ งตั ้ ง วั น ที ่ / เวลาให้ ถ ู ก ต้ อ ง เลื...
- Page 19 2. บั น ทึ ก วิ ธ ี ท ี ่ ง ่ า ยที ่ ส ุ ด สำหรั บ การบั น ทึ ก 2.1 โหมดการบั น ทึ ก เลื อ กแถบเมนู “เวลา” โดยกดปุ ่ ม กดปุ ่ ม แล้...
- Page 20 3. ขั ้ น สู ง เลื อ ก “เปิ ด ” หรื อ “ปิ ด ” โดยกดปุ ่ ม [-], [+] ที ่ ห น้ า เครื ่ อ งหรื อ ที ่ ร ี โ มทคอนโทรล “เปิ ด ” : เลื อ กหั ว ข้ อ นี ้ เ พื ่ อ เข้ า เมนู ห ลั ก และกดปุ ่ ม [ENTER] เพื ่ อ ออกจากเมนู แ ละบั น ทึ ก ค่ า การ ค่...
-
Page 21: การดู ภ าพสด
4.การดู ภ าพสด 4.1 อธิ บ ายหน้ า จอ (1) โหมดการบั น ทึ ก (2) ไอคอนบอกเหตุ ก ารณ์ ได้ ร ั บ สั ญ ญาณจากเซ็ น เซอร์ ไม่ ต ้ อ งการให้ ป รากฏ กดปุ ่ ม [CANCEL] เกิ ด การเคลื ่ อ นไหว ไม่ ต ้ อ งการให้ ป รากฏ กดปุ ่ ม [CANCEL] สั... -
Page 22: การแสดงสั ญ ญาณกล้ อ งแบบแบ่ ง ช่ อ งและแบบสลั บ
4.2 การแสดงสั ญ ญาณกล้ อ งแบบแบ่ ง ช่ อ งและแบบสลั บ 1) แสดงสั ญ ญาณกล้ อ งแบบเต็ ม จอ เลื อ กช่ อ งสั ญ ญาณกล้ อ งที ่ ต ้ อ งการแสดงแบบเต็ ม จอ โดยกดปุ ่ ม [-],[+] ที ่ ห น้ า เครื ่ อ ง หรื อ หมายเลข กล้... -
Page 23: การขยายภาพ
3) สลั บ ตำแหน่ ง กล้ อ ง สลั บ ตำแหน่ ง กล้ อ งที ่ แ สดงทางจอภาพ 3.1 รี โ มทคอนโทรลจำลอง 1) ใช้ เ มาส์ ค ลิ ก ปุ ่ ม ที ่ ร ี โ มทคอนโทรลจำลอง จากนั ้ น สั ญ ลั ก ษณ์ จะปรากฏทางหน้... -
Page 24: จอภาพรอง
4.4 จอภาพรอง ท่ า นสามารถเพิ ่ ม จอภาพรอง สำหรั บ แสดงภาพที ่ ต ้ อ งการดู เ ป็ น พิ เ ศษ ซึ ่ ง จะแสดงสั ญ ญาณกล้ อ ง ต่ า งจากจอมอภาพหลั ก มี ข ั ้ น ตอนดั ง นี ้ กดปุ... -
Page 25: การตั ้ ง ค่ า การทำงาน
5. การตั ้ ง ค่ า การทำงาน 5.1 เมนู ห ลั ก เมื ่ อ กดปุ ่ ม [MENU] ที ่ ห น้ า เครื ่ อ ง รี โ มทคอนโทรล หรื อ รี โ มทคอนโทรลจำลอง จะปรากฏหน้ า ต่ า งให้ ใ ส่ รหั... -
Page 26: จอภาพ
5.2 จอภาพ 1) ตั ้ ง ค่ า จอภาพ กดปุ ่ ม เพื ่ อ เลื อ กเมนู “จอภาพ” แล้ ว กดปุ ่ ม [ENTER] เพื ่ อ เข้ า ไปตั ้ ง ค่ า กดปุ ่ ม เพื ่ อ เปลี ่ ย นแถบเมนู “ตั ้ ง ค่ า จอภาพ” ซึ ่ ง แถบเมนู ท ี ่ เ ลื อ กจะเป็ น สี ส ้ ม กดปุ... - Page 27 2) การตั ้ ง ค่ า สลั บ ภาพ กดปุ ่ ม เพื ่ อ เปลี ่ ย นแถบเมนู “ตั ้ ง ค่ า สลั บ ภาพ” ซึ ่ ง แถบเมนู ท ี ่ เ ลื อ ก จะเป็ น สี ส ้ ม กดปุ...
-
Page 28: การตั ้ ง ค่ า กล้ อ ง
5.3 การตั ้ ง ค่ า กล้ อ ง กดปุ ่ ม เพื ่ อ เลื อ กเมนู “กล้ อ ง” แล้ ว ปุ ่ ม [ENTER] เพื ่ อ เข้ า ไปตั ้ ง ค่ า กดปุ ่ ม เพื... - Page 29 การตั ้ ง ค่ า ตั ว อั ก ษรจากรี โ มทคอลโทรล ที ่ กดครั ้ ้ ง 1 กดครั ้ ้ ง 2 กดครั ้ ้ ง 3 กดครั ้ ้ ง 4 ที ่ กดครั ้ ้ ง 1 กดครั ้ ้ ง 2 กดครั ้ ้ ง 3 กดครั ้ ้ ง 4 10+ SPACE การตั...
-
Page 30: การตั ้ ง ค่ า การตรวจจั บ การเคลื ่ อ นไหว
5.4 การตั ้ ง ค่ า การตรวจจั บ การเคลื ่ อ นไหว กดปุ ่ ม เพื ่ อ เลื อ กเมนู “เคลื ่ อ นไหว” แล้ ว กดปุ ่ ม [ENTER] เพื ่ อ เข้ า ไปตั ้ ง ค่ า กดปุ... - Page 31 • เมื ่ อ เกิ ด การเคลื ่ อ นไหวในพื ้ น ที ่ ท ี ่ ก ำหนด จะปรากฏเป็ น สี น ้ ำ เงิ น พื ้ น ที ่ ท ี ่ ก ำหนดตรวจจั บ การเคลื ่ อ นไหว •...
-
Page 32: การบั น ทึ ก ต่ อ เนื ่ อ ง
5.5 การบั น ทึ ก ต่ อ เนื ่ อ ง ค่ า มาตรฐานของการบั น ทึ ก ต่ อ เนื ่ อ ง จะถู ก ตั ้ ง ค่ า มาจากโรงงาน โดยจะปิ ด การ บั น ทึ ก เสี ย ง การบั... -
Page 33: การทำงานร่ ว มกั บ อุ ป กรณ์ เ ตื อ นภั ย
ถ้ า ต้ อ งการหยุ ด บั น ทึ ก กดปุ ่ ม หรื อ กดปุ ่ ม อี ก ครั ้ ง ที ่ ห น้ า เครื ่ อ งที ่ ร ี โ มทคอนโทรล หรื อ คลิ ก ขวา แล้... - Page 34 กดปุ ่ ม เพื ่ อ เลื อ กเมนู “อลาร์ ม ” แล้ ว กดปุ ่ ม [ENTER] เพื ่ อ เข้ า ไปตั ้ ง ค่ า กดปุ ่ ม เพื ่ อ เลื อ กแถบเมนู ซึ ่ ง เมนู ท ี ่ เ ลื อ กจะเป็ น สี ส ้ ม กดปุ...
- Page 35 รายการ รายละเอี ย ดการปรั บ ค่ า เวลาบั น ทึ ก กำหนดระยะเวลาบั น ทึ ก เมื ่ อ ได้ ร ั บ สั ญ ญาณจากอุ ป กรณ์ เ ตื อ นภั ย [10~300 วิ น าที ] กล้ อ งที ่ บ ั น ทึ ก •...
- Page 36 3) ลำดั บ การบั น ทึ ก ตั ว อย่ า งที ่ 1 สถานะการบั น ทึ ก สถานะการบั น ทึ ก อลาร์ ม ใช้ เคลื ่ อ นไหว เปิ ด ปิ ด ปิ ด • ผลการทำงาน กดปุ ่ ม [REC] เพิ ่ ม เริ ่ ม ต้ น บั น ทึ ก ร่ ว มกั บ อลาร์ ม ที ่ ม ี ก ารตั ้ ง ค่ า ดั ง แสดงด้ า นบนเป็ น หลั ก (คุ...
- Page 37 ตั ว อย่ า งที ่ 3 สถานะการบั น ทึ ก สถานะการบั น ทึ ก อลาร์ ม ใช้ เคลื ่ อ นไหว เปิ ด เปิ ด เปิ ด • ผลการทำงาน: กดปุ ่ ม [REC] เพิ ่ ม เริ ่ ม ต้ น บั น ทึ ก เมื ่ อ มี ก ารเคลื ่ อ นไหวมี ก ารตั ้ ง ค่ า ดั ง แสดงด้ า นบนเป็ น หลั ก (คุ...
-
Page 38: การตั ้ ง เวลาบั น ทึ ก
5.7 การตั ้ ง เวลาบั น ทึ ก การตั ้ ง เวลาบั น ทึ ก จะแสดงตารางรู ป สี ่ เ หลี ่ ย มตามสี ข องโหมด 1~4 ถ้ า มี ก ารตั ้ ง ค่ า การบั น ทึ ก ที ่ ใ ช้ ต าราง เวลาร่... - Page 39 7. กำหนดค่ า ต่ า งๆ ในโหมดดั ง รู ป ด้ า นล่ า ง *** เวลาบั น ทึ ก ถู ก ตั ้ ง ไว้ ต ลอด 24 ชม. (00:00-23:59) ถ้ า ผู ้ ใ ช้ ง านบั น ทึ ก ข้ า มวั น จะต้ อ งดั ง ค่ า ดั ง นี ้ วั...
- Page 40 ตารางสรุ ป การบั น ทึ ก แบบผสม โหมดบั น ทึ ก เมนู ต่ อ เนื ่ อ ง อลาร์ ม ตั ้ ง เวลา กล้ อ งที ่ ใ ช้ ใช้ ต่ อ เนื ่ อ ง โหมด 1-4 โหมด 1~4, เคลื...
-
Page 41: การตั ้ ง ค่ า เครื อ ข่ า ย
5.8 การตั ้ ง ค่ า เครื อ ข่ า ย 1) การตั ้ ง ค่ า ไอพี กดปุ ่ ม เพื ่ อ เลื อ กเมนู “เครื อ ข่ า ย” แล้ ว กดปุ ่ ม [ENTER] ที ่ ร ี โ มทคอนโทรล กดปุ... - Page 42 2) การตั ้ ง ค่ า การแจ้ ง เตื อ นทางอี เ มล์ เครื ่ อ งบั น ทึ ก สามารถแจ้ ง เตื อ นเหตุ ก ารณ์ ท างอี เ มล์ ไ ด้ ถ ึ ง 5 แอดเดรส โดยมี เ หตุ ก ารณ์ ด ั ง นี ้ : Alarm พร้...
- Page 43 3) การตั ้ ง ค่ า DDNS รายการ รายละเอี ย ดการปรั บ ค่ า ใช้ ปิ ด ปิ ด การอั พ เดต DDNS ค่ า มาตรฐานเป็ น ปิ ด ค่ า มาตรฐาน เลื อ กค่ า ที ่ โ รงงานตั ้ ง ให้ DYNDNS เลื...
- Page 44 4) การตั ้ ง ค่ า ทั ่ ว ไป รายการ รายละเอี ย ดการปรั บ ค่ า แบนวิ ธ สามารถกำหนดแบนวิ ธ ได้ ต ั ้ ง แต่ 64 KBS~8MBS ค่ า มาตรฐาน “ไม่ จ ำกั ด ” ไม่ จ ำกั ด แบนวิ ธ บล็...
-
Page 45: การตั ้ ง ค่ า ระบบ
5.9 การตั ้ ง ค่ า ระบบ 1) การตั ้ ง ค่ า ทั ่ ว ไป (General) กดปุ ่ ม เพื ่ อ เลื อ กเมนู “ระบบ” แล้ ว กดปุ ่ ม [ENTER] ที ่ ร ี โ มทคอนโทรล กดปุ... - Page 46 จำกั ด การบั น ทึ ก จำกั ด การบั น ทึ ก ของฮาร์ ด ดิ ส ก์ ค่ า มาตรฐานคื อ ไม่ ม ี สามารถเลื อ กว่ า จะให้ ฮ าร์ ด ดิ ส ก์ บ ั น ทึ ก ตามเวลาที ่ ก ำหนดไว้ [12 ชั...
- Page 47 2) การตั ้ ง ค่ า วั น ที ่ / เวลา รายการ รายละเอี ย ดการปรั บ ค่ า วั น ที ่ / เวลา ตั ้ ง วั น ที ่ / เวลา ข้ อ สั ง เกต ขณะอยู ่ ใ นโหมดบั น ทึ ก ท่ า นไม่ ส ามารถตั ้ ง วั น ที ่ / เวลาได้ ควรหยุ ด บั น ทึ ก ก่ อ นเพื ่ อ เปลี ่ ย นวั น ที ่ / เวลา <โหมดบั...
- Page 48 3) การตั ้ ง ค่ า บั ญ ชี ผ ู ้ ใ ช้ ง าน รายการ รายละเอี ย ดการปรั บ ค่ า ผู ้ ใ ช้ ผู ้ ใ ช้ ง านหลั ก จะมี ส ถานะเป็ น ADMIN สามารถควบคุ ม ดู แ ลการตั ้ ง ค่ า ระบบต่ า งๆ ได้...
- Page 49 4) การตั ้ ง ค่ า ดิ ส ก์ รายการ รายละเอี ย ดการปรั บ ค่ า ฟอร์ แ มต ทุ ก ครั ้ ง ที ่ ม ี ก ารติ ด ตั ้ ง ฮาร์ ด ดิ ส ก์ ใ หม่ ควรฟอร์ แ มตให้ เ รี ย บร้ อ ยก่ อ น •...
- Page 50 5) อั พ เดตเฟิ ร ์ ม แวร์ รายการ รายละเอี ย ดการปรั บ ค่ า อั พ เดต หลั ง จากเสี ย บ USB DRIVE เพื ่ อ ต้ อ งการอั พ เตด กดปุ ่ ม [เริ ่ ม ] หรื...
- Page 51 6) รายละเอี ย ดของเครื ่ อ ง เมื ่ อ เลื อ กรายการนี ้ กดปุ ่ ม [INFO] ที ่ ร ี โ มทคอนโทรล หรื อ คลิ ก เมาส์ ข วาแล้ ว เลื อ กไอคอน ปุ ่ ม INFO จะแสดงรายละเอี ย ดของระบบทั ้ ง หมด ผู ้ ใ ช้ ง านสามารถตรวจสอบระบบเครื ่ อ ง จากรายการนี ้ ไ ด้ รายการ...
-
Page 52: การควบคุ ม กล้ อ ง Ptz
6. การควบคุ ม กล้ อ ง PTZ เครื ่ อ งบั น ทึ ก มี ฟ ั ง ก์ ช ั ่ น ที ่ ส ามารถควบคุ ม กล้ อ ง PTZ โดยต่ อ กล้ อ ง PTZ เข้ า กั บ ช่ อ งต่ อ สั ญ ญาณกล้ อ ง ด้... - Page 53 กดปุ ่ ม นี ้ เ พื ่ อ ยกเลิ ก การส่ า ยหรื อ ก้ ม เงยของกล้ อ ง ปุ ่ ม [CANCEL] เมื ่ อ ผู ้ ใ ช้ ง านกดปุ ่ ม นี ้ จะแสดงเมนู ก ารใช้ ง านทั ้ ง หมด กดปุ ่ ม นี ้ อ ี ก ครั ้ ง จะแสดงเมนู...
- Page 54 2) เมนู Preset & Tour ปุ ่ ม ฟั ง ก์ ช ั ่ น • ตั ้ ง ตำแหน่ ง Preset กดปุ ่ ม [SPOT OUT] ที ่ ร ี โ มทคอนโทรล • ย้ า ยกล้ อ ง PTZ ไปยั ง ตำแหน่ ง ที ่ ต ้ อ งการ •...
- Page 55 4) รายชื ่ อ รุ ่ น ของ กล้ อ ง PTZ ที ่ ร องรั บ Model Name Speed Preset Go to Tour A.Pan A.Tilt ESC/ ENTER NUVICO, NV 9600 BPS MERIT LILIN, PIH- 7000/7600 VCL, Orbiter Micro- sphere SAMSUNG, SCC-641 NEC, NC-21D SUNKWANG, SK2107...
- Page 56 Model Name Speed Preset Go to Tour A.Pan A.Tilt ESC/ ENTER BOSCH, TC8560/TC700 SYSMANIA, ORX1000 AD, DELTADOME HUNT, HTZ-2300 HAZEM, RESERVED RVT, EZ Protocol LG, MULTIX ELMO, PTC-200C/400C NICECAM, MP-1xxx C&B TECH, CNBPTZ102 ***ข้ อ สั ง เกต*** ผู ้ ใ ช้ ง านสามารถตั ้ ง ค่ า ความเร็ ว 1 (ข้ า ) ~ 8 (เร็ ว ) กดปุ...
-
Page 57: ค้ น หา/ดู ภ าพย้ อ นหลั ง
7. ค้ น หา/ดู ภ าพย้ อ นหลั ง 7.1 ค้ น หาด้ ว ยเวลา ต้ อ งการดู ภ าพย้ อ นหลั ง กดปุ ่ ม ที ่ ห น้ า เครื ่ อ ง หรื อ ปุ ่ ม [TIME SEARCH] จะปรากฏไดอะล็ อ กให้ ใส่... - Page 58 *** ถ้ า เลื อ ก เวลา จะแสดงแบบหลายช่ อ งสั ญ ญาณ *** ถ้ า เลื อ ก กล้ อ ง จะแสดงช่ อ งสั ญ ญาณกล้ อ งนั ้ น เต็ ม จอ TH_52 H.264 DVR...
-
Page 59: ค้ น หาข้ อ มู ล Log
7.2 ค้ น หาข้ อ มู ล LOG ถ้ า ต้ อ งการดู เ หตุ ก ารณ์ ต ่ า งๆ ในขณะเครื ่ อ งกำลั ง บั น ทึ ก สามารถค้ น หาข้ อ มู ล ใน LOG และดู ภ าพย้ อ น หลั... -
Page 60: การถ่ า ยโอนข้ อ มู ล
8. การถ่ า ยโอนข้ อ มู ล 8.1 ถ่ า ยโอนข้ อ มู ล ด้ ว ย USB Memory stick เสี ย บที ่ พ อร์ ต USB ด้ า นหน้ า เครื ่ อ งบั น ทึ ก <ข้ อ สั ง เกต: แน่ ใ จว่ า อุ ป กรณ์ USB มี พ ื ้ น ที ่ ค วามจุ เ พี ย งพอก่ อ นเริ ่ ม ต้ น ถ่ า ยโอนข้ อ มู ล > กดปุ... -
Page 61: ถ่ า ยโอนข้ อ มู ล ด้ ว ย Usb ฮาร์ ด ดิ ส ก
8.2 ถ่ า ยโอนข้ อ มู ล ด้ ว ย USB ฮาร์ ด ดิ ส ก์ สามารถใช้ USB HDD เพื ่ อ ถ่ า ยโอนข้ อ มู ล ได้ รอประมาณ 10 วิ น าที ระบบจะจดจำการ เชื ่ อ มต่ อ หลั... -
Page 62: Usb Memory Stick
- เริ ่ ม ต้ น ถ่ า ยโอน โปรดใช้ FAT32 ในวิ น โดส์ ส ำหรั บ อ่ า นข้ อ มู ล ที ่ ถ ่ า ยโอนจาก USB ฮาร์ ด ดิ ส ก์ กรณี ท ี ่ ใ ช้ ฮ าร์ ด ดิ ส ก์ ท ี ่ ม ี ค วามจุ จ ำนวนมาก จำเป็ น ต้ อ งฟอร์ แ มตที ่ เ ครื ่ อ งบั น ทึ ก ก่ อ น ดู เ รื ่ อ งการฟอร์ แ มต ในห้... - Page 63 <การฟอร์ แ มตเป็ น FAT32> วิ ธ ี ก ารฟอร์ แ มตฮาร์ ด ดิ ส ก์ เ ป็ น FAT32 มี 2 วิ ธ ี : 1-1. ฟอร์ แ มต USB ฮาร์ ด ดิ ส ก์ เ ป็ น FAT32 โดยใช้ เ ครื ่ อ งบั น ทึ ก ในเมนู ก ารตั ้ ง ค่ า ดิ ส ก์ <ข้...
- Page 64 8.3 ถ่ า ยโอนข้ อ มู ล ด้ ว ย USB CD/DVD-RW สามารถใช้ EX. CD/ DVD-RW เพื ่ อ ถ่ า ยโอนข้ อ มู ล ได้ รอประมาณ 10 วิ น าที ระบบจะจดจำการ เชื ่ อ มต่ อ หลั ง จากเสี ย บที ่ พ อร์ ต USB หน้ า เครื ่ อ งบั น ทึ ก ข้...
-
Page 65: วิ ธ ี ด ู ภ าพจากข้ อ มู ล ที ่ ถ ่ า ยโอนด้ ว ย Usb Memory Stick
8.4 วิ ธ ี ด ู ภ าพจากข้ อ มู ล ที ่ ถ ่ า ยโอนด้ ว ย USB Memory Stick 1. เปิ ด ดู ด ้ ว ยโปรแกรม “MCD Plyer” - เสี ย บ USB Memory Stick เข้ า ที ่ เ ครื ่ อ งคอมพิ ว เตอร์ ไม่ ต ้ อ งติ ด ตั ้ ง โปรแกรม 2. -
Page 66: Client Software (Cms)
9. Client Software (CMS) โปรแกรม DVR Player จะให้ ท ่ า นดู ภ าพสด ค้ น หาผ่ า นภาพวิ ด ี โ อที ่ ถ ่ า ยโอน ควบคุ ม กล้ อ ง PTZ และควบคุ ม การตั ้ ง ค่ า ได้ อ ย่ า งครบถ้ ว น โปรแกรม DVR Player เป็ น โปรแกรมบริ ห ารจั ด การที ่ ศ ู น ย์ ก ลาง (CMS) สำหรั บ ระบบเครื... - Page 67 การติ ด ตั ้ ง โปรแกรม • ดั บ เบิ ล คลิ ก “DvrPlayerInstaller.exe” หลั ง จากใส่ แ ผ่ น CD เข้ า ไปแล้ ว คลิ ก NEXT ตามรู ป คลิ ก “INSTALL” หรื อ เลื อ กไดเร็ ก ทอรี ท ี ่ ต ้ อ งการแล้ ว คลิ ก “INSTALL” คลิ...
- Page 68 จะมี ไ อคอน ปรากฏอยู ่ บ นเดสก์ ท ็ อ บ ดั บ เบิ ล คลิ ก ไอคอน เปิ ด โปรแกรม แล้ ว ใส่ ร หั ส ผ่ า น *** รหั ส ผ่ า นมาตรฐาน คื อ “0” ถ้ า ต้ อ งการเปลี ่ ย นรหั ส ผ่ า น เข้ า ไปตั ้ ง ค่ า ที ่ เ มนู SETUP> PASSWORD *** ต้...
-
Page 69: การใช้ ง านโปรแกรม
9.2 การใช้ ง านโปรแกรม หน้ า ต่ า งหลั ก ของโปรแกรม แบ่ ง ช่ อ งสั ญ ญาณ โหมด CMS ปั จ จุ บ ั น วั น ที ่ / เวลา สลั บ โหมดภาพสด /ภาพย้ อ นหลั ง ปุ ่ ม ตั ้ ง ค่ า ปุ... - Page 70 แสดงเวลาปั จ จุ บ ั น ในโหมดแสดงภาพสดและเวลาขณะดู ย ้ อ นหลั ง ในโหมดดู ย ้ อ นหลั ง เดื อ น วั น ที ่ วั น ชั ่ ว โมง นาที วิ น าที (3.) ปุ ่ ม สลั บ โหมดดู ภ าพสด/ดู ภ าพย้ อ นหลั ง ก.
-
Page 71: Osd Setup
* ตั ้ ง ค่ า โปรแกรม CMS - GENERAL 1 ก) OSD SETUP แสดงเวลา, ชื ่ อ DVR, หมายเลข กล้ อ ง, ชื ่ อ กล้ อ ง, เฟรมเรตของแต่ ล ะ กล้ อ ง ที ่ ช ่ อ งสั ญ ญาณกล้ อ ง ข) OVERLAY (Defualf) แนะนำให้... - Page 72 - GENERAL 2 ก) POS จำกั ด การค้ น หา POS ไม่ เ กิ น 1,000 ข) LOG จำกั ด ไฟล์ LOG ไม่ เ กิ น 1,000 ค) CHECK WATERMARK ตรวจสอบ WATERMARK ฆ) AUTO FULL SCREEN FOR ALARM EVENT เมื ่ อ เกิ ด เหตุ ก ารณ์ ท ี ่ เ ครื ่ อ งบั น ทึ ก ให้...
- Page 73 - SOUND ตั ้ ง ค่ า การแจ้ ง เตื อ นด้ ว ยเสี ย งสำหรั บ โปรแกรม CMS ท่ า นสามารถเลื อ กเปิ ด /ปิ ด เสี ย งจากซอฟต์ แ วร์ • CONNECT: โปรแกรม CMS จะส่ ง เสี ย ง เมื...
- Page 74 (6.) ปุ ่ ม ควบคุ ม กล้ อ ง PTZ กดปุ ่ ม นี ้ เ พื ่ อ แสดงแบบเต็ ม กดปุ ่ ม นี ้ เ พื ่ อ แสดง แบบย่ อ ซู ม ออก ซู ม เข้ า คลิ...
- Page 75 ค. ปรั บ ไอริ ส (IRIS) เปิ ด ไอริ ส ปิ ด ไอริ ส ปรั บ ไอริ ส อั ต โนมั ต ิ ฆ. ทั ว ร์ (TOUR) กำหนดจุ ด preset ไปยั ง จุ ด preset ที ่ ต ั ้ ง ไว้ ทั...
- Page 76 (7.) รายงานการเชื ่ อ มต่ อ DVR แสดงรายชื ่ อ เครื ่ อ งบั น ทึ ก ล่ า สุ ด ที ่ ม ี ป ั ญ หาหรื อ เกิ ด เหตุ ก ารณ์ สี จ ะเปลี ่ ย นแปลงขึ ้ น อยู ่ กั บ เหตุ ก ารณ์ ห รื อ ปั...
-
Page 77: Health Report
*** เมนู HEALTH REPORT รายงานสถานะนี ้ จะแจ้ ง ผู ้ ใ ช้ ง านให้ ท ราบถึ ง เงื ่ อ นไขทั ้ ง หมดเกี ่ ย วกั บ การเชื ่ อ มต่ อ เครื ่ อ งบั น ทึ ก ผู... -
Page 78: Dvr Property
6. SCHE. OFF: บอกสถานะไฟสั ญ ญาณบั น ทึ ก แบบตั ้ ง ตารางเวลาที ่ เ ครื ่ อ งบั น ทึ ก ว่ า เปิ ด หรื อ ปิ ด 7. BACKUP OFF: บอกสถานะการถ่ า ยโอนข้ อ มู ล *** DVR Property ถ้... -
Page 79: Cms Log List
*** CMS LOG LIST ขณะเปิ ด โปรแกรม CMS ระบบจะเก็ บ CMS LOG ถ้ า ต้ อ งการดู ร ายละเอี ย ดเพิ ่ ม เติ ม ให้ ค ลิ ก ขวาที ่ ไ อคอน DVR แล้ ว เลื อ ก DVR LOG LIST *** DVR LOG LIST โปรแกรมจะแสดงไฟล์... -
Page 80: การควบคุ ม เครื ่ อ งบั น ทึ ก (Dvr Control)
9.3 การควบคุ ม เครื ่ อ งบั น ทึ ก (DVR CONTROL) 1) SET LIST MANAGER สำหรั บ เพิ ่ ม หรื อ ลบเครื ่ อ งบั น ทึ ก คลิ ก ปุ ่ ม เพื ่ อ เปิ ด หน้ า ต่ า งดั ง รู ป (1.) AUTO SCAN : ค้... - Page 81 2) เงื ่ อ นไขของเครื ่ อ งบั น ทึ ก โปรแกรม CMS จะแสดงไอคอนของเครื ่ อ งบั น ทึ ก ที ่ เ ชื ่ อ มต่ อ อยู ่ โดยมี เ งื ่ อ นไขแต่ ล ะ อย่ า งเพื ่ อ แจ้ ง ผู ้ ใ ช้ งานได้...
- Page 82 3) สั ญ ลั ก ษณ์ ข องเครื ่ อ งบั น ทึ ก โปรแกรม CMS จะแสดงไอคอนเครื ่ อ งบั น ทึ ก เพื ่ อ ช่ ว ยผู ้ ใ ช้ ง านให้ ส ะดวกขึ ้ น โดยผู ้ ใ ช้ ง านสามารถคลิ ก ไอคอนเครื...
- Page 83 4) ดู ภ าพสด (Live Viewing) ดู ภ าพสดแต่ ล ะเครื ่ อ ง คลิ ก ไอคอน หรื อ เพื ่ อ แสดงภาพสด สั ญ ลั ก ษณ์ บ นจอภาพ เวลา ชื ่ อ เครื ่ อ งบั น ทึ ก +ชื ่ อ กล้ อ ง เฟรมเรต...
- Page 84 เลื อ ก เพื ่ อ เลื อ กแสดงแบบแบ่ ง ช่ อ งสั ญ ญาณ เปลี ่ ย นตำแหน่ ง กล้ อ งโดยคลิ ก เลื อ กกล้ อ งที ่ ต ้ อ งการแล้ ว ลากไปวางแทนกล้ อ งที ่ ต้ อ งการเปลี ่ ย น ถ้...
- Page 85 เมื ่ อ คลิ ก ขวาไอคอนเครื ่ อ งบั น ทึ ก ซึ ่ ง อยู ่ ใ นหน้ า ต่ า งไอคอนเครื ่ อ งบั น ทึ ก จะปรากฏเมนู ช ่ ว ย ท่ า นสามารถเลื อ กเมนู ต ่ า งๆ ที ่ ต ้ อ งการได้ ดั ง รู ป 1) LIVE: แสดงภาพสด...
- Page 86 6) ดู ภ าพย้ อ นหลั ง (Playback) เครื ่ อ งบั น ทึ ก ที ่ เ พิ ่ ม เข้ า สามารถดู ภ าพย้ อ นหลั ง หรื อ ดาวน์ โ หลดไฟล์ แ ล้ ว บั น ทึ ก ไว้ ท ี ่ ี เ ครื ่ อ งคอมพิ ว เตอร์ ท ี ่ เปิ...
- Page 87 (1.) ดู ย ้ อ นหลั ง จากเครื ่ อ งบั น ทึ ก 1. เลื อ ก “REMOTE” และเครื ่ อ งบั น ทึ ก ที ่ ต ้ อ งการ 2. เมื ่ อ เลื อ กเครื ่ อ งบั น ทึ ก จะแสดงปฏิ ท ิ น ถ้ า มี ข ้ อ มู ล จะแสดงบล็ อ กสี แ ดง เส้ น สี ก ารบั น ทึ ก ข้ อ มู ล สี...
- Page 88 (2.) ดาวน์ โ หลดจากเครื ่ อ งบั น ทึ ก ท่ า นสามารถดาวน์ โ หลดข้ อ มู ล ภาพจากเครื ่ อ งบั น ทึ ก มาเก็ บ ไว้ ท ี ่ เ ครื ่ อ งคอมพิ ว เตอร์ ผ ่ า นทาง โปรแกรม...
- Page 89 ฆ. ดาวน์ โ หลดเรี ย บร้ อ ย: เมนู CURENT เปลี ่ ย นเป็ น ข้ อ ความ “Download Complete” แสดงว่ า การดาวน์ โ หลดเสร็ จ เรี ย บร้ อ ยแล้ ว ดั ง รู ป ที ่ แ สดงด้ า นล่ า ง คลิ ก “OK” ดู...
- Page 90 7) ตั ้ ง ค่ า เครื ่ อ งบั น ทึ ก - ท่ า นสามารถเข้ า ไปตั ้ ง ค่ า เครื ่ อ งบั น ทึ ก ผ่ า นทางโปรแกรม CMS เหมื อ นกั บ การตั ้ ง ค่ า หน้ า เครื ่ อ งบั น ทึ ก - การเข้...
-
Page 91: Virtual Set List Manager
1. ความหมายของเครื ่ อ งบั น ทึ ก จำลอง เครื ่ อ งบั น ทึ ก จำลอง ไม่ ใ ช่ เ ครื ่ อ งบั น ทึ ก จริ ง แต่ เ ป็ น การรวมเครื ่ อ งบั น ทึ ก หลายๆ เครื ่ อ งเข้ า ไว้ ด ้ ว ยกั น เครื... - Page 92 (3.) คุ ณ สมบั ต ิ ข องเครื ่ อ งบั น ทึ ก จำลอง เลื อ กไอคอนเครื ่ อ งบั น ทึ ก ที ่ ต ้ อ งการแล้ ว กดปุ ่ ม “PROP- ERTY” จะแสดงหน้ า ต่ า งรายละเอี ย ดของเครื ่ อ งบั น ทึ ก จำลอง เช่ น ชื ่ อ , จำนวนเครื ่ อ งบั น ทึ ก , จำนวนกล้...
- Page 93 เลื อ กสั ญ ญาณกล้ อ งที ่ ต ้ อ งการลบ จากนั ้ น คลิ ก ขวาเลื อ ก “REMOVE” เลื อ กสั ญ ญาณกล้ อ งที ต ้ อ งการ จากนั ้ น ใช้ เ มาส์ ล ากไปวางที ่ ไ อคอน DVR หรื อ DVR จำลอง การดู...
-
Page 94: ภาคผนวก 1 : Web Server
ภาคผนวก 1 : Web Server เปิ ด โปรแกรม IE พิ ม พ์ ห มายเลขไอพี หรื อ ชื ่ อ โฮสต์ แล้ ว ตามด้ ว ยพอร์ ต (พอร์ ต มาตรฐาน คื อ 7000) ตั ว อย่ า ง http://192.168.1.100:7000 http://fujikoonline.dyndns.info:7000 ใส่ ช ื ่ อ (ADMIN หรื อ USER) และรหั ส ผ่ า น ค่... - Page 95 หลั ง จากคลิ ก WEB SERVER จะปรากฏ หน้ า ต่ า งพร้ อ มแสดงสั ญ ญาณภาพจาก เครื ่ อ งบั น ทึ ก ท่ า นสามารถเลื อ กฟั ง ก์ ช ั ่ น ต่ า งๆ ของโปรแกรม WebServer ก. Live : แสดงภาพสด ข.
- Page 97 CAUTION: TO REDUCE THE RISK OF ELECTRIC SHOCK, DO NOT REMOVE COVER (OR BACK). NO USER SERVICEABLE PARTS INSIDE. REFER SERVICING TO QUALIFIED SERVICE PERSONNEL. The lightning flash with arrowhead symbol, within an equilateral triangle, is intended to alert the user to the presence of un insulated “dangerous voltage”...
- Page 98 Contents Disclaimer Warning Caution Package Contents..................EN_ 1 1. CONTROLS..................EN_2 1.1 Front Panel.....................EN_ 2 1.2 Rear Panel.....................EN_4 1.3 Remote Controller....................EN_5 1.4 Virtual Keypad for Mouse Control................EN_6 2. INSTALLATION & CONNECTIONS............EN_7 2.1 Camera, Monitor, Microphone, Alarm sensor and Power cord........EN_ 7 2.2 PC system requirement for Network connection...........EN_10 3.
- Page 99 8.3 External CD/DVD-RW Backup................EN_ 54 8.4 How to Play Backup data in USB Memory Stick Backup........EN_ 55 9. Client Software (CMS)................EN_56 9.1 DVR Player Program Introduction..............EN_ 56 9.2 Features.......................EN_59 9.3 DVR CONTROL.....................EN_70 9.4 Virtual DVR....................EN_81 Appendix 1: VIEW ONLY................EN_85...
-
Page 100: Disclaimer
Disclaimer Š The information in this manual is believed to be accurate and reliable as of the date of publica- tion. The information contained herein is subject to change without notice. Revisions or New editions to this publication may be issued to incorporate such change Š... - Page 101 Š Do not use substances containing alcohol, benzene, thinners or other flammable substances to clean or maintain the equipment. The use of these substances may lead to fire. Use a dry cloth on a regular periodic basis and wipe away the dust and dirt that collects on the device. In dusty, humid or greasy environments, the dust that collects around the ventilation or the slots on the outer casing over long periods of time may become saturated with humidity and short-circuit, leading to fire.
-
Page 102: Caution
Caution Š Do not operate the appliance beyond its specified temperature, humidity or power source rat- ings. Do not use the appliance in an extreme environment where there is high temperature or ° ° ° ° high humidity. Use the device at temperatures within +0 C - +40 C (32 F - 104... -
Page 103: Package Contents
Package Contents Please check the package and contents for visible damage. If any components are damaged or missing, do not attempt to use the unit, contact the supplier immediately. If the unit must be returned, it must be shipped in the original packing box. CONTENTS QUANTITY REMARK... -
Page 104: Controls
1. CONTROLS 1.1 Front Panel FK-HM3004 FK-HM3008 FK-HM3016 1. 1. Mode indicator : 3 LEDs display the status of the Digital Video Recorder. Power (Blue), Recording (Red) and HDD (Green) 2. Playback / Record control: These functions are used in Live Mode or Playback mode. 1) Direction buttons: In Menu setup mode, used to move the cursor. - Page 105 - Reverse Step : This button is used to move reverse field by field during STILL mode - Fast Rewind : This button is used to fast rewind during PLAYBACK mode. - REC : Press this button to start recording. Press the button again to stop. [Clear / Still or Playback] - Clear : This button is used to hide the On-Screen-Display information such as the time, date and channel icons.
-
Page 106: Rear Panel
1.2 Rear Panel FK-HM3004, FK-HM3008, FK-HM3016 CAM1~4, 1~8 or 1~16 : BNC input (Camera 1~4, 1~8 or 1~16) connectors MONITOR (Composite Output) : BNC standard composite video output connector. SPOT : Spot out connector AUDIO Input / SPEAKER (Output) connectors : RCA VGA out connector LAN (RJ-45 Ethernet Port) : For connecting to remote PC via Ethernet network. -
Page 107: Remote Controller
1.3 Remote Controller CANCEL / ESC POWER + BUTTON MENU - BUTTON DISPLAY MODE RECORD ENTER / ZOOM PLAY REWIND/INFO FAST REWARD/ STOP STEP_FORWARD/ PTZ/STEP_BACK STPOT NUMBERIC/ ALPHABETIC TIME SEARCH EN_5 H.264 DVR... -
Page 108: Virtual Keypad For Mouse Control
1.4 Virtual Keypad for Mouse Control. This DVR can be controlled by Mouse. Connect a mouse via USB port before use. If you click right button of your mouse in Live mode and Playback mode, you will see following virtual Remote con- trollers respectively and Virtual Keypad will be shown to enter PASSWORD and Camera Name etc Repositioning TIME SEARCH... -
Page 109: Installation & Connections
2. INSTALLATION & CONNECTIONS 2.1 Camera, Monitor, Microphone, Alarm sensor and Power cord 1. System Configuration Diagram The following illustration is showing the fully installed system. EN_7 H.264 DVR... - Page 110 2. CAMERA This product can be installed up to 4~8 cameras. Connect cameras to the VIDEO IN (BNC) on the back panel of the system. To connect a PTZ camera, connect the PTZ camera’s control line to the RS-422 TX+, RS-422 TX- terminal and connect the video output to one out of VIDEO IN on the back panel of the product.
- Page 111 3. AUDIO The system has one channel audio input and output. If you wish to record and playback audio signal, connect the proper audio device (microphone) to the AUDIO IN (1 Vp-p @600 ohms) and speaker to the AUDIO OUTPUT (See illustration below). 4.
-
Page 112: Pc System Requirement For Network Connection
2.2 PC system requirement for Network connection. (a) Pentium-4 2.0GHz or higher (b) 256MB System Memory (c) 1,024 x 768 Display Resolution, 32 Bit color (d) Windows XP, VISTA (e) Spare 10/100-BaseT Ethernet Port (f) Microsoft DirectX 9.0c It is recommended to have DirectX 9.0c version in Client PC. DirectX 9.0c is available for download from Microsoft homepage (www.microsoft.com/windows/directx). -
Page 113: Quick Setup
3. QUICK SETUP To turn on the DVR, press [POWER] button on the front panel or on the remote controller. When the Digital Video Recorder is powered on, the Live Viewing screen will appear in about 30sec. 1) Stop recording first to set QUICK SETUP menu. While DVR is recording, TIME and RECORD menu is not activated. - Page 114 1. TIME When the Digital Video Recorder is powered on for the very first time, it is important to set the exact date and time., Select “Time” on TAP menu by using Directional buttons. Enter the Date and Time by pressing numeric buttons on the remote controller or “–/+” on the unit.
- Page 115 2. RECORD This is an easy setup for recording. 2.1 RECORD MODE Select “RECORD MODE” on TAP menu by using Directional buttons. Select MODE by pressing “–/+” buttons on the remote controller or on the unit. Press [ENTER] button to exit a menu with saving changes. Press [ESC] to exit a menu without making changes.
- Page 116 2.4 RECORD SETUP INFO This displays the picture quality and recording speed. NOTE 1. START RECORDING When setup is finished, press [REC] button on the front panel or on the remote controller to start recording, 2. For individual recording setup of each channel and more specified setup, enter into RECORD in main menu.
-
Page 117: Live Viewing
4.LIVE VIEWING 4.1 Display Overview (1) Recording Mode (2) Event Indicator Indicate Alarm In terminal is triggered by an alarm sensor. To disappear, press [CANCEL/ESC] button on remote controller or [CLR] button on the front panel. Indicate Motion detected. To disappear, press [CANCEL/ESC] button on remote controller or [CLR] button on the front panel. -
Page 118: Multi Screen Display And Sequencing
- It shows Number of Client, which is connected to Network.(MAX:3) : Displays Year, Month, Time and Date. Show you the remaining recording time of the DVR. If remaining HDD capacity is less than 4GB, this blue “Recycling” icon will be shown up. 4.2 Multi screen Display and Sequencing 1) Full Screen Display Select any camera for Full screen display by pressing the Number button of the desired... -
Page 119: Zooming
3) Repositioning To reposition a camera view on screen, 3.1 Virtual Remote controller 1) press button on virtual remote controller by using mouse, then Mark will be dis- played on screen. Move icon to the desired position by pressing directional buttons on remote controller or virtual control pad. -
Page 120: Spot Monitor
4.4 Spot Monitor In addition to the Main Monitor, attaching a Spot Monitor enables user to monitor specific chan- nels independently form the main monitor Press [Spot] button on the remote controller, then press number button you wish watch as full screen. -
Page 121: Operation
5. OPERATION 5.1 Main Menu Overview When the DVR is powered on, Live Viewing screen will appear after initialization about 30sec. Press [MENU] button to access the main menu. An Admin Password Box will appear. Enter the password using Numeric buttons on IR remote controller or CH increase button on Front Panel. Default pass- word is ‘000000’. -
Page 122: Display Option
5.2 Display Option 1) Display Setup Use Direction buttons [ ] to select “DISPLAY” menu. Then, press [ENTER] button to display “DISPLAY SETUP”. Use Left/Right buttons [ ] to select on TAP menu Selected items changed [ORANGE] color. Use Down [ ] button to specify. - Page 123 2) Sequential Setup (Auto Sequence) ITEM DEFAULT ADJUSTMENT DWELL TIME 2 Sec Specify the dwell time of each camera or Multi screen mode is displayed. Use [-, +] button : [1 second ~ 30 second SEQ. MODE None Select desired sequence mode to switching. FULL SCREEN Select the cameras to be included or excluded from the automatic sequencing.
-
Page 124: Camera Setup
5.3 Camera Setup Use Direction buttons [ ] to select “CAMERA” menu. Then, press [ENTER] button to display “CAMERA”. Use Left/Right buttons [ ] or Number button to select the Camera you wish to configure. Use Down [ ] button to move specified menu and use Left/Right buttons [ ] to select other item. - Page 125 No 1st No 1st Press Press Press Press Press Press Press Press 10+ SPACE <Insert characters from IR Remote Controller > EN_23 H.264 DVR...
-
Page 126: Motion Recording
5.4 Motion Recording Use Direction buttons [ ] to select “MOTION” menu. Then, press [ENTER] button to display “MOTION”. Use Left/Right buttons [ ] or Number button to select the Camera you wish to configure. Use Down [ ] button to move specified menu and use Left/Right buttons [ ] to select other item. - Page 127 • Motion detected zones will be changed to BLUE Color. Motion Detected zones • USE Numeric button to select Motion Grid. GRAY Will be cleared. Or Use <+> button to select Motion Grid at Front Panel. Running Man Icon will be activated. <+> button is used for selecting and cancel.
-
Page 128: Continues Recording (Normal Recording)
5.5 Continues Recording (Normal Recording) The DVR comes with a certain preset settings from the factory. Therefore once the DVR is installed, immediate recording is possible after pressing the record buttons. By default, audio alarm, motion recording are off. Use Direction buttons [ ] to select “RECORD”... - Page 129 Save changes and exit the menu, press [ENTER] button. Press [ REC] button. Then, the red REC LED lights on the front panel and recording starts. To Record stop, press the “ STOP” button on IR remote or [REC] button again on Front Panel. <...
- Page 130 ITEM ADJUSTMENT Enable or Disable Alarm Recording on a per camera. QUALITY Specify the record picture quality for each camera on Alarm Recording. ULTRA > SUPER > HIGH > MIDDLE > LOW RATE Select recording rate of each camera when Alarm is triggered AUDIO Select audio recording: ON or OFF.
- Page 131 ALARM BUZZER • ON: The buzzer Sounds if an alarm is triggered. The buzzer will sound for the duration of the RECORD TIME. This buzzer related with Alarm Out. Please configure Alarm Out “ON” for Alarm buzzer. • OFF: Disables the ALARM BUZZER function. <Note>...
- Page 132 <Example 2> RECORDING STATUS ALARM RECORDING STATUS MOTION • Resulting Actions: Press the REC button to commence continuous recording based on the configuration shown above. (High picture quality at 3F/S without Audio). If an alarm is triggered on this channel, the configuration will be changed to Super picture qual- ityat 6F/S with Audio.
-
Page 133: Schedule Recording
5.7 Schedule Recording The schedule chart shows a graphical representation of the defined record mode: Mode1~4. However, the schedules are only displayed if a corresponding schedule has been configured in the schedule menu. Use Direction buttons [ ] to select “Schedule” menu. Then, press [ENTER] button to display “Schedule”. - Page 134 6. Define modes below. ***Refer to Basic Recording for set up <Note> The recording time is set by 24H(00:00 - 23:59). You need to set 2 days if the setting is over one day. BEGIN MODE Monday 18:00 23:59 MODE 1 Tuesday 00:00 08:59...
-
Page 135: Summary Of Combination
Summary of combination Record Menu RECORD ALARM SCHEDULE Mode USE CAMERA Normal MODE 1-4 MOTION Continuous RECORD Motion RECORD Alarm ALARM Schedule SCHEDULE Schedule Motion SCHEDULE Normal and Alarm RECORD &ALARM Motion and Alarm RECORD &ALARM Schedule and Alarm ALARM &SCHEDULE EN_33 H.264 DVR... -
Page 136: Network Setup
5.8 Network Setup The static service consists of an IP address that remains constant for the duration of the contract of the internet service, whereas the dynamic service consists of an IP address that frequently changes every time a new connection is made through the provided modem, or recurrently in a given period of time. - Page 137 2) E-Mail The DVR is capable of sending e-mails when an event occurs to up to 5 different e-mail ad- dresses: Alarm , Video Loss, Power Loss (when power recovered), HDD Failure. There are two types of sending e-mail method; Using “Unique” or “Public/ your own mail server”.
- Page 138 3) DDNS ITEM ADJUSTMENT • OFF : NO use of DDNS • DEFAULT : use default “dvrhost.com” server for DDNS If your DVR’s host name(SYSTEM >INFO) is L50AD25, Your DVR’s DDNS address is http://L50AD25.dvrhost.com:portNO. • DYNDNS : to use “Dyndns.com” domain. Domain Name Enter your domain name if you use “Dyndns”...
-
Page 139: System Setup
5.9 System Setup 1) General Use Direction buttons [ ] to select “SYSTEM” menu. Then, press [ENTER] button. Use Left/Right buttons [ ] to select on TAP menu Use Down button [ ] to specify the detail. Use [-, +] button to change the value. Save changes and exit the menu, press [ENTER] button. - Page 140 PB DEINTER- • ON: Reducing image flickering but less picture quality. LACE • OFF: Better picture quality for still image but having flicker for moving picture. RUN ON This is the purpose to start REC without pressing REC button when you turn BOOT PASSWORD if you choose “OFF”, The password window will not be shown except POWER/...
- Page 141 3) Account Admin can define each user’s Authority. Select User 1~5 , then select Activate option on or off. When enabled, it will be possible to check individually under user settings: Monitoring, Playback, Back up, Network, Configuration (Main Menu Setup), Shutdown (Power off). Enter the 6 numbers for the new password, and then re-enter the same password under COMFIRM section.
- Page 142 4) DISK ITEM ADJUSTMENT FORMAT 1. Stop the DVR completely before the disk format. 2. Use [-, +] button to change select device. * Internal HDD * USB – Memory Stick * USB – CD/DVD-RW * USB – HDD <Note> When you format USB-HDD, it is formatted to FAT 32 format type.
- Page 143 DISK MONITOR It stops automatically if HDD failure happens. It starts to “Monitoring” again after DVR reboot . (Use [-, +] button to stop or start) RECORD LIMIT Allows you to configure when the DVR automatically deletes all data from HDD.
- Page 144 <Note> 1. Please make sure your USB Flash memory stick has enough space for update file size. 2. Do not make special folder into memory stick for these files. 3. Do not format the USB at window, just remove all files inside. 4.
-
Page 145: Pan/Tilt Zoom Control
6. PAN/TILT ZOOM CONTROL 1) P.T.Z Menu To activate the Pan/Tilt Control, select the full screen display of the camera you wish to control. Then press the [P/T/Z/FOCUS] button. Shortcut Menu box pops up, as shown below. <Note > Please Refer to Help Menu for specific control. INDICATOR RESULTING ACTIONS Press this button to display “HELP”... - Page 146 PTZ camera control interface will be extended to use whole function. Press this button again to make short-cut menu. [MENU] Button • To Tilt up and Down. • To pan Right and Left. Zooming In and Out. The layout of the PTZ interface conforms to the layout of the front of the DVR or the remote controller.
- Page 147 2) Preset & Tour Button Function Set preset position; SPOT OUT on remote controller a. Move the PTZ into desired location. b. Press the Preset button. c. Custom 1 will illuminate. d. Set the # for the Preset location. e. Press Enter to save and exit. Go to preset position;...
- Page 148 4) PTZ Camera Model - PAN/TILT/ZOOM Camera List Model Name Speed Preset Go to Tour A.Pan A.Tilt ESC/ ENTER NUVICO, NV 9600 BPS MERIT LILIN, PIH- 7000/7600 VCL, Orbiter Micro- sphere SAMSUNG, SCC-641 NEC, NC-21D SUNKWANG, SK2107 RESERVED D-MAX, PTZ PROTOCOL LG, LPT-A100L P/T/Z HONEYWELL, GCC- 655N...
- Page 149 Model Name Speed Preset Go to Tour A.Pan A.Tilt ESC/ ENTER BOSCH, TC8560/TC700 SYSMANIA, ORX1000 AD, DELTADOME HUNT, HTZ-2300 HAZEM, RESERVED RVT, EZ Protocol LG, MULTIX ELMO, PTC-200C/400C NICECAM, MP-1xxx C&B TECH, CNBPTZ102 <Note> Speed has 0~8 steps 1 (Slow) – 8 (Fast) * 0 –...
-
Page 150: Search/Playback
7. SEARCH/ PLAYBACK 7.1 Time Search 1. To start playback, press [Time Search] button, Time search Calendar Menu pops up, as shown below. 2. Use Left /Right button to change select Month on <Note> It will not be changed if there are no stored data on previous/next month. <Note>... -
Page 151: Log List Search/Alarm, Motion Search
7.2 Log List Search/Alarm, Motion Search The logs can be used to search and review directly to a point in time of the recorded data. Alarm, motion, video loss and system related logs can be searched and played back directly from the time of the incident. -
Page 152: Backup
8. BACKUP 8.1 USB Memory Stick Backup Insert a USB Memory Stick into the USB connection port on the front panel. <Note> Make sure your USB device has enough space before commencing backups. Press [BACKUP] button on the front panel to display the backup menu. Use [-, +] button to change select device: USB - Memory Stick. -
Page 153: External Usb Hdd Backup
8.2 External USB HDD Backup External USB-HDD, CD/DVD-RW is recognized within 10 seconds after plug in UBS connection cable to UBS port in DVR. - Before progress to Backup, refer to below Note first. <Note 1.> Stop recording to back up when you want to back up by using external HDD or CD/DVD- <Record mode>... - Page 154 - Start to backup To Read USB backup HDD in Window, please use FAT32 formats. To use bigger size HDD, you need to format in our own methods. Format is discussed in “SYSTEM>DISK” Section. Plug in USB connector into the USB connection port on the front panel. Press [BACKUP] button to display the backup menu.
- Page 155 <CF. FAT 32 Formats> There are two way to format HDD to FAT 32 type. 1-1. Format external USB HDD to FAT 32 type by DVR in disk of system menu. <Note> USB HDD will be formatted to FAT 32 type regardless of HDD capacity. 1-2.
-
Page 156: External Cd/Dvd-Rw Backup
8.3 External CD/DVD –RW Backup External USB-HDD, CD/DVD-RW is recognized within 10 seconds after plug in UBS connection cable to UBS port in DVR. <Note> Stop recording to back up first when you want to back up by using external HDD or external CD/ DVD –RW. -
Page 157: How To Play Backup Data In Usb Memory Stick Backup
8.4 How to Play Backup data in USB Memory Stick Backup 1. With “MCD Player” - Plug a USB memory stick into your PC. No software installation is required. 2. Double Click on “MCD Player” in the window and will play as follows. Channel Select FF/FR Watermark... -
Page 158: Client Software (Cms)
9. Client Software (CMS) 9.1 DVR Player Program Introduction The DVR player Software allows you to view live video, search through archived video, control PTZ camera and have full setup control. DVR player Software is a kind of Central Management Software for DVR users to fully control up to 10 DVRs (based on 4 channels) simultaneously at a central sta- tion. - Page 159 How to Install Insert “Client Install CD” to CD-ROM of your PC and Find “DvrPlayerinstaller.exe” and double click Click <NEXT> button below: Click <Install>. Otherwise, designate a directory for Install then Click “Install”. Click <Close> Button after below images appears. EN_57 H.264 DVR...
- Page 160 The ICON of CMS will be displayed on your desktop. Double click the ICON to start, enter the password to access. * Enter “0” as the default password. Refer to CMS Setup to change the password. To get rid of this screen, Press “ESC” EN_58 H.264 DVR...
-
Page 161: Features
9.2 Features CMS Overview Multiscreen selection Current CMS Mode Time and Date Live /PB mode Switch Quick Button Playback Button Pan/Tilt Control Power ON/OFF Health Report Virtual DVR Window Camera CH No. Audio Volume Add/Delete DVRs DVR Window Live Viewing Functions (1.) Display option / Multiscreen Displays... - Page 162 It shows you current time on LIVE Mode and Playback time on PB mode. Date Day of week Month Hour Minutes Second (3.) Live /Playback mode Switch LIVE Viewing. Remote Playback or Playback for Downloaded file. (4.) Quick Button Save the current live images. When the remote recording is in progress, the record button will change its color to cyan.
- Page 163 *** CMS Setup - GENERAL 1 a) OSD SETUP Select On-Screen-Display information such as the Time, DVR name, Camera Num- ber, Camera Name, Frame Rates for each camera. b) OVERLAY (Defualf) It is recommended to use OVERLAY for transmission speed up. Please cancel the Overlay function if there is broken screen caused by Invalid Video Driver installed.
- Page 164 - GENERAL 2 a) POS Setting to limit the POS item search. <Not supported this model> b) LOG Setting to limit the Display of Logs. c) CHECK WATERMARK Setting to check for watermark. d) AUTO FULL SCREEN FOR ALARM EVENT Setting to perform a full screen pop-up for alarm event.
- Page 165 - SOUND Audio alert setting for the CMS. You can toggle to enable the sound or to disable the sound from the software. • Connect: CMS will emit a sound when a DVR connects. • Disconect: CMS will emit a sound when a DVR disconnects.
- Page 166 (6.) PAN/TILT Control button. Switch to Full Interface Switch to Compact Interface Zoom Out Zoom IN If one or more Pan/Tilt/Zoom Cameras are installed on the DVR, they can be individually selected and controlled using the PTZ control box. To control a channel-specific PTZ camera, simply click on the channel where the PTZ camera is connected.
- Page 167 c. IRIS Indicator Resulting Actions Iris Open Iris Close Iris Auto d. TOUR Indicator Resulting Actions Set Tour by clicking. Total address is depends on connected Pan/Tilt Camera. Go To, Calls up preset Start Automatic Tour e. Special Function Key It has various function depends on PTZ camera f.
- Page 168 (7.) HEALTH Displays the name of the last five DVRs with an problem or event. The color will change appro- priately based on the event or problems reported from the DVR. a. Red The color changes to red when critical functions of the DVR is inter- rupted or has failed: Connection Fail, Connection time out, Disconnect Power Fail, Fan Lock, System Fail, HDD Fail, Power Fail Recover, Fan Lock Recover, System Fail Recover, HDD Fail Recover...
- Page 169 *** HEALTH REPORT Health Report menu is provided so that users may quickly overview all the condition of con- nected DVR. You can check maximum 300 DVR statuses such as Failure, Event, Recording Mode and etc Health Report can be accessed at any time by double-clicking “HEALTH”. The detail log lists can be showed by double clicking Name on Health Report or ICON on DVR Window.
- Page 170 6. SCHE. OFF: Indicate Schedule LED ON/OFF on DVR <Not supported in this model> 7. BACKUP OFF: Indicate Backup status on DVR *** DVR Property The Property of DVR can be viewed by Double Click “DVR NO or DVR NAME”. This menu provides information such as listed below.
- Page 171 *** CMS LOG LIST This menu provides CMS log while CMS is operating. For more specific information for each DVR, please refer to DVR Log list. *** DVR LOG LIST - It shows the same log list with DVR Set. It has a list of all the events since the initial power on procedure of DVR.
-
Page 172: Dvr Control
9.3 DVR CONTROL 1) SET LIST MANAGER - Set List Manger is mainly used to add or delete DVR on CMS. Click button to start the Set List Manager. (1.) AUTO SCAN : It automatically tracks down DVRs connected local network but skips over already on the list. - Page 173 (5.) PROPERTY: This menu provides information such as DVR Name, IP number & port, Software version, and what kind of DVR is. 2) Condition of DVR The condition of DVR menu is provided so that users may quickly check the condition of each connected DVR.
- Page 174 Exit the menu with clear the statues and back to blue colored DVR : Select “OK” 2 Exit the menu with keeping previous statues: Select “x (Close)” 3) Indication of Camera In addition to the Health Status Report and supplementary information from the DVR icons in DVR window, the Camera Status Bar displays the status of individual cameras.
- Page 175 4) Live Viewing Individual DVR monitoring Double click to display live. On-Screen Indicators There are four types of on screen indicators. OSD Display can be chosen in the CMS Set Time Camera Title Frame Rate DVR Status 1) Camera Title: Displays the following orders: Camera Number- DVR Name or Host Name -Camera title 2) Time : Displays time.
- Page 176 Multi screen Display Click the individual Multi screen buttons to display corresponding multi screen. Change the camera position. Click on each camera to directly switch the desired camera. Full Screen Display There are 2 way of Full Screen display. 1) Select any camera for Full Screen display by double clicking the window of desired camera.
- Page 177 (2) There are seven types of Context Menu on each DVR. 1) LIVE: Live display for selected DVR. 2) PROPERTY: DVR information 3) CMS LOG LIST 4) DVR LOG LIST 5) SETUP: See “DVR Menu Setup” 6) REMOVE: Delete the selected DVR from DVR Window. EN_75 H.264 DVR...
- Page 178 6) Playback DVRs that have been added onto the DVR window using the DVR Set List Manager can be ac- cessed in Playback Mode for remote playback or to download the files onto the remote PC. Unlike the live mode, only one DVR can be accessed at a time 1.
- Page 179 (1.) Remote Playback Remote Playback is provided so that users directly playback the stored video on the internal HDD through CMS. 1. Select “REMOTE” button and desired DVR. 2. Remote Search shows a graphical representation of the recorded video stored on the DVR.
- Page 180 (2.) Remote Download Remote Download is provided so that users save on remotely connected computer through CMS. 1. Select “Remote” button and desired DVR. 2. Remote Search shows a graphical representation of the recorded video stored on the DVR. 3. Select desired date and time and click “Download” button to start save. It will be saved on “C:\Program Files\DvrPlayer\Download”.
- Page 181 LOCAL (3.) Local Menu is mainly used to review the data downloaded from a DVR through CMS. 1. Select “LOCAL” button 2. Local Search shows a graphical representation of the stored file on the PC. 3. Select desired DVR, Date and time, then click “PLAY” button to start playback. Deleted selected file from the PC.
- Page 182 7) DVR Menu Setup -DVR Menu Setup allows modification of various system settings to the DVR through CMS as it would be done accessing the DVR menu screen. - DVR set up can be accessed through the context menu from any DVRs Select any DVR for Menu setup.
-
Page 183: Virtual Dvr
9.4 Virtual DVR 1. What is Virtual DVR. Virtual DVR is not an actual DVR, but a combination , or group of several DVRs already listed under the DVR window. Under one Virtual DVR set, up to 64 DVRs can be added, pulling one camera from each DVR to be displayed. - Page 184 (1.) ADD to CMS List Please follow steps to Make Virtual DVR. 1) NAME: Enter Virtual DVR title to display on CMS window. * Auto Arrange : - Check this option to have the CMS arrange cameras with any of the events occurring from a virtual DVR with registered cameras.
- Page 185 3. Editing Virtual DVR (1.) Double click the desired Virtual DVR . (2.) The selected Virtual DVR will be activated and it is indicated with “ “ (3.) Select any of Multiscreen to Display. There are two way to add cameras: one is Whole DVR and the other is selected camera on each DVR.
- Page 186 Any selected camera on DVR. - Click any DVR on DVR Window while Virtual DVR is activating. - After camera Icons diplyed, any camera on DVR to directly drag the desired channel. In the following exampels, Camera No 1 on 3rd DVR is draged to Channel No 14. <...
-
Page 187: Appendix 1: View Only
Appendix 1: VIEW ONLY Enter the IP address of the unit in the ad- dress page of the Internet Explorer. For example, type in http://192.168.2.112:7000 Above illustrates example of a unit when it is utilizing port 7000. You can either sign in with: admin or user. Next enter the password for the unit. - Page 188 After click on Web servier, Web server menu will appear. Functions: a. Live: Live viewing b. Remote Search c. File Open : to Review back-up device through the Set. d. Setup : DVR setup e. Capture f. Rec : Local Recording g.
- Page 189 Specifications 4CH / 8CH / 16Ch Video Input 4 , 8, 16 Video Output Composite, VGA, SPOT-OUT Compression H.264 Live Display Resolution NTSC 720*480, PAL 720*576 Alarm In/Out(Relay) 4/1 , 8/1 16/1 Operating System EMBEDDED LINUX System Control Key buttons, IR Remote Controller, Remote software(DVR Player), Mouse Live Display Speed Real Time...
- Page 190 WEEE Symbol Information Correct Disposal of This Product (Waste Electrical & Electronic Equipment) (Applicable in the European Union and other European countries with separate collection systems) This marking shown on the product or its literature, indicates, that it should not be disposed with other household wastes at the end of its working life.
- Page 192 บริ ษ ั ท เอส จี ดี อิ น เตอร์ เ ทรดดิ ้ ง จำกั ด 54/5-6 ซ.หน้ า วั ง ถ.เจริ ญ กรุ ง 3 แขวงวั ง บู ร พาภิ ร มย์ เขตพระนคร กทม. 10200 โทร: 0-2222-0559 แฟ็ ก ซ์ : 0-2226-3031 อี เ มล์ : sgdinter@fujiko.biz เว็ บ ไซต์ : www.fujiko.co.th...
Need help?
Do you have a question about the FK-HM3004, FK-HM3008,FK-HM3016 and is the answer not in the manual?
Questions and answers