Table of Contents
Advertisement
Advertisement
Chapters
Table of Contents

Related Manuals for Island Oasis SB3X

Summary of Contents for Island Oasis SB3X
- Page 1 SERVICE MANUAL The Taste of Paradise ™...
-
Page 3: Table Of Contents
SERVICE MANUAL PAGE SECTION I GENERAL INFORMATION ..........2 GENERAL REPAIRS ............. 13 PARTS ................. 32 TROUBLESHOOTING ..........41 DAILY CLEANING PROCEDURES ....... 43 POLICIES ..............44... -
Page 4: Section I
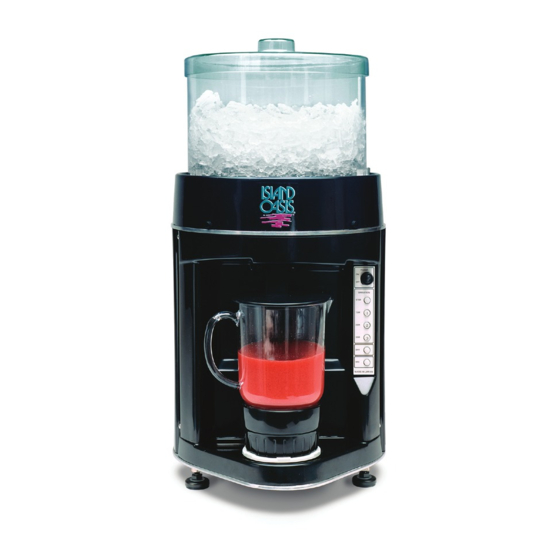
SECTION I GENERAL INFORMATION PART 1. SPECS RECEIVING YOUR SHAVER/BLENDER SET UP AND INSTALLATION • ICE HOPPER/SAFETY SWITCH • DRAIN HOSE CONNECTION • LEG ADJUSTMENT • DRINK DISPLAY BOARD • ADJUSTMENTS • TIMING • ICE FLOW OPERATION—MAKING A FROZEN DRINK •... - Page 5 PART 1. SPECIFICATIONS The Shaver/Blender was designed to offer our customer: 1. Speed: Just 9 seconds for a 12 oz. drink 2. Consistency: Produces a perfect drink every time 3. Portion Control: No product waste 4. Versatility: Ability to produce many different drinks without making special adjustments DIMENSIONS Height - 27”...
- Page 6 PART 2. RECEIVING YOUR SHAVER/BLENDER Upon receipt of your Shaver/Blender please check that all parts are included and that no damage has occurred during shipment. Save all shipping cartons and notify Island Oasis with any problems. CONTENTS CARTON #1 • Machine...
- Page 7 PART 3. SET UP AND INSTALLATION 1. Prior to installations, check the general operation of the Shaver/ Blender at your office (See #7 Adjustments). 2. When removing the machine from its carton, lift from its base. Do not lift from the Ice Skirt. 3.
- Page 8 PART 3. SET UP AND INSTALLATION (Cont.) STEP 2. With Ice Hopper upside down, slide Safety Switch Rod into Sleeve. Attach Ice Skirt to Ice Hopper. 4. DRAIN HOSE CONNECTION A. Attach hose to the Drain Port located beneath the base of the machine.
- Page 9 PART 3. SET UP AND INSTALLATION (Cont.) 5. LEG ADJUSTMENT In order for water to drain properly, position the machine on a level surface and adjust legs so that the machine will tilt at a slight angle to the rear. 6.
- Page 10 PART 3. SET UP AND INSTALLATION (Cont.) 7. ADJUSTMENTS A. Shaver and Blender Motor Timing Timing on both Shaver and Blender Motors is set at the factory. Be sure to check these adjustments prior to installation. The drink cycle will run for a total of nine seconds. The Shaver Motor will engage at the press of the Drink Button and run for four seconds.
- Page 11 / oz. 6 oz. 12 oz. 4.0 oz. / oz. 7.0 oz. 14 oz. 4.5 oz. / oz. 8.0 oz. 16 oz. 5.5 oz. / oz. 9.0 oz. The plastic ice container and Pelouze Scale shown are available through Island Oasis.
- Page 12 The following is based on a 12 oz. drink. STEP 1. Thaw product completely, shake well and pour 4 oz. into measuring cup. STEP 2. Pour 1-1/2 oz. of liquor into measuring cup. NOTE: When making non-alcoholic drinks, substitute liquor by increasing Island Oasis mix by one ounce.
- Page 13 PART 4. MAKING A FROZEN DRINK (Cont.) STEP 3. Pour contents of measuring cup into Blender Cup. STEP 4. Place Blender Cup on base and press the #1 Drink Button. STEP 5. Remove Blender Cup and pour into glass. The finished product should have a smooth, consistent texture that will fill the glass to the top.
- Page 14 PART 4. MAKING A FROZEN DRINK (Cont.) MULTIPLE DRINKS Once the SB3-X has been calibrated for a particular drink size, it is important to pour the correct amount of product and liquor for multiple drinks. The following chart is based on multiple drink formulations for a 12 oz.
-
Page 15: General Repairs
SECTION II GENERAL REPAIRS PART 1. MAIN POWER BOARD DRINK DISPLAY BOARD SHAVER MOTOR BLENDER MOTOR BLENDER BASE BEARINGS MAIN SHAFT BEARINGS ICE SHAVER BLADE RESET SWITCH DRAIN SYSTEM BLENDER CUP SAFETY SWITCH... - Page 16 IMPORTANT When performing interior repairs, begin by following these basic steps. 1. Turn off Power Switch 2. Disconnect Power Cord 3. Remove Ice Chute 4. Remove Front and Rear Covers* * Swing Front Cover to the right when removing. This will avoid damage to Drink Board connections.
-
Page 17: Main Power Board
PART 1. MAIN POWER BOARD DESCRIPTION The main Power Board functions as the control center of the Shaver/Blender. TROUBLESHOOTING A. On occasion, water damage may occur due to condensation build-up on the Power Board. This will cause the unit to malfunction. - Page 18 PART 1. MAIN POWER BOARD TROUBLESHOOTING (Cont.) B. If the Main Power Board fuse is blown, there will be a loss of power to the Shaver/Blender. Replace fuse located at the top right of Power Board. You may find it necessary to remove Power Board from its housing.
-
Page 19: Drink Display Board
PART 1. MAIN POWER BOARD REPLACEMENT (Cont.) 3. Pinch four white spacers in order to remove Power Board from its housing. 4. Disconnect wiring to Main Power Board (see Wiring Diagram). 5. Install new Board by following reverse procedures. PART 2. DRINK DISPLAY BOARD DESCRIPTION Serves as the Main Control Center for all functions of the machine. - Page 20 PART 2. DRINK DISPLAY BOARD REPLACEMENT (Cont.) 4. Remove center nut and bolt. You will have to access center bolt through front of Board. Remove On/Off Switch and decal to locate bolt. Be sure to save Drink Board insulator. 5. Make certain Drink Board is placed into position properly. Note that the connector wires sit to the right of the Board.
-
Page 21: Shaver Motor
PART 3. SHAVER MOTOR DESCRIPTION Power Supply for the ice shaving function. TROUBLESHOOTING Shaver Motor won't run. Reset Button is in off position. Check the following. 1. Power supply, check wiring. 2. Check shaver belt for wear. 3. Jamming of Ice Bowl* (see next page). - Page 22 PART 3. SHAVER MOTOR (Cont.) * To clear the Ice Shaver Bowl, follow these procedures. 1. Remove Ice Skirt. 2. Remove Ice Bowl Cone. Unscrew and remove Ice Scrambler. Lift out rotary wing. 4. If debris is found, e.g., bottle caps, check Shaver Blade for damage and replace.
-
Page 23: Blender Motor
PART 3. SHAVER MOTOR REPLACEMENT (Cont.) 3. Remove four bolts securing Shaver Motor to main shaft. 4. Disconnect wires by snipping them as close to the motor as possible. When connecting new motor, be sure to use pig tails and electrical tape to splice wires. - Page 24 6. Main Power Board. The last step before replacing a Blender Motor is to hook up a direct power line to the motor and test. REPLACEMENT 1. Follow beginning steps. 2. Remove two screws on mounting bracket located behind Blender Motor.
-
Page 25: Blender Base Bearings
PART 4. BLENDER MOTOR TROUBLESHOOTING (Cont.) 6. Disconnect wires by snipping them as close to the motor as possible. 7. Reverse procedure to install new motor. PART 5. BLENDER BASE BEARINGS Replace bearings when excessive noise occurs during blending cycle. REMOVING BEARINGS 1. - Page 26 PART 5. BLENDER BASE BEARINGS (Cont.) 4. Remove bottom bearing by placing a 1/4" punch through through the center of the top bearing and tap gently. Reverse procedures to remove top bearing. NEW BEARING INSTALLATION To install bearings, you will need a 5/16" nut and bolt with two washers.
- Page 27 PART 5. BLENDER BASE BEARINGS TROUBLESHOOTING (Cont.) 2. Place Bearing into the bottom of the Blender Base Housing. Place the second bearing over the bolt. Place the washer over the bearing. Place the nut on the bolt and tighten until bearings are seated flush.
-
Page 28: Main Shaft Bearings
PART 6. MAIN SHAFT BEARINGS There are two bearings located on the main shaft housing—one at the top and one at the bottom. If the main shaft is not spinning freely, or excessive noise is evident, you should change these bearings. TO REPLACE BEARINGS REMOVE: 1. - Page 29 PART 6. MAIN SHAFT BEARING REPLACEMENT (Cont.) 7. Remove snap ring holding bottom bearing in place. 8. Remove bottom bearing. To remove bottom bearing, use a screwdriver and hammer and punch out bearing from the top. 9. Replace new bearing on top and bottom. Re-install snap ring.
-
Page 30: Ice Shaver Blade
PART 7. ICE SHAVER BLADE The Shaver Blade is a double edge design that cannot be resharpened. TROUBLESHOOTING • If ice in the machine becomes inconsistent in the texture, check Blade for damage and replace. • If there is not enough ice being shaved, check the Blade for dullness. -
Page 31: Reset Switch
PART 8. RESET SWITCH DESCRIPTION Protects Ice Shaver Motor from sudden power surges and jamming of the Ice Bowl. TROUBLESHOOTING When Reset Button malfunctions, check wiring to Shaver motor and Shaver relay. REPLACEMENT 1. Remove screws securing Reset Switch. 2. Remove wires and install new Switch. PART 9. - Page 32 The use of Cleaner will prevent this problem. To clean clogged drain lines, use a small wine bottle brush available through Island Oasis. To check for leaks, pour water into top and bottom drain holes. Be sure that the rear drain outlet is plugged.
- Page 33 PART 11. SAFETY SWITCH The purpose of the Safety Switch is to interrupt power to the machine when the cover is removed. If the Safety Switch is not performing this function, check that the Upper Safety Switch Rod is moving freely in its sleeve and making contact with the Lower Metal Switch Rod.
-
Page 34: Parts
SECTION III PARTS PART 1. EXPLODED VIEWS WIRING DIAGRAM PARTS LIST... - Page 35 7/8” I.D. (Drain exits at bottom 1 1/8” O.D. of machine) The Island Oasis Ice Shaver/Blender was designed to offer our customers: 1. Speed: Just 9 seconds for a 12 oz. drink. 2. Consistency: Produces a perfect drink every time.
- Page 36 50145 50179 50147 50163 50144 50147 50175 50166 50143 50192 50208 50170 50238 50114 50148 50146 50192 50222 50173 50171 50222 50151 50150 50222 50152 50229 50167 50222 50154 50221...
- Page 37 50174 50160 50161 50184 50164 50207 50190 50172 502230 50218 50113 50203 50210 50208 50237 50206 50202 50211 50253 50189 50233 50178 50254 50246 50204 50209 50181 50234 50213 50168 50191 50227 50186 50226 50195 50189 50225 50212 50212 50194 50153 50205 50212...
- Page 38 50120 50121 50197 50165 50125 50196 50250 50236 50141 50139 50245 50220 50162 50157 50231 50142 50165 50135 50128 50252 50126 50215 50130 50127 50131 50182 50251 50165 50185 50180 50187 50134 50132 50116 50157 50193 50118 50208 50133 50157 50155 50219 50115...
- Page 39 5A 120-250 VAC WIRE DIAGRAM WITH NOISE FILTER FOR 120 VAC SAFETY *NOTE POSITION OF LOBES SWITCH ON THE MAIN CONTROL BOARD SHAVER (TOP) BLENDER (BOTTOM) RUNNING TIME CONTROLS 10A 125 VAC *OPPOSITE SIDE OF BOARD FUSE (0.1 AMP) MAIN CONTROL STOP BOARD DRINK...
-
Page 40: Parts List
MAIN POWER BOARD COVER 50142 MAIN POWER BOARD HOUSING 50143 BLENDER BASE COVER (BLACK) 50144 BLENDER BASE 50145 SB3X ALUMINUM CLUTCH 50146 BLENDER CUP CLUTCH 50147 STAINLESS STEEL BLENDER BEARINGS 50148 BLENDER MOTOR 50150 FRONT BLENDER PULLEY (FOR RIB-STAR BELT) - Page 41 PART DESCRIPTION 50157 BLACK HEAD SCREW 50160 SCREW FOR LOWER ICE CONE COVER (E-142) 50161 LOWER ICE CONE COVER 50162 ISLAND OASIS DECAL (BLACK MACHINE) 50163 MIXING SHAFT 50164 O-RING FOR ICE SCRAMBLER (E-166) 50165 PHILLIPS HEAD SCREW 50166 BLENDER CUP (PITCHER ONLY)
- Page 42 ITEM # PART DESCRIPTION 50203 SAFETY SWITCH COLLAR (FINE THREAD) 50204 LOWER SAFETY SWITCH ROD 50205 SHAVER BELT PULLEY (BLACK BELT) 50206 CONICAL CASE 50207 BUSHING (FOR E-171) 50208 SCREW (FOR SKIRT BRACKET E-229) 50209 BOLT (FOR SHAVER MOTOR E-149) 50210 SHAVER BLADE MOUNTING SCREW 50211...
-
Page 43: Troubleshooting
SECTION IV TROUBLESHOOTING Inconsistent Ice Flow. Check that Blade and Assembly are secure. Check Blade for damage. Also check shaver belt for wear. If the ice being used is changed, the ice flow will be affected and will have to be readjusted. - Page 44 Machine leaking water/drains backing up. 1. Drain is clogged. 2. Drink Hose below water line. 3. Drain Hose not positioned properly to provide maximum water flow. (See Section II - Drain System) Loud noise during mix cycle. Check: 1. Worn Blender Belt 2.
-
Page 45: Daily Cleaning Procedures
SECTION V MAINTENANCE/DAILY CLEANING PROCEDURES 1. Run the blender to shave most of the remaining ice in the machine. You should leave a few cubes in the bottom of the hopper. 2. Remove the hopper lid and pour one full measuring cup (6 ounces) of KAY-5 Sanitizer/Cleaner solution around the bottom of the hopper. -
Page 46: Policies
RETURNING PARTS Any parts replaced on warranty must have a “Return Material Tag” which must be filled out by you and sent to Island Oasis. NOTE: Most service calls are due to lack of proper cleaning. The daily use of Cleaner will save considerable time and... - Page 48 For Sales and Service please call: Island Oasis Frozen Beverage Co. 141 Norfolk Street, P.O. Box 769 Walpole, Massachusetts 02081 Tel: (800) 777-4752 Fax: (508) 660-1435...
Need help?
Do you have a question about the SB3X and is the answer not in the manual?
Questions and answers
How do I troubleshoot this machine if it keeps tripping my breaker when I plug it in
To troubleshoot the Island Oasis SB3X machine if it keeps tripping the breaker when plugged in, check the following:
1. Power Supply – Ensure the outlet provides correct voltage and is not overloaded.
2. Wire Connections – Inspect for loose or damaged wires.
3. Main Power Board – Check for faults or shorts.
4. Fuse in Main Power Board – Replace if blown.
5. On/Off Switch – Make sure it is not faulty.
6. Safety Switch – Confirm it is working properly and making correct contact.
If all components are functioning correctly, the issue may be with the internal wiring or a short circuit in one of the machine's parts.
This answer is automatically generated