
Subscribe to Our Youtube Channel
Related Manuals for Plugable Universal Docking Station


Summary of Contents for Plugable Universal Docking Station
- Page 1 Universal Docking Station User’s Manual Questions? We’re here to help! Visit http://plugable.com/support/ Or email support@plugable.com More product info & tips at http://plugable.com/products/ud-160-a/...
- Page 3 Docking Station with Video User’s Manual ABOUT THIS MANUAL This manual is designed for use with the Docking Station with Video. Information in this document has been carefully checked for accuracy; however, no guarantee is given to the correctness of the contents. The information in this document is subject to change without notice.
-
Page 4: Table Of Contents
Table of Contents Table of Contents 1. Introduction .......................1 Features ..........................2 Package Contents ......................2 System Requirements......................2 Assembly and Disassembly ....................3 Front Panel ........................4 Rear Panel ......................... 5 2. Installation ......................6 A. On Windows ® 2000 / Windows ® XP / Windows Vista ® ............6 B. - Page 5 Docking Station with Video User’s Manual 6. Regulatory Compliance ..................27 FCC Conditions ......................27 CE ........................... 27 WEEE Information ......................27...
-
Page 7: Introduction
Docking Station with Video User’s Manual 1. Introduction The Docking Station with Video is a unique expansion unit designed for computers that have extra connectivity demands. Just with one USB port on the computer, its connection can be extended not only to USB peripherals, Ethernet network, speaker, microphone but also an additional monitor. -
Page 8: Features
Docking Station with Video User’s Manual Features Great expansion unit for computers with extra connectivity demand Extends connectivity to USB peripherals, Ethernet network, speaker, microphone, and even an additional monitor Creative appearance complements any home or office space Industry-standard security lock slot for anti-theft purpose Windows Vista ®... -
Page 9: Assembly And Disassembly
Docking Station with Video User’s Manual Assembly and Disassembly The docking station comes with a base plate to make it self-standing. To assemble the docking station, slide the body of the docking station firmly as shown below. Make sure a click is heard to ensure the body snaps into place. To disassemble the docking station, hold the base with one hand and then use another hand to push the docking station firmly as shown below. -
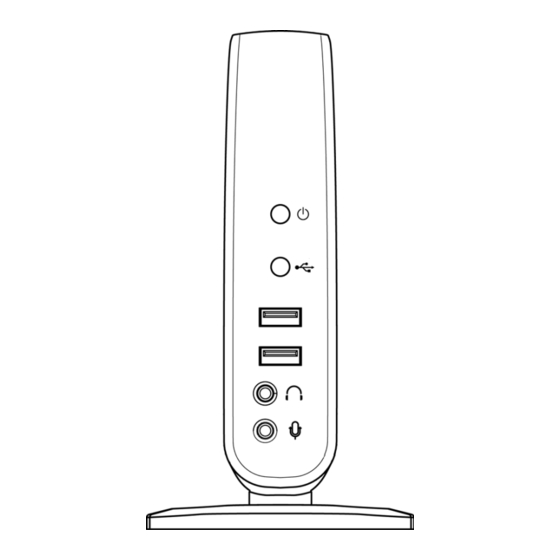
Page 10: Front Panel
Docking Station with Video User’s Manual Front Panel Power LED: Glows when the docking station is powered. USB Hub LED: Glows when any of the four USB downstream ports is connected to a USB device. 2 USB 2.0 downstream ports: For connection to USB peripherals. -
Page 11: Rear Panel
Docking Station with Video User’s Manual Rear Panel 4 USB 2.0 downstream ports (A type female connector): For connection to USB peripherals. 10/100 Mbps Ethernet port: For connection to the Ethernet network via a network cable (not provided). DVI video output port: For connection to a VGA or DVI monitor. -
Page 12: Installation
Docking Station with Video User’s Manual 2. Installation As the docking station with video comprise several components and some components require specific installation procedure, please follow the steps described in this manual to install the drivers first and then make the connection. A. - Page 13 Docking Station with Video User’s Manual 3. After the installation is completed, the following Window will pop up. You can change the appearance of your displays through the Window. In particular, move the monitors pictured in the control panel to match how the monitors are physicaly positioned on your desk.
- Page 14 Docking Station with Video User’s Manual B. On Mac OS X ® 10.4+ Drivers for the Mac are beta level, with significant limitations including disabling of the network interface on the docking station. Limitations may change or improve over time. We recommend downloading and installing the latest drivers from http://displaylink.com/ C.
- Page 15 Docking Station with Video User’s Manual Note: You may need to restart your system for the configuration changes made to DisplayLink Graphics to take effect. After the installation is completed, you will see the DisplayLink Manager Icon in System Tray that looks like a monitor as below. Click on the icon to bring up the menu.
-
Page 16: Connecting The Docking Station To Computer
Docking Station with Video User’s Manual B. Connecting the Docking Station to Computer 1. Assemble the docking station by sliding the main body onto the base plate to make it self-standing. 2. Plug the power cord of the power adaptor into the DC IN jack on the back of the docking station and then connect the power adapter to a working electrical outlet. -
Page 17: Connecting Usb Devices
Docking Station with Video User’s Manual • Or, it can be connected to an analog VGA monitor using the privided DVI-I to VGA adapter and a VGA cable (not provided). Upon the connection it’s normal that the screen flicks black a couple of times. Once the connection is done, an extended screen will appear on the add-on monitor. -
Page 18: Using The Docking Station With Video
Docking Station with Video User’s Manual 3. Using the Docking Station with Video USB 2.0 Ports The four USB ports on the docking station function just like the ports on a USB hub. Just connect any USB device to the docking station’s USB ports when required. All the four USB ports provide power when the computer is either off, suspended or hibernated. -
Page 19: Configuring Instant Messaging Software Audio Device
Docking Station with Video User’s Manual section. If you want to use your original sound card for music playback, make sure to select it instead of USB (Multimedia) Audio Device. Configuring Instant Messaging Software Audio Device To chat via instant messaging software using the headphone and microphone connected to the docking station, make sure the instant messaging software, such as MSN messenger, Yahoo messenger or Skype, are configure to use USB (Multimedia) Audio Device as the audio in and out devices. -
Page 20: Video Port
Docking Station with Video User’s Manual Video Port Display Modes There are several ways you can utilize the monitor attached on the docking station. The add-on monitor can be configured to use either “mirror mode”, “extended mode” or be the primary display as described in this section. Extend Your Windows Desktop to Add-on Monitor (Default) In this so-called “extended mode”, your display will be spread over the add-on monitor(s). - Page 21 Docking Station with Video User’s Manual 5. Click OK to close the settings screen. Once the setting is done, to use your extended desktop, simply drag and drop your open windows over to your second monitor. However, note that some applications may not support display on the extended desktop.
- Page 22 Docking Station with Video User’s Manual Video and DVD Playback in Extened Mode On Windows Vista ® with extended mode, it’s suggested that you run video or DVD playback programs on your primary monitor instead of the add-on monitor to ensure the playback performance.
-
Page 23: Adjusting Resolution, Color Depth And Refresh Rate
Docking Station with Video User’s Manual Be the Primary Monitor To make the add-on monitor the primary display: 1. Position the mouse anywhere on your computer desktop, right-click and select Screen Resolution on Windows ® 7, Personalize > Display Settings on Windows Vista ®... - Page 24 Docking Station with Video User’s Manual The software supports the modes listed below. Color Depth Refresh rates available at Refresh rates available at 16 bit color quality 32 bit color quality Resolution 60 72 75 85 60 72 75 85 640x480 56 60 72 75 85 56 60 72 75 85...
-
Page 25: Disconnecting The Docking Station
Docking Station with Video User’s Manual cloned desktop. It is recommended that the primary display resolution be changed to closer match the default resolution of the add-on monitor. To configure the three components (resolution, color depth and refresh rate) of a screen mode, follow these steps: 1. -
Page 26: How Standby Or Hibernate Mode Affects Devices Attached To The Docking Station
Docking Station with Video User’s Manual How Standby or Hibernate Mode Affects Devices Attached to the Docking Station External Monitors When the docking station is connected to a computer and an external monitor, if the computer goes into standby or hibernate mode, the external monitor display goes blank. -
Page 27: Uninstalling The Drivers
Docking Station with Video User’s Manual 4. Uninstalling the Drivers Uninstalling the Driver Please take these steps to uninstall Drive: 1. Open the Control Panel and double-click Uninstall a Program on Windows ® 7, Programs and Features on Windows Vista ® or Add or Remove Programs on Windows ®... -
Page 28: Specifications
Docking Station with Video User’s Manual 5. Specifications General USB 2.0 Host Interface Windows ® 2000 SP4, Windows ® XP SP2, Operating System Support Windows Vista ® (32/ 64 bit) and Windows ® 7 (32/64 bit). Ports and Connectors 1 x Upstream USB 2.0 Port (Type B female Connector) Upstream 4 x Downstream USB 2.0 Port (Type A female connector) USB Hub Downstream... - Page 29 Docking Station with Video User’s Manual IEEE 802.3: 10Base-T Network Standards IEEE 802.3u: 100Base-T Ethernet: 10Mbps/20Mbps (Half/Full Duplex) Data Transfer Rates Fast Ethernet: 100Mbps/200Mbps (Half/Full Duplex) Embedded 16KB SRAM for RX packet buffering and 8KB SRAM for TX packet buffering Video Component Extended Desktop (Default), Mirrored Desktop, Primary Supported Modes...
- Page 30 Docking Station with Video User’s Manual Main body without base: 36.5 (W) x 92 (D) x 154 (H) mm Dimensions Main body with base: 86 (W) x 110 (D) x 162 (H) mm Approximately 285g (including base) Weight Environmental Specifications 10-40°C Operating Temperature -10~80°C...
-
Page 31: Regulatory Compliance
Docking Station with Video User’s Manual 6. Regulatory Compliance FCC Conditions This equipment has been tested and found to comply with Part 15 of the FCC Rules. Operation is subject to the following two conditions: (1) This device may not cause harmful interference (2) This device must accept any interference received. - Page 32 Docking Station with Video User’s Manual...
Need help?
Do you have a question about the Universal Docking Station and is the answer not in the manual?
Questions and answers