
Summary of Contents for Jasco Wireless Color Camera with Portable LCD Monitor 45236
- Page 1 45236 Home Monitoring Wireless Color Camera with Portable LCD Monitor User Manual www.jascoproducts.com 1-800-654-8483...
-
Page 2: Product Features
Thank you for purchasing the GE 45236 Wireless Color Camera System with Portable LCD Monitor. Please review these instructions carefully before attempting to operate the unit. PRODUCT FEATURES • “Wi-Fi” internet friendly wireless system—won’t interfere with home wireless networks • Portable 2.5”... -
Page 3: Package Contents
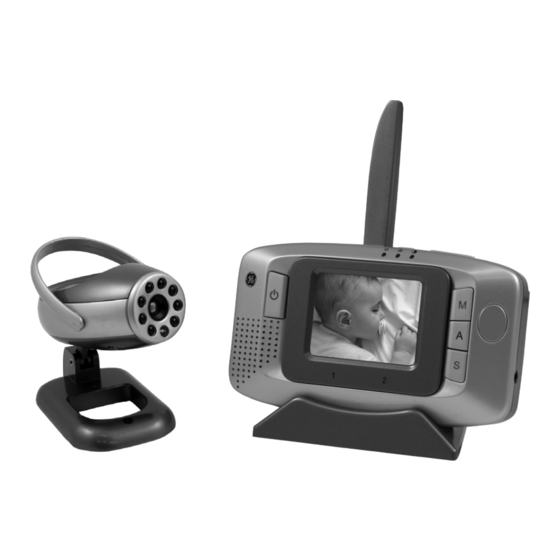
PACKAGE CONTENTS Please check and identify all the parts before proceeding with the installation. 45233 Wireless Color Camera 45236 Portable 2.5” Color Monitor/Receiver Charging cradle Wall mounting hardware 2 AC adapters AV cable BEFORE YOU INSTALL When choosing the best location for the placement of the camera and LCD monitor, it is best to avoid any sources of possible RF interference such as microwave ovens and cordless phones. - Page 4 CHOOSING A CAMERA MOUNTING LOCATION The 45233 Wireless Color Camera can be positioned on a desktop, or mounted to a wall. It is suitable for indoor or outdoor use. When choosing a mounting location, please be advised: • Do not use in wet locations. If using outside, position camera in a sheltered location.
- Page 5 If using the optional rechargeable NiMH battery (sold separately), the operational time is up to 5 hours, depending on usage. • The Camera has an unobstructed wireless transmission range up to 200 ft. from the receiver. Transmission distance indoors is reduced due to interior walls, wiring, household fi...
-
Page 6: Channel Selection
2. Similarly, set the slide switch located inside the battery compartment area of the Portable LCD monitor to match the channel used by the camera. 3. Plug AC power adapter of the LCD monitor into the power jack at the rear of the charging base. This provides power to the Portable LDC monitor and also charges the LCD monitor’s battery. -
Page 7: Lcd Monitor
CHANNEL SELECTION Manual, Auto or Stand-by The wireless system can be set to operate in one of three modes: Manual, Auto or Stand-by. The desired operating mode can be selected using the buttons on the front panel of the LCD monitor. Manual Mode To select one of the two channels manually, press the ‘M’... - Page 8 CAMERA 1 Channel Setting separately. IMPORTANT: When using more than one camera, each camera must be assigned to a specifi c channel using the channel selection switch located on the underside of the camera housing. Select either 1 or 2 for each camera. Each camera must be assigned to a specifi...
-
Page 9: Standby Mode
Note: two cameras must be available in order for Auto mode to operate correctly. Both cameras cannot be on the same channel or the signals will cancel out. Stand-by Mode Pressing the ‘S’ button places the system in Stand- by mode and will utilize the Audio Notifi cation/ Detection feature (see pg. -
Page 10: Camera Installation
Night Vision The 45233 Wireless Color Camera features Night Vision technology. Objects and images can be seen in little or no light up to 10 ft. The camera uses a special image sensor that automatically detects available light levels. It turns on/off the Infra-Red (IR) LEDs on the front of the camera. -
Page 11: Wall Mount
corresponds to the camera channel setting. 5. Adjust antenna and camera angle as needed for the clearest picture. Positioning the antenna upwards to improve sensitivity, and downwards to reduce sensitivity. Take care not to force the antennas past their lock positions. Wall Mount: 1. -
Page 12: Menu Functions
3. Set Channel switch on camera to 1 or 2. Slide the camera onto the alignment and locking pins of the mounting plate. Plug in AC adapter into camera. 4. Adjust antenna and camera angle as needed for the clearest picture. AUDIO DETECTION AND NOTIFICATION FEATURE This feature allows the system to emit an audio alert whenever sound is detected within a monitored area. - Page 13 2. Pressing the “menu” button twice… • the Middle LED will light-up in blue. You can then adjust the Color by pressing “+” or “-” on the Volume/Adjust Button. If no input is received within 30 seconds, it will revert back to Volume Adjust mode automatically.
- Page 14 USING THE 45236 WIRELESS COLOR CAMERA SYSTEM WITH A VCR You can connect the 45236 LCD Monitor (using the supplied A/V cable) to a VCR, DVR or another monitor in order to record/view the images received from up to 2 cameras. If connected to VCR or DVR, the VCR/ DVR must also be connected a TV/Monitor in order to see live or recorded images.
-
Page 15: Troubleshooting
approximately 5 hours* on a single charge. To order this battery, please visit www.jascoproducts.com/ batteryoffer or call our Customer Support department at 1-800-654-8483, Monday–Friday, 8 a.m.–5 p.m. CST. Wall or desktop mount *If using the camera with battery in the night vision mode, usage is reduced to ~2 hrs. -
Page 16: Audio Problems
Interference on camera picture 1. Make sure each camera (transmitter) is within range, and that no large obstructions are blocking the signal. 2. Try repositioning the camera, LCD monitor or both to improve the reception quality. 3. Reposition other nearby equipment transmitting on the 900MHz frequency. - Page 17 Operating temperature: ... 14°F to 104°F (-10°C to 40°C) Humidity: ...Less than 85% WARRANTY ONE-YEAR LIMITED WARRANTY: Jasco Products Company warrants this product to be free from manufacturing defects for a period of one year from the original date of consumer purchase. This warranty is limited...
- Page 18 - Consult the dealer or an experienced radio/TV technician for help. is a trademark of General Electric Company and is used under license to Jasco Products Company LLC, 10 E. Memorial Road, Oklahoma City, OK 73114 www.jascoproducts.com...
Need help?
Do you have a question about the Wireless Color Camera with Portable LCD Monitor 45236 and is the answer not in the manual?
Questions and answers