Table of Contents
Advertisement
Advertisement
Table of Contents

Summary of Contents for PerfectFlite Pnut
- Page 1 Pnut Users Manual...
- Page 2 Pnut Users Manual PO Box 29 Andover, NH 03216 URL: www.perfectflite.com Voice (603) 735-5994 Sales: sales@perfectflite.com (603) 735-5221 Support: support@perfectflite.com...
-
Page 3: Table Of Contents
Contents Introduction....................1 Parts Identification Diagram.............. 3 Installation Payload Bay Construction................... 4 Static Pressure Sampling Ports................. 6 Operation Charging Battery......................7 Power Switches....................... 7 Numerical Reporting..................... 8 Powerup Sequence......................9 Downloading Data......................9 Changeable Settings....................... 9 Tips for Achieving Optimal Accuracy..............14 Telemetry Information.................... -
Page 4: Introduction
The Pnut is installed inside your rocket and activated prior to launch. When you retrieve your rocket, the Pnut will report the apogee altitude (how high your rocket went, up to 100,000 feet above ground) and the maximum velocity (how fast your rocket went, in miles per hour). - Page 5 The Pnut utilizes a precision pressure sensor and 24 bit delta sigma analog to digital converter to obtain an extremely accurate measurement of the air pressure surrounding your rocket.
-
Page 6: Parts Identification Diagram
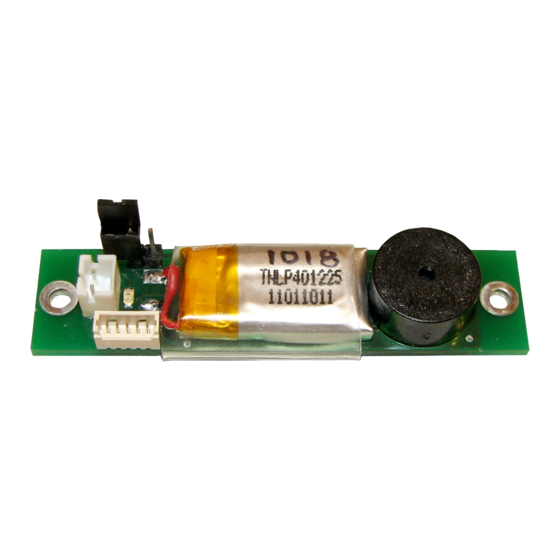
Parts Identification Refer to the top of the altimeter to locate the following items: A) Beeper: Audibly reports altitude and velocity after flight. B) Battery: Built-in rechargeable Lithium Polymer battery. C) Power Pins and Jumper Shunt. Shunt shown in storage (“off”) position. Place shunt across both pins to turn altimeter “on”. -
Page 7: Installation
Installation For best results, your altimeter should be installed in a separate payload compartment, sealed from the pressure and heat of the ejection charge gasses. While other alternatives are possible, isolating the altimeter in a protected compartment will provide the most precise readings and will keep high temperature and pressure from affecting the long-term accuracy of the instrument. - Page 8 (and your rocket!). When installing the Pnut in larger rockets it may be easier to add a short (~3” long) section of BT20 tube with padded end plugs for the altimeter to ride in.
-
Page 9: Static Pressure Sampling Ports
Static Pressure Sampling Holes You must drill one or more clean-edged holes in the payload compartment to allow outside air pressure to be sampled by the altimeter (see table below for recommended sizes). These holes should be as far away from the nosecone shoulder and other body tube irregularities as possible (at least 3 times the body tube diameter or more) to minimize pressure disturbances being created by turbulent airflow over the body... -
Page 10: Operation
A single fresh 9V alkaline battery can provide up to 6 full charges to the Pnut’s battery. Tip: You can also use partially depleted batteries (e.g. old smoke detector batteries) and the Pnut’s charger will extract any... -
Page 11: Numerical Reporting
Numerical Reporting Numbers are reported as a long beep (separator), followed by a pattern of shorter beeps for the individual digits, with a pause before the next digit. You simply count the number of short beeps for each digit place and assemble them together to form a number. -
Page 12: Powerup Sequence
Powerup When the altimeter is turned on, it will report the peak altitude from the last flight and the current battery voltage before readying itself for flight. This is what you will hear: • A three to six digit number (range of 160 feet to 103,500 feet) representing the apogee altitude of the last flight. -
Page 13: Downloading Data
• A three to six digit number representing the peak altitude in feet. • A long separator tone followed by a two to five digit number representing the maximum velocity during the flight in miles per hour. This number, and its preceding separator, are reported in a higher pitch to differentiate it from the peak altitude number. - Page 14 The following descriptions assume that you have the software running and the altimeter connected to the computer and powered up. Select the “Settings” menu item from the “Altimeter” menu. A screen will appear with the current settings, altimeter model, altimeter serial number, firmware revision level, and total number of flights listed.
- Page 15 Powerup Delay An additional delay can be inserted between the time that the altimeter finishes reporting battery voltage on powerup and when the “launch-ready chirps” start as the altimeter awaits launch. This is typically used when a power switch is not accessible from the outside of the rocket and additional time is needed after power is applied to provide time to close up the altimeter compartment and allow pressure to stabilize before...
- Page 16 altimeter goes into a low power sleep mode while it is silent so that with the maximum siren delay of 120 seconds a full battery charge will continue to operate the altimeter for over two weeks. Even if you don’t find your rocket the first day, you’ll have many more opportunities before it goes silent! Valid settings are 0 (siren disabled) to 120 seconds.
-
Page 17: Tips For Achieving Optimal Accuracy
Tips for Achieving Best Accuracy • Use four static sampling ports instead of just one. Make sure they are sized and positioned according to the instructions in the previous section. All barometric altimeters base their altitude measurements on the air pressure surrounding the rocket, so getting a clean, turbulence-free sample is essential. - Page 18 • Use a long shock cord. This will allow the ejected payload section and nose cone to slow gradually rather then being jerked to a stop when the cord comes to full extension. Again, minimizing abrupt changes in the rocket’s trajectory will result in the smoothest, most accurate data.
-
Page 19: Telemetry Information
Telemetry Information The data connector pinout is shown below. All signals are 3.3V CMOS logic level, and the lines idle “high”. Please double-check your cables before connecting anything to the data port; make sure that the input to your device is connected to the altimeter’s output. - Page 20 When telemetry data is selected to start “OnPad”, the first value sent will be the approximate ground elevation, and all subsequent data will be AGL (Above Ground Level) altitudes: 880<CR><LF> {first data point is launch elevation MSL} 0<CR><LF> {all subsequent data points are AGL altitude} 0<CR><LF>...
-
Page 21: Testing
Testing A simple apparatus for testing the altimeter can be made with a small jar and a length of plastic hose. Drill a hole in the center of the jar’s lid and insert one end of the plastic hose. Glue hose in place to achieve a tight seal (hot melt glue works well). -
Page 22: Cautions
Do not charge the battery or use the altimeter if the battery has been punctured or shows signs of damage; contact PerfectFlite for details on obtaining a replacement battery. • Provide adequate padding fore and aft of the altimeter for protection in the event of a crash or excessively hard landing. -
Page 23: Specifications
Specifications: Power: 3.5V to 4.2V, built-in 3.7V LiPo battery Current consumption: 1.5 ma Battery life: 100 hours (40% pre-flight, 60% post-flight) Launch detect: 40’ to 300’ AGL, default is 100’ Maximum altitude: 100,000’ MSL Altitude resolution: 1’ up to 38,000’MSL <... -
Page 24: Warranty
All PerfectFlite products include a full three year/36 month warranty against defects in parts and workmanship. Should your PerfectFlite product fail during this period, call or email our Customer Service department for information about returning your product. The warranty applies to the altimeter only, and does not cover the rocket, motor, or other equipment.
Need help?
Do you have a question about the Pnut and is the answer not in the manual?
Questions and answers