
Related Manuals for Hillman HDC-1660


Summary of Contents for Hillman HDC-1660
-
Page 1: Operation Instructions
DVD/VCD/CD/MP3/USB/SD/MMC PLAYER BLUETOOTH, WITH FM/MW TUNER USB/SD/MMC Player w Operating In Operation Instructions HDC-1660... -
Page 2: Safety Precautions
Safety Precautions Never expose this unit, amplifier, and Thank you for purchasing this product. speakers to moisture or water for preventing P l e a s e r e a d t h r o u g h t h e s e o p e r a t i n g electric sparks or fires. -
Page 3: Table Of Contents
Safety Information Contents Caution Safety Precautions .........1 Safety Information ..........2 This product is a CLASS 1 LASER PRODUCT. Features ............3 Use of controls or adjustments or performance Panel Controls ..........4 of procedures other than those specified Remote Controls . -
Page 4: Features
Features DVD-R/RW Compatibility About MP3 It is possible to playback DVD-R/RW discs Supply of this product only conveys a license recorded with the video format and Video for private, non-commercial use and does not Recording format. convey a license nor imply any right to use this product in any commercial (i.e. -
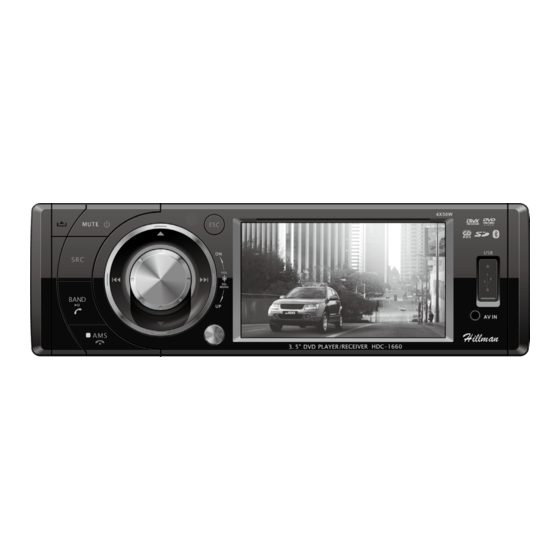
Page 5: Panel Controls
Panel Controls Power on/off: Press to turn on/off the unit. 1. Panel open DVD video mode) 2. - Power on/off (press and hold more than 2 - Fast rewind (press and hold more than 2 seconds) seconds, in CD, MP3/WMA and DVD - Mute video mode) 3. -
Page 6: Remote Controls
Remote Controls Press to turn on/off the unit. - AMS: Search and store stations automatically 22. - DVD audio - VCD audio L/R/ST 23. - Display time/clock (Video mode) - Return to previous menu 24. - Angle (DVD only) - Terminate call (in BT mode) 25. -
Page 7: Usb/Sd/Mmc/Mp3 Playback
USB/SD/MMC/MP3 Playback 1. Load SD/MMC Card USB/SD/MMC Notes USB functions (flash memory type) MP3 Insert the SD/MMC card into the slot, with music play the front side at right. 1. SD/MMC card support The unit will play the music automatically and the LCD will show CARD. -
Page 8: Basic Operation
Basic Operations Turn on/off the Power 1. Press to turn on the unit. The unit goes back to the last status after power on. 2. Press more than 2 seconds to power off. Mute When power on, press briefly to cut the sound. -
Page 9: Rotary Knob Menu
Rotary Knob Menu 1. Rotate the knob to adjust volume level. 3. Press the knob more than 2 seconds to enter Setting mode, then Use 2. Short press to access the Audio&VIDEO and OK key to select setting items. Setting menu. General Setting BEEP: ON/ OFF The beep tone feature allows the selection of... - Page 10 Rotary Knob Menu The password : 0000 image view when a rear view backup camera (sold separately) is connected to the CAMERA IN input on the back of the radio. Turn the RATING: 1 KID SAFE/2 G/3 PG/4 PG13/5 rotary encoder to select “On” or “Off”. PG-R/6 R/7 NC-17/8 ADULT The rating of the disc is from 1 to 8: (1) with the most limits when playing.
-
Page 11: Language Setting
Rotary Knob Menu LANGUAGE Setting Portuguese Select one language that you are familiar with to display DVD menu. Note: If the DVD disc has the selected language, the DVD MENU/TITLE will be displayed in the selected language. If the DVD disc does not contain the selected language, the DVD MENU/TITLE will be displayed in the default language. -
Page 12: Rotary Knob Menu
Rotary Knob Menu will blink. AUTO CONNECT: ON/OFF When traffic announcement is received, the TA After disconnecting with your mobile phone, indicator will display. The unit will temporarily the built-in bluetooth will send connection switch to the tuner mode (regardless of the order automatically in 20s if you have set the 'AUTO CONNECT' to 'ON'. -
Page 13: Radio Mode
Radio Mode Accessing Radio Mode Press the SRC button on the front panel or remote control to switch to the Radio source. 1. Source Indicator 2. Current Preset Channels 3. Time/Clock 4. AM/FM Band 5. RDS Information 6. Radio Station Frequency 7. -
Page 14: Rds (Radio Data System)
RDS (Radio Data System, optional) PTY Reception (Program Type) RDS service availability varies with areas. Please understand if RDS service is not RDS FM stations provide a program type available in you area, the following service is identification signal. not available. Example: news, rock, info, sport, etc. -
Page 15: Disc Mode
Disc Mode Accessing Disc Mode If a disc is already in the disc slot but is not playing, press the SRC button on the front panel or on the remote control to switch to the DISC source. To play files from an SD or USB that is already inserted, choose the CARD or USB source. - Page 16 Disc Mode Disc and File NOT Supported front panel or ENTER on the remote control to start play. *.AAC, *.DLF, *.M3U, *.PLS, MP3 PRO files 5. During the file playing, press to stop and and files with DRM. return to the sub-root. Open session discs.
-
Page 17: Stop Playback Temporarily
Disc Mode only file names and folder names that can and 7 since they do not contain since they do be entered and displayed. Using any other not contain any tracks directly. Folder 5 is not character will cause the file and folder recognized at all since it is at the fourth level. -
Page 18: Disc Mode
Disc Mode - RPT icon will appear on the display. chapter number. - For VCD/CD: Display appears RPT ONE For VCD and CD, select track number. RPT ALL RPT OFF - Press to play, or move the cursor to - For DVD: Display appears RPT CHAPTER select "PLAY"... -
Page 19: Bt Mode
Bluetooth Mode Accessing Bluetooth Mode Stop Pairing Press the SRC button on the front panel or You can stop pairing or disconnecting in this remote control to switch to the DVD source. following way: Enter BT Setting menu, switch the PAIR: ON/ OFF options to OFF, then press ESC to return Note: to Bluetooth main menu. -
Page 20: Music Mode
Bluetooth Mode In the mode of the music player working, if front panel and remote control (if the options you want to make a phone call, you can press are available). the number keys on the mobile phone or on the remote control, then press to dial. - Page 21 Bluetooth Mode require you to perform again the pairing operation. 4. For mobile phone, the Bluetooth device n a m e m u s t b e p r i m a r y s y m b o l s o r numbers.
-
Page 22: Device Connections
Device Connections Notes of connection If a proper fuse is installed and electrical problems still occur, please contact with • To avoid short circuit in the electrical any professional car shops for inquiry. system, ensure that the negative battery • DO NOT connect other equipments with the cable is disconnected before installation. - Page 23 Device Connections Wiring Diagram...
-
Page 24: Installation Guide
Installation Guide Device Connections Preparation Using the ISO Connector 1. If your car is equipped with the ISO 1. Disconnect battery connector, then connect the ISO connectors Before you begin, always disconnect the as illustrated. battery negative terminal. 2 . F o r c o n n e c t i o n s w i t h o u t t h e I S O connectors, check the wiring in the vehicle carefully before connecting, incorrect Note:... - Page 25 Installation Guide Kit Installation sleeve. With the sleeve fully inserted into the dashboard opening, bend as many of I f y o u r v e h i c l e r e q u i r e s t h e u s e o f a n the tabs outward as necessary to firmly installation kit to mount this unit, follow the secure the sleeve to the dashboard.
-
Page 26: Anti-Theft System
Installation Guide Anti-Theft System 4. Wire the new unit as outlined in the Thi s unit is designed with a flip-down Mounting Sleeve Installation instructions. detachable panel. 5. Mount the new unit assembly to the The panel can be detached and taken with dashboard or center console using the you, helping to deter theft. -
Page 27: Troubleshooting
Troubleshooting If you suspect something is wrong, immediately switch power off. Immediately stop using it and call the store where you purchased it. Never try to repair the unit yourself because it is dangerous to do so. Problem Possible cause Solution General Car ignition is not on. -
Page 28: Care And Maintainance
Care and Maintenance DVD Player The following guidelines will help you extend the life of your DVD player: 1. When cleaning the vehicle interior, do not get water or cleaning fluids on the unit. 2. The DVD player will not operate properly in extreme hot/cold or under damp conditions. In case of such conditions, wait until the vehicle interior reaches a normal temperature or any condensation on the disc player lens has evaporated before using the player. -
Page 29: Specifications
Specifications General Power supply: 12VDC (11V-16V), Test voltage 14.4V, negative ground Maximum power output: 50W x 4 channels Continuous power output: 20W x 4 channels (4 10% T.H.D.) Suitable speaker impedance: 4-8ohm Pre-Amp output voltage: 4.0V (CD play mode: 1KHz, 0dB, 10K load) Fuse: Dimensions (WxHxD):... - Page 31 CLASS 1 LASER PRODUCT P.N.: 127075002317...
Need help?
Do you have a question about the HDC-1660 and is the answer not in the manual?
Questions and answers