Table of Contents
Advertisement
Quick Links
Advertisement
Table of Contents

Related Manuals for LONGHORN 4000 PRO

Summary of Contents for LONGHORN 4000 PRO
- Page 1 LONGHORN 4000 PRO Touch Screen Smart Remote Control User’s Manual 040130...
-
Page 3: About This Manual
Longhorn Australia. Trademarks All trademarks and registered trademarks are the property of their respective owners. LONGHORN Customer Service & Support Info URL: www.longhorn.com.au... -
Page 4: Table Of Contents
Table of Contents Chapter 1 Introducing the 4000-PRO ....1 1.1 4000-PRO Features..............2 1.2 Unpacking the 4000-PRO ............. 2 1.3 Identifying Components............3 Chapter 2 Getting Started .........4 2.1 Inserting the Batteries ............4 2.1.1 Battery Indicator............4 2.1.2 Battery Tips and Precautions ......... 5 2.2 About the Touch Screen............ - Page 5 3.6.1 Creating a Macro ..........21 3.6.2 An example to create a Macro ......23 3.6.3 Macro Interruption..........25 3.6.4 Viewing the Macro Key ........25 Chapter 4 Miscellaneous Settings....26 4.1 Using the Transmission Function......... 26 4.2 Setting the Backlight ............28 4.2.1 Setting the Backlight..........
-
Page 7: Chapter 1 Introducing The 4000-Pro
Chapter 1 Introducing the 4000-PRO Congratulations on your purchase of the 4000-PRO Touch Screen Remote Control. The 4000-PRO is a digital universal remote control that is easy to use, enabling you to control all of your electronic devices equipped with an infrared (IR) remote. -
Page 8: 4000-Pro Features
1.1 4000-PRO Features Large touch screen display Macro function, each Macro can store 60 commands at most Controls up to eight devices including DVDs, TVs, Satellite Receivers, VCRs, and CDs Learns the IR codes from your existing remotes to control your devices quickly Pre-programmed codes for many remote controls User-programmable keys for each device, up to 56 keys in total... -
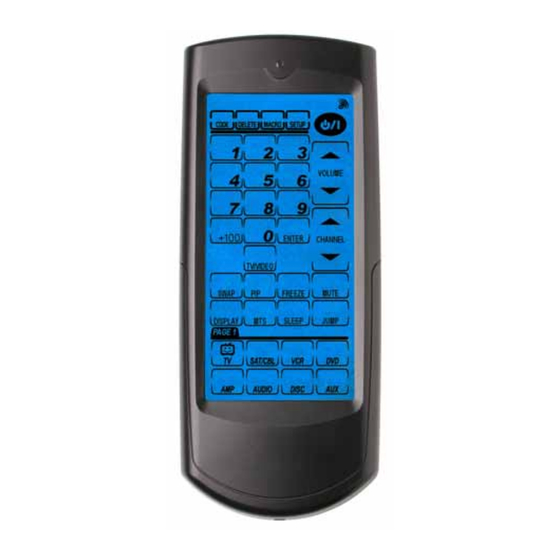
Page 9: Identifying Components
1.3 Identifying Components Refer to the following illustration to identify the components of the 4000-PRO. 1. Infrared Eye Point the infrared eye at 1. Infrared Eye the device you want to operate. 2. Light Sensor 2. Light Sensor Detects ambient light to automatically turn on the backlight. -
Page 10: Chapter 2 Getting Started
Chapter 2 Getting Started This chapter provides the information helping you to use the 4000-PRO quickly. 2.1 Inserting the Batteries The 4000-PRO operates on three AAA alkaline batteries (not included in the package). Batteries must be inserted before you can operate the 4000-PRO. 1. -
Page 11: Battery Tips And Precautions
2.1.2 Battery Tips and Precautions 1. The 4000-PRO will not lose programmed data when batteries are replaced. 2. Please always use fresh batteries. Alkaline batteries are recommended. Do not mix different types of batteries. 3. Ensure that positive (+) and negative (–) polarities of the batteries match the diagram inside the compartment. -
Page 12: About The Touch Screen
2.2 About the Touch Screen The Touch Screen changes the number of soft keys according to the device that is selected. 2.2.1 Turning the Touch Screen On Turn on the 4000-PRO by touching the screen. The 4000- PRO turns itself off after 90 seconds of inactivity. 2.2.2 Touch Screen Precautions Please review the following information carefully before using the 4000-PRO. -
Page 13: Using The Touch Screen Soft Keys
2.2.3 Using the Touch Screen Soft Keys The Touch Screen Soft Keys enable you to operate the 4000-PRO and your devices. You can use these keys to program codes from your original remotes, to control your devices, and to set up command sequences called Macros. - Page 14 The following table provides an overview of major key functions. Name & Key Function Setup Description Icon Device keys Device setting Key: Enter device setting and and LCD layout arrange the LCD touch screen layout to correspond to your remote control. (P.9) You can also toggle device pages by pressing the key again.
-
Page 15: Chapter 3 Setting Up The 4000-Pro
Chapter 3 Setting Up the 4000-PRO Before the 4000-PRO can be used to control a device, it needs to be configured to display your existing remote control keys and it must be programmed to send the correct infrared signals. This chapter guides you through the Touch Screen layout and 4000-PRO setup procedures. - Page 16 Select a key you want to modify. Press that key repeatedly to scroll through the available icons for the key. NOTE: You can press to display all the available icons. Repeat step 3 to modify all desired keys. After finishing customizing the layout, press confirm the changes and leave the mode.
-
Page 17: Code And Learn Setting Key
CODE function. However, if you have the problem that the 4000-PRO cannot learn your device codes, please refer to “Troubleshooting” on page 35 or contact LONGHORN. -
Page 18: Using Pre-Programmed Code To Program Devices
3.3 Using Pre-programmed Code to Program Devices You can follow these instructions to program a device by using pre-programmed codes. There are two ways for you to collect the right codes within the function: A. Manually Programming remote by Code. B. - Page 19 Locate your target device’s four-digit code in Preprogrammed Code List and enter it. NOTES: a. Some codes are designed to operate more than one model. It may take several trials to find the code that fits your device. b. When you enter the four-digit code number and the icon is displayed, it could be that the code number doesn’t exist in the Pre-programmed Code List c.
- Page 20 Automatically Programming remote by Code Please follow step1-4 stated in Manual Entry section. Turn on the target device you want to control and point the 4000-PRO to the target device. Press to start Auto Search Function. 4000-PRO will send out IR codes to find the correct ones.
-
Page 21: Using Learning Function To Customize 4000-Pro
3.4 Using Learn Function to Customize 4000-PRO You can use Learning Function to get the codes directly from the original remotes. 3.4.1 Before Using Learning Function Before you start to use Learning Function to get the codes, please pay attention to the followings: Before using Learning Function, please delete the original codes saved in the specific device. - Page 22 Press to scroll through the options until you reach the icon . And then press to confirm your selection. Select a device (for example TV) in 4000-PRO. Have your original remote pointed to “Learning Eye” at the bottom of 4000-PRO. The blinking key denotes the key to be learned.
- Page 23 NOTES: a. Although 4000-PRO will guide you to learn each key, you can also select any key to learn as you want by touching it directly. You can also change the page by touching the device key. b. If a key has been programmed with a code, the icon appears on the LCD.
-
Page 24: Deleting Key Codes And Device Codes
3.4.3 Deleting Key Codes and Device Codes You can follow these instructions to delete a code in a single key or all the codes in a device. Press and hold the for 3 seconds to enter the confirmation screen. Press each number button (2, 4, 6, 8) in any order until they disappear and start to use the function. -
Page 25: Resetting The 4000-Pro To Factory Defaults
3.5 Resetting the 4000-PRO to Factory Defaults 4000-PRO This function enables you to reset the to the factory default configuration. NOTE: All Macros and programmed keys will be deleted when you reset the 4000-PRO to factory defaults. Press and hold the for 3 seconds to enter the confirmation screen. - Page 26 icon appears briefly on the screen to tell that 4000-PRO returns factory defaults.
-
Page 27: Macro Function
3.6 Macro Function A Macro includes a series of commands. Macro function enables you to initiate a sequence of up to 60 commands just with a single key. You can use any key as your Macro key and insert time delays into the sequence. However, please remember that it will disable the original key function when you use the key as your Macro key. - Page 28 NOTE: If you select a key that already has been used as a Macro key, the new setting will replace the old Macro setting. Press any key as the commands saved in the Macro key. NOTES: a. You can choose any key in any device.
-
Page 29: An Example To Create A Macro
3.6.2 An example to create a Macro The following example will help you better understand creating a Macro sequence. It is provided to teach you how to create a Macro. By no means it is the only Macro sequence you can create. You can create Macros using any sequence of commands you desire. - Page 30 5. Press to switch to the DVD device menu so you can construct a series of commands for the DVD player. 6. Press (You may need to set a time delay between turning on the DVD player and playing a DVD.) 7.
-
Page 31: Macro Interruption
3.6.3 Macro Interruption After pressing the preset Macro key for a device, you can interrupt the command sequence by pressing , then appears and the macro stops. 3.6.4 Viewing the Macro Key You can view which keys are used as Macros for any particular device. -
Page 32: Chapter 4 Miscellaneous Settings
Chapter 4 Miscellaneous Settings This chapter will tell you how to use transmission function, setup the backlight, and adjust the beep. 4.1 Using the Transmission Function 4000-PRO can transmit customized data to another 4000-PRO NOTE: Before using this function to transfer data, you must connect two 4000-PRO with SLC-2080 USB cable (optional accessory). - Page 33 When the transmission is completed, an icon will be displayed on the LCD. If the transmitting fails, an icon will show up. For a double transmission, repeat Step 3. You can press cancel the transmission. NOTES: Before transferring the data, please pay attention to 3 points: a.
-
Page 34: Setting The Backlight
4.2 Setting the Backlight 4.2.1 Setting the Backlight Press and hold for 3 seconds to enter the confirmation screen. Press each number button (2, 4, 6, 8) in any order until they disappear and start to use the function. Press to select the icon . -
Page 35: Setting Backlight Sensitivity
4.2.2 Setting Backlight Sensitivity Press and hold for 3 seconds to enter the confirmation screen. Press each number button (2, 4, 6, 8) in any order until they disappear and start to use the function. Press to select the icon . -
Page 36: Turning Off The Beep Signal
4.3 Turning Off the Beep Signal Press and hold for 3 seconds to enter the confirmation screen. Press each number button (2, 4, 6, 8) in any order until they disappear and start to use the function. Press to select the icon . -
Page 37: Chapter 5 Controlling Devices
Chapter 5 Controlling Devices 4000-PRO is designed to be simple and straightforward 4000-PRO to operate. This chapter explains how to use the to control all your devices. NOTE: This chapter assumes you have already set up the 4000- PRO and saved all the IR codes for the keys. You can refer to Chapter 3 Setting Up the 4000-PRO on page 9 for more information about how to get the IR codes. -
Page 38: Appendix A Functions And Specifications
Appendix A Functions and Specifications Functions • 8 in One IR learning type and pre-programmed remote control • High performance MCU capable of upgrading programs • 512 KB Flash Memory for Learning/pre-programmed codes, so that you never lose your data when removing your batteries. -
Page 39: Specifications
Specifications Model 4000-PRO Dimensions (WxHxD) 3.1 x 7.5 x 1.25 inches (7.9 x 19 x 3.2 cm) Weight (without Batteries) 210 g Number of Device 8 devices Keys 2 pages/56 keys/ each device Backlighting Blue LED Learning Frequency 20 KHz – 455 KHz & pulse up to 256 bits long Memory 512 KB flash memory... -
Page 40: Appendix B Accessories
Appendix B Accessories SLC-2080 USB cable The SLC-2080 USB cable is an optional USB cable that transfers the data between two 4000-PROs. All settings including MCU firmware, settings in the flash memory and pre-programmed codes will transferred transmission function described Chapter “Miscellaneous Settings.”... -
Page 41: Appendix C Troubleshooting
Appendix C Troubleshooting Troubleshooting Tables Problem Solution 1. Batteries may be dead. Replace LCD does not show the batteries with three new AAA anything when you alkaline batteries (page 4) touch it. 2. Check that the batteries are properly installed. The 4000-PRO doesn’t 1. - Page 42 Problem Solution You cannot operate 1. Make sure that your 4000-PRO has a device even after correctly learned the target using the Learning device’s remote control code Function. (page 15). 2. Delete the device data from the 4000-PRO and carry out the learning function again (page 15).
- Page 43 5. The learning process has no errors, but you still can’t control your AV devices: repeat the learning procedure again. If you still can’t solve the problem, contact LONGHORN for help. 6. Original remote might not be compatible with learning procedure. A key of your existing...
- Page 44 • Coloured buttons (R/G/Y/B) Are self-explanatory as they are directly programmed into the same keys on your Longhorn remote control. However, please refer to the image on the right for specialized Foxtel Digital remote control functions like AV, Foxtel, TV Guide, i (information), Select and...
Need help?
Do you have a question about the 4000 PRO and is the answer not in the manual?
Questions and answers