Table of Contents
Advertisement
Advertisement
Table of Contents

Related Manuals for Hensel POrty L600


Summary of Contents for Hensel POrty L600
- Page 2 19 18 17 16 15 14 13 12 11 10 CHARGE CHECK...
- Page 3 F3 F4 Strobe Wizard Plus / freemask P1 P2 P3 P4 P1 P2 P3 P4 Profoto Air Remote Profoto Air Sync...
- Page 4 E-mail: info@hensel.de Internet: http://www.hensel.de © HENSEL-VISIT GmbH & Co. KG, 2012 Distribution and reproduction of this documentation is not permitted unless specifically authorized. In case of violation, payment of damages will be due. All rights reserved, including rights created by patent grant, or registration of a utility model or design (ISO 16016).
-
Page 5: Preface
Hensel-Visit took great care and observed all pertinent regula- tions on order to manufacture a safe product of highest quality. Stringent quality checks ensure our high quality standard even in large-scale production. -
Page 6: Table Of Contents
Mains operation with AC Porty mains drawer....21 Flash head connection ..........22 8 Operation ..............25 ON/OFF switch ............25 Synchronization ............25 Modeling light ............28 Power adjustment .............29 Test flash ..............31 Audio ...............31 Flash readiness ............31 Daily flash counter ............32 HENSEL-VISIT GmbH & Co. KG... - Page 7 Replacing fuse ............43 Error messages ............44 Warranty ..............45 Disposal ..............45 13 Customer service points ..........46 Manufacturer’s service ..........46 Service points listed in the Internet ......46 14 Accessories ..............47 15 Subject index ..............48 16 Declaration of Confirmity ..........49 HENSEL-VISIT GmbH & Co. KG...
-
Page 8: Safety Instructions
Hensel-Visit. The Strobe Wizard Plus transmitter, the freemask transmitter and Profoto Air are used for triggering flashes and adjusting the flash output of Hensel-Visit flash units with built-in receiver via radio signal. Abnormal use The appliance may not be used for any other purpose than described above, especially not for other electrical applications. - Page 9 Use the device’s safety features and secure the device additionally with a safety rope. Suitable safety ropes can be purchased from Hensel- Visit, see „14 Accessories“ on page 48. HENSEL-VISIT GmbH & Co. KG...
- Page 10 This means touching the device could pose a life- threatening danger. Halogen lamps and flash tubes may burst and must only be operated with properly mounted Hensel safety dome. ATTENTION! Risk of death when coming in contact with the condenser volta- Opening the housing and repairs of the unit must only be done by an authorized customer service provider.
-
Page 11: General
Hensel user logic make the Porty L easy to use. Pro Mini and Pro Mini Porty series flash heads can be connected to it and also the ring flash RF. Other Hensel flash heads can be connected (battery operation without modeling light) via an optional adapter cable (20-way on round). -
Page 12: Technical Data
U (list) = 14,6 V/6,5 Ah Weight 1,2 kg Charge time battery: 2 h/100%. 45 min./80% Fitting flash heads: Hensel Pro Mini, Pro Mini P , also simultan. Fuse protection modeling light/charge: 2 x 10 AM, 5 x 20 mm Weight including battery: 5,4 kg... - Page 13 Code no.: 4965 Radio remote unit series/unit type Hensel Profoto Air See the original user manual of the manufacturer Profoto Technical modifications excepted. The listed data are standard values which may deviate depending on component tolerances. HENSEL-VISIT GmbH & Co. KG...
-
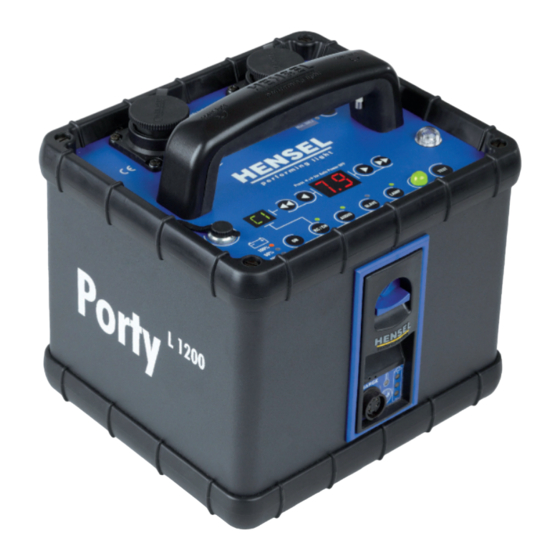
Page 14: Summary Of Control Elements
14 ..Photo cell ON/OFF SLAVE 15 ..Audio signal ON/OFF AUDIO 16 ..Output reduction in 1/10 or 1 f-stop increments 17 ..Radio receiver ON/OFF (Hensel,Profoto) and channel selection RC/CH 18 ..Power switch ON/OFF ON 19 ..Indicator channel selection 20 ..Battery charge level 21 ..Sync socket SYNC... -
Page 15: Initial Use
Protect the unit from precipitation during use and when not in use. Always make sure the unit is positioned securely. When neces- sary, secure against tipping and falling. HENSEL-VISIT GmbH & Co. KG... - Page 16 According to the applicable safety mounting regulations, it is necessary to secure the units twice by using a steel rope. This can be ordered from Hensel-Visit, see „14 Accessories“ on page 48. Â Lead the steel rope through the generator’s handle and through a suitable eyelet on the suspension.
-
Page 17: Battery Operation
The charger Porty Lithium ATTENTION! The battery pack must only be charged with a genuine Hensel charger Porty Lithium. The micro chip controlled charger has an input voltage range of 100-240 VAC. The charge time is 2 hours. After 45 minu- tes, the battery has reached a charge level of 80% maximum capacity. - Page 18 A ..Charge cable B ..Start charging Wake Up C ..Error indicator Error (rot) D ..Charge indicator Charging (yellow) E ..Charge level indicator Full (green) F ..Power check Power (red) HENSEL-VISIT GmbH & Co. KG...
- Page 19 Â Insert the plug of the charger cable A into the charge socket 27 of the battery and lock the plug by turning it clockwise a quarter of the way. The yellow charge control Charging D is blinking. HENSEL-VISIT GmbH & Co. KG...
-
Page 20: Battery Charge Status Indicator
25. This is also possible when the gene- rator is switched off. Â Press the CHECK key 26 on the battery drawer. The capacity of the battery is indicated by a lit-up LED. HENSEL-VISIT GmbH & Co. KG... - Page 21 In case of overheating due to charging the battery too long, the battery’s overheating indicator 24 lights up. Â Discontinue the charge process until the battery has cooled down. HENSEL-VISIT GmbH & Co. KG...
-
Page 22: Mains Operation With Ac Porty Mains Drawer
 Plug the included mains cable into the mains connector 34 and connect the mains plug to the power source.  Use the power switch 28 to switch on the mains adapter. The LED POWER 30 lights up. HENSEL-VISIT GmbH & Co. KG... -
Page 23: Flash Head Connection
Depending on the flash heads’ type of modeling light and whe- ther the generator is operated with battery or mains adapter, different functional properties and limitations apply. These are listed in the following summary. HENSEL-VISIT GmbH & Co. KG... - Page 24 These flash heads are operated with a 115 V or 230 V mode- ling light. The modeling light has a maximum of 650 W. Note: These flash heads must be connected via the flash head cable marked with red. HENSEL-VISIT GmbH & Co. KG...
- Page 25 Though similar lamp sockets and plugs may be used by other manufacturers, their lamps and flash heads must not be con- nected to the Porty L. Please contact the Hensel customer sup- port concerning options for adaption. HENSEL-VISIT GmbH & Co. KG...
-
Page 26: Operation
Turn off is signalled by a dual tone signal when the audio func- tion is activated. Synchronization The synchronization between battery flash generator and came- ra is either done via sync cord, the built-in photo cell, or via the radio Strobe Wizard Plus, freemask or Profoto Air. HENSEL-VISIT GmbH & Co. KG... - Page 27 If this cannot be avoided, use a cable or radio transmitter for synchronization. Another interference can be arc discharge lamps, like the ones used in ceiling spots. The impulse-like eradiated light could pos- sibly trigger the slave. HENSEL-VISIT GmbH & Co. KG...
- Page 28 For a detailed description of the systems, please see „9 Opera- tion with Strobe Wizard Plus“ on page 34. Note: Other radio transmitters like radio thermometers or radio remo- tes that use the same radio frequency may interfere with radio operation. HENSEL-VISIT GmbH & Co. KG...
-
Page 29: Modeling Light
AC mains drawer. Note: Switch off the modeling light during longer breaks to conserve energy and extend the life of your lamp. HENSEL-VISIT GmbH & Co. KG... -
Page 30: Power Adjustment
300 J 300 J 150 J 150 J 75 J 75 J 38 J 38 J 18 J 18 J Â Press the A key 2 again to switch off the flash channel A again. HENSEL-VISIT GmbH & Co. KG... - Page 31 11. Option Channel A Channel B Power value Porty 1200 L 900 J 300 J 10-6 600 J 300 J 9.6-5.6 Porty 600 L 450 J 150 J 10-6 300 J 150 J 9.6-5.6 HENSEL-VISIT GmbH & Co. KG...
-
Page 32: Test Flash
• Automatic switch-off (2x) • Error message (1x long) Flash readiness Flash readiness after switching on is indicated by a LED READY 10. Flash readiness is also signalled by an audio signal if this function is activated. HENSEL-VISIT GmbH & Co. KG... -
Page 33: Daily Flash Counter
 While in flash count mode, press the SLAVE key 14 The display is reset to 00 00. USB Interface The USB interface 22 located on the side of the generator’s housing is only used for service purposes. HENSEL-VISIT GmbH & Co. KG... -
Page 34: Operation With Strobe Wizard Plus
Transmitter and receiver can be synchronized via three different channels. Up to three different work stations can be controlled separately. Additionally, the transmitter can also control all receivers together. The setting is done with the channel selection switch F5. HENSEL-VISIT GmbH & Co. KG... -
Page 35: Setting Receiver
F1 and p F2 on the generator  Briefly press q to reduce the output  Briefly press p to increase the output The generator’s LED display shows the selected output values. HENSEL-VISIT GmbH & Co. KG... -
Page 36: Switching The Modeling Light
OFF – FULL – PROP – OFF. Note: The flash head’s modeling light can only be set to automatic switch off mode (limited to 30 s). The modeling light turns off after the flash is triggered. HENSEL-VISIT GmbH & Co. KG... -
Page 37: Operation With Freemask
Motif lighting  Set all flash units for the motif lighting on „C“ channels (C1, C2, C3). Mask lighting  Set the Porty L for lighting the mask on „F“ channels (F1, F2, F3). HENSEL-VISIT GmbH & Co. KG... - Page 38  Assign the same “F” channel to lighting the mask. Example: station 1: transmitter channel 1 motif C1 mask F1 station 2: transmitter channel 2 motif C2 mask F2 station 3: transmitter channel 3 motif C3 mask F3 HENSEL-VISIT GmbH & Co. KG...
-
Page 39: Operation With Profoto Air
• The flash heads of several generators can be assigned to one group, e.g. all lamps of one light bank. • In master mode, all flash heads assigned to the same chan- nel can be controlled regardless of their group assignment. HENSEL-VISIT GmbH & Co. KG... -
Page 40: Summary Of Control Elements
 Switch the transmitter on by pressing the ON key P4. The LEDs are blinking and show the current settings.  Press the ON key P4 again to turn the transmitter off. The transmitter turns off automatically after 30 minutes of inac- tivity. HENSEL-VISIT GmbH & Co. KG... -
Page 41: Remote Trigger
The group setting lets you combine individual flash heads. This lets you jointly control the settings of the flash heads contai- ned in this group. Triggering of the flash heads is done via the channel assignment. HENSEL-VISIT GmbH & Co. KG... - Page 42 Â Press the RC/CH key 17 for ca. 2s. Both displays 13 and 19 are blinking. The selected channel is displayed in the left display 19, the se- lected groups for both flash channels are displayed in the right HENSEL-VISIT GmbH & Co. KG...
-
Page 43: Remote Control
 Press P9 to switch on the modeling light. Note: The generator’s modeling light can only be set to automatic switch off mode (limited to 30 s). The modeling light turns off after the flash is triggered. HENSEL-VISIT GmbH & Co. KG... -
Page 44: Maintenance
The flash lamp connectors of the battery flash generator and the mains drawer are protected against short circuit by a 10 AM safety fuse. Only use fuses with „large switching capacity“ according to EN 60127-2/1 or IEC 127-2/1. HENSEL-VISIT GmbH & Co. KG... -
Page 45: Error Messages
The numbers mean the following: Error Description Charging error maximum charge time was exceeded Discharge error maximum discharge time was excee- Overload error No flash error disappears after a short period. Re-start unit Temperature error HENSEL-VISIT GmbH & Co. KG... -
Page 46: Warranty
Please include a short description of the defect. Disposal The packing material of the generator needs to be sorted and recycled as necessary. Retired and defective electronic equip- ment must be recycled in accordance with regulation. HENSEL-VISIT GmbH & Co. KG... -
Page 47: Customer Service Points
+49 931 27881-0 Fax: +49 931 27881-50 E-Mail: info@hensel.de Service points listed in the Internet Additional national and international service and distribution addresses can be found on the web page of Hensel-Visit GmbH & Co. KG: www.hensel.de HENSEL-VISIT GmbH & Co. KG... -
Page 48: Accessories
3391 Radio transmitter/receiver Strobe Wizard Plus transmitter code no.: 3950 freemask transmitter code no.: 3955 Profoto / Hensel Air Sync code no.: 3965 Profoto / Hensel Air Remote code no.: 3966 Profoto / Hensel Air USB code no.: 3967... -
Page 49: Subject Index
Set-up 8, 15 Fuses 22, 44, 45 Strobe Wizard Plus 26, 28, 34, 48 freemask 28, 35, 37, 48 Synchronization 26, 40 Generator support 16, 48 Warranty 46 Group 37, 39, 42 Lithium battery 11 HENSEL-VISIT GmbH & Co. KG... -
Page 50: Declaration Of Confirmity
User Manual Porty L 16 Declaration of Confirmity for Radio and Telecommunication Terminal Equipment, Electromagnetic Compatibility and Safety HENSEL-VISIT GmbH & Co. KG... - Page 51 User Manual Porty L Notes HENSEL-VISIT GmbH & Co. KG...
Need help?
Do you have a question about the POrty L600 and is the answer not in the manual?
Questions and answers