Bosch D296 Installation Instructions Manual
Long-range beam smoke detectors
Hide thumbs
Also See for D296:
- Installation manual (32 pages) ,
- Installation instructions manual (28 pages) ,
- Application manual (20 pages)
Table of Contents
Advertisement
Advertisement
Table of Contents

Related Manuals for Bosch D296


Summary of Contents for Bosch D296
- Page 1 D296/D297 Installation Instructions Long-Range Beam Smoke Detectors...
-
Page 2: Fcc Compliance Notice
FCC Compliance Notice Operation This equipment was tested and complies with the limits Each D296 and D297 Transmitter sends an invisible for a Class B Digital Device, pursuant to Part 15 of the infrared beam of a specific frequency and intensity. Each Federal Communications Commission (FCC) rules. -
Page 3: Installation Considerations
Sources After a signal loss of 50%, the receiver indicates a • Place the D296 and D297 Detectors where the beam trouble. When the dust and dirt buildup are cleaned or path does not pass near heating and cooling outlets. -
Page 4: Use Correct Wire Gauge And Length
In some unusual circumstances, the walls and support structure might be subject to more significant movement because of heavy equipment operation, such as cranes anchored to the top of the walls. Bosch Security Systems, Inc. | 09/06 | 31344F... - Page 5 (refer to Figure 6). Figure 6: Removing the Back Plate 1 - Remove screw to expose the back plate. 2 - Mounting slot (4) 3 - Wiring entrance 4 - Do not remove. Bosch Security Systems, Inc. | 09/06 | 31344F...
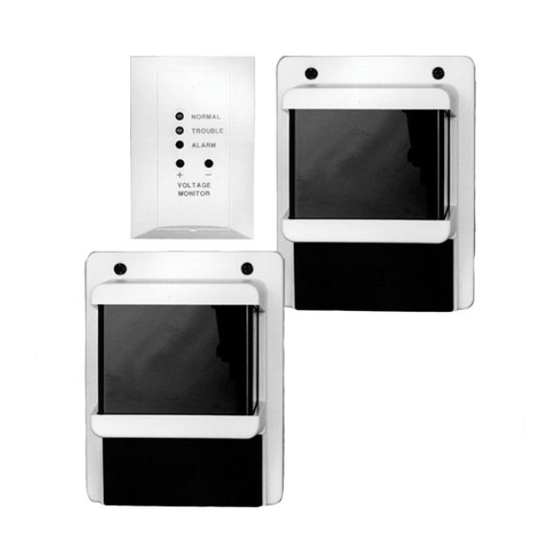
- Page 6 Wiring Wiring Remote Indicator Plate The D306 Remote Indicator Plate is shipped with the D296 as a standard accessory. Although the D306 is not Only apply power after all connections are required, the manufacturer recommends its installation made and inspected.
-
Page 7: Preliminary Alignment
(aligned with the front and rear bore sights). 5. Replace and secure the transmitter's cover. 6. Ensure the transmitter's green LED is flashing. Replace and secure the transmitter's access door. Bosch Security Systems, Inc. | 09/06 | 31344F... -
Page 8: Sensitivity Adjustment
0.50 V to 5.00 V. The voltage at the receiver is greater at shorter distances. Make a note of the alignment voltage. It might be helpful if you need to troubleshoot at another time. Bosch Security Systems, Inc. | 09/06 | 31344F... -
Page 9: Additional Information
If the voltage is not within this range, press the Setup button. 12. After setup, remove the test cable. 13. Reconnect the D306 connector if used. 14. Replace and secure the access door. Bosch Security Systems, Inc. | 09/06 | 31344F... - Page 10 Set detector sensitivity to respond to the proper smoke obscuration and to reduce the chance of a false activation. Bosch Security Systems, Inc. | 09/06 | 31344F...
-
Page 11: Field Sensitivity Measurements
D296/D297 | Installation Instructions | 7.0 Additional Information Field Sensitivity Measurements The D296 and D297 automatically compensate for the effects of dust and dirt accumulation on their covers. They also compensate for component aging. The NFPA requires the detector sensitivity be measured in the field within one year after its initial installation and every alternate year thereafter (refer to NFPA 72). -
Page 12: Troubleshooting
Replace the access door. Closed Open Alarm and Trouble. An alarm Determine the cause of occurred, then the beam was the alarm and reset the blocked. receiver. Clear the beam path. Bosch Security Systems, Inc. | 09/06 | 31344F... - Page 13 When two or more adjacent detectors are installed in the same area, alternate the transmitter and receiver locations. If the transmitter and receiver are not alternated, ensure the spacing between the detectors is 1/5 the distance from the transmitter to the receiver. Bosch Security Systems, Inc. | 09/06 | 31344F...
-
Page 14: Quick Start Installation Flowchart
D296/D297 | Installation Instructions | 10.0 Quick Start Installation Flowchart 10.0 Quick Start Installation Flowchart Figure 19: Quick Start Installation Flowchart Start TX = Transmittter RX = Receiver • Mount TX and RX according to Section 4.0 Mounting • The green LED is off. -
Page 15: Specifications
Specifications Operating Voltage D296: 18.0 VDC to 32.0 VDC D297: 10.2 VDC to 15.0 VDC D296 Receiver: 45 mA at 24 VDC Standby Current D296 Transmitter: 20 mA at 24 VDC D297 Receiver: 50 mA at 12 VDC D297 Transmitter: 20 mA at 12 VDC... - Page 16 Bosch Security Systems, Inc. 130 Perinton Parkway Fairport, NY 14450-9199 USA Customer Service: (800) 289-0096 Technical Support: (888) 886-6189 © 2006 Bosch Security Systems, Inc. 31344F...
Need help?
Do you have a question about the D296 and is the answer not in the manual?
Questions and answers