
Subscribe to Our Youtube Channel
Related Manuals for Acson G6


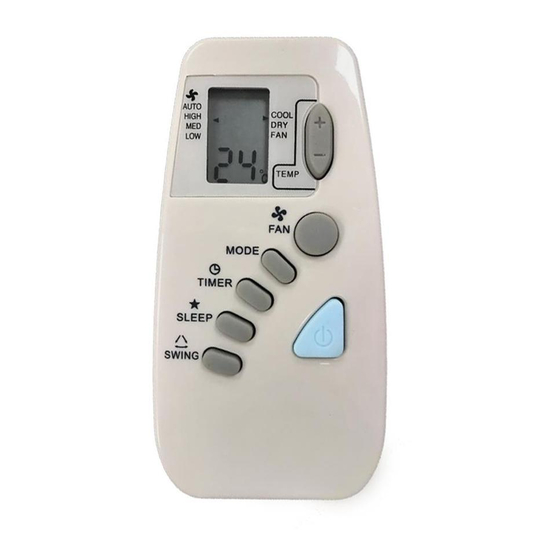
Summary of Contents for Acson G6
- Page 1 OPERATING OPERATING MANUAL MANUAL TEMP MODE TIMER SLEEP SWING Before using your air conditioner, please read this operating manual carefully and keep it for future reference.
- Page 2 G6 Remote Controller Indication TEMP MODE TIMER SLEEP SWING Part No.: 08019010808 0M-G6-0200-1...
- Page 3 OPERATING GUIDE 1. Transmission source • The source where the signal will be transmitted. 2. Signal transmission indication • Blink to confirm that the last setting has been transmitted to the unit. 3. Temperature setting • To set the desired room temperature, press the TEMP + or TEMP – button to increase or decrease the set temperature.
- Page 4 • When the unit is operating under heating mode, +2°C the set temperature is decreased by 1°C after the first half an hour, 2°C after the second half an +1°C hour and total of 3°C after the following 1 hour. This function will prevent night sweat during summer season.
- Page 5 HOW TO MOUNT ONTO THE WALL • Affix the holder onto the wall using the screws provided. Ensure that the signal can be received by the air conditioner unit from that location. Affix the holder to the wall using the screws.
- Page 6 Indication de télécommande G6 (Refroidissement d’eau) TEMP MODE TIMER SLEEP SWING Part No.: 08019010808 0M-G6-0200-1...
- Page 7 MODE D’EMPLOI 1. Source de transmission • La source d’où le signal sera transmis. 2. Indication de transmission de signal • Clignotement pour confirmer que le dernier réglage ait été transmis à l’unité. 3. Réglage de la température. • Pour régler la température au niveau que vous souhaitez, appuyez sur le bouton TEMP + ou TEMP –...
-
Page 8: Introduire Les Piles
refroidissement, la température est réglée de sorte qu’elle monte de 0,5°C au bout d’une demie-heure, +2°C de 1°C au bout d’une heure et de 2°C au bout de la +1°C deuxième heure.Cette fonction permet d’éviter un refroidissement trop élevé en été. •... - Page 9 COMMENT INSTALLER SUR LE MUR • Montez le support sur le mur en utilisant les vis fournis. Assurez-vous que le climatiseur puisse recevoir les signaux à partir de cet emplacement. Montez le support sur le mur à l’aide des vis. •...
- Page 10 G6-Remote-Controller-Anzeige TEMP MODE TIMER SLEEP SWING Part No.: 08019010964 0M-G6W-0500...
- Page 11 GEBRAUCHSANWEISUNG 1. Sendungsquelle • Die Ausgangsquelle des Signals. 2. Signalübertragungsanzeige • Blinkt auf, um anzuzeigen, dass das letzte Signal an das Gerät übertragen wurde. 3. Temperatureinstellung • Um die gewünschte Temperatur einzustellen, den TEMP + oder den TEMP – Knopf betätigen, so wird die eingestellte Temperatur höher oder niedriger gestellt.
- Page 12 • Dabei kann man Energie sparen. Wenn das Gerät auf Kühlbetrieb eingestellt ist, erhöht sich die +2°C eingestellte Temperatur nach einer halben Stunde +1°C um 0,5°C, nach einer weiteren halben Stunde um 1°C und eine Stunde danach um insgesamt 2°C. Mit dieser Funktion wird übermässiges Kühlen im Sommer vermieden.
- Page 13 ANBRINGEN DER FERNSTEUERUNG AN DER WAND • Die Halterung mit Hilfe der Schrauben an der Wand befestigen. Es ist darauf zu achten, dass die Klimaanlage das Signal von dort empfangen kann. Die Halterung wird mit Hilfe der Schrauben an der Wand befestigt.
- Page 14 Indicazione controller remoto G6 TEMP MODE TIMER SLEEP SWING Part No.: 08019010964 0M-G6W-0500...
- Page 15 GUIDA PER L’USO 1. Fonte di trasmissione • La fonte dalle quale viene trasmesso il segnale. 2. Indicatore di trasmissione • L’indicatore lampeggia per confermare l’invio dell’ultimo valore al condizionatore. 3. Valori di temperatura • Per selezionare la temperatura desiderata premere il tasto TEMP + o TEMP – per aumentare o diminuire la temperatura.
- Page 16 prima mezz’ora, di 1°C dopo la seconda mezz’ora e per un totale di 2°C l’ora successiva. Questa +2°C funzione impedisce un eccessivo abbassamento di +1°C temperatura durante il periodo estivo. • Quando il condizionatore opera in funzione di riscaldamento, la temperatura selezionata viene ridotta di 0,5°C dopo la prima mezz’ora, di 1°C - 1°C dopo la seconda mezz’ora ed un totale di 2°C l’ora...
- Page 17 COME FISSARE L’ASTUCCIO DEL TELECOMANDO ALLA PARETE • Fissate l’astuccio alla parete usando le vite fornite. Assicuratevi che il segnale possa essere ricevuto dal condizionatore da questa posizione. Fissare l’astuccio alla parete utilizzando le viti fornite. • Per fissare il telecomando al suo astuccio: i) Inserire il telecomando nel suo astuccio.
- Page 18 Indicación del mando a distancia G6 TEMP MODE TIMER SLEEP SWING Part No.: 08019010964 0M-G6W-0500...
- Page 19 GUÍA DE UTILIZACIÓN 1. Fuente de transmisión • La fuente donde la señal será transmitida. 2. Indicación de transmisión de la señal • Parpadea para confirmar que el último ajuste ha sido transmitido a la unidad. 3. Ajuste de la temperatura •...
- Page 20 • Esta es una opción de ahorro de energía. Cuando la unidad está operando bajo el primera media hora, +2°C 1°C después de la segunda media hora y un total +1°C de 2°C después de la siguiente hora. Esta función prevendrá...
- Page 21 MONTAGE SOBRE LA PARED • Fije la sujeción en la pared utilizando los tornillos provistos. Asegúrese que la señal puede ser recibida por el acondicionador de aire desde ese lugar. Fije la sujeción en la pared utilizando los tornillos. • Para ajustar el control remote en su sujeción: i) Introduzca el control remoto en su sujeción.
- Page 22 Пульт дистанционного управления G6 Индикация TEMP MODE TIMER SLEEP SWING Part No.: 08019010808 0M-G6-0200-1...
- Page 23 РУКОВОДСТВО ПО ИСПОЛЬЗОВАНИЮ 1. Источник сигналов • Источник откуда сигнал будет передаваться. 2. Индикация передачи сигнала • Мигает для подтверждения того, что последняя установка была передана на модуль. 3. Установка температуры • Для установки желаемой температуры в комнате, нажмите TEMP + или...
- Page 24 8. Установка режима сна • Нажмите кнопку СОН для включения +2°C функции режима сна. +1°C • Эта опция служит для энергосбережения. При работе модуля в режиме охлаждения, установленная температура повышается на 0,5°С после первого - 1°C получаса, на 1°С после следующего получаса...
- Page 25 КАК УСТАНОВИТЬ НА СТЕНУ • Закрепите держатель на стену при помощи имеющихся винтов. Удостоверьтесь, что прием сигналов кондиционером с этого места возможен. Поместите пульт дистанционного управления в держатель. • Для установки пульта дистанционного управления в держатель: i) Поместите пульт дистанционного управления в держатель. ii) Протолкните...
- Page 26 OYL MANUFACTURING COMPANY SDN BHD JALAN PENGAPIT 15/19, P .O. BOX 7072, 40702 SHAH ALAM, SELANGOR, MALAYSIA.
Need help?
Do you have a question about the G6 and is the answer not in the manual?
Questions and answers