
Subscribe to Our Youtube Channel
Related Manuals for TTI TSC-3000R

Summary of Contents for TTI TSC-3000R
- Page 1 TSC-3000R MULTIBAND SCANNING RECEIVER INSTRUCTION MANUAL Manufactured by www.ttikorea.co.kr...
-
Page 2: Table Of Contents
CONTENTS CAUTIONS ..........5 SUPPLIED ACCESSORIES ...... 6 FITTING AND REMOVING THE BATTERY PACK ............6 INSTALLING THE ANTENNA ....7 INSTALLING THE LANYARD ....7 CHARGING THE BATTERY ...... 8 CONTROLS ..........10 Power On/Off Lock Button ....11 Control Knob ........ - Page 3 LCD DISPLAY ..........15 GENERAL OPERATION ......16 Turning the unit On or OFF ....16 KEY Lock ..........16 Volume ..........16 Squelch ..........16 Func Keys .......... 16 Menu Keys .......... 17 E/VFO Key [Enter/VFO] ...... 17 Control Knob ........
- Page 4 MENU SETTINGS ........46 VFO Mode ........... 47 Memory Read Mode ......48 COPYING FREQUENCIES BETWEEN MEMORY BANKS ........49 Bank Copy ........... 49 Channel Copy ........50 Channel Move ........51 All Clear ..........52 Bank Clear .......... 53 Channel Clear ........
-
Page 5: Cautions
• Use only munufacturer-supplied rechargeable battery in your receiver. • Do Not expose the receiver to water. It is not waterproof. Avoid storing or charging the receiver in direct sunlight. • Avoid storing the receiver in temperatures below -20°C or above +60°C . TSC-3000R... -
Page 6: Supplied Accessories
2) Holding the receiver in one hand, p r e s s d o w n o n t h e b a t t e r y release catch. 3) List the top of the battery pack away from the receiver. TSC-3000R... -
Page 7: Installing The Antenna
3) Do not over tighten. INSTALLING THE LANYARD 1) Slide the small end loop of the lanyard through the slot in the rear of the receiver’s top panel. 2) Feed the large end of the lanyard through the loop and tighten. TSC-3000R... -
Page 8: Charging The Battery
• If the charging LED blinks RED and GREEN or does not light at all, remove the receiver into the cradle and reinsert it. The charging time for a discharged battery is typically 12– 15 hours. When the battery is fully charged, the LED will turn GREEN. TSC-3000R... - Page 9 NOTE : If you find yourself in a position where you need to charge the battery but the charging Cradle is not available, you can plug the AC Adaptor directly into the receivers charging socket located under the Accessory Jack cover. TSC-3000R...
-
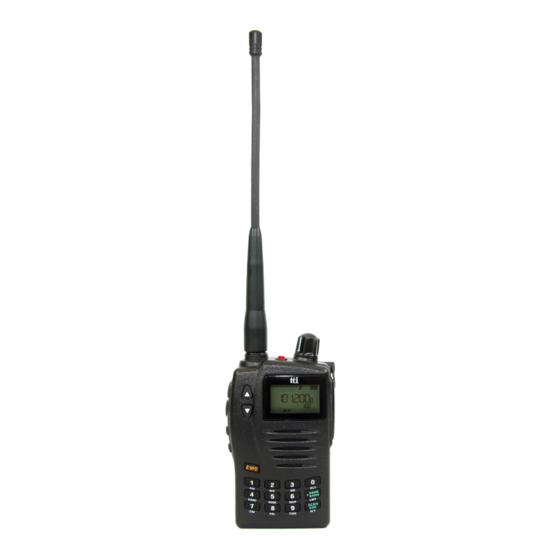
Page 10: Controls
CONTROLS Power On/Off Lock Button Keypad Control Knob Accessory Jack Up/Down Keys LCD Display Squelch Up/Down Keys Jack Cover Securing Point Function Key Antenna Menu Key Lanyard Slot Enter/VFO Key TSC-3000R... -
Page 11: Power On/Off Lock Button
Provides charging and earphone jacks. LCD Display Shows frequencies and selected functions. Jack Cover Securing Point Holds the accessory jack cover in place. Antenna Provides reception of signals. Lanyard Slot Allows connection of the Lanyard to protect the receiver from being accidentally dropped. TSC-3000R... -
Page 12: Keypad
Used to enter frequencies in VFO mode and to make direct selected of Banks in memory Read mode. Bank/Band Key Used to change Memory Banks or Frequency Bands. Scan/Search Key Used to activate or deactivate the Scan function in memory read mode or the Search function in VFO mode. TSC-3000R... -
Page 13: Extended Function Keys
EXTENDED FUNCTION KEYS The Keypad Keys on the front panel have secondary functions which are printed below each key. These secondary functions are accessed after pressing the FUNC key. TSC-3000R... -
Page 14: Canc
The Delay time is set from the Menu function. Allows the entry of upper and lower Limit: frequency limits when Searching. Activates or deactivates the signal attenuator to reduce the receiver's Attenuator: sensitivity in strong signal conditions. TSC-3000R... -
Page 15: Lcd Display
Data Transfer Priority Channel Battery Charge Level Power Save Frequency Display Scan Channel Indicator Function AM, FM, WFM Mode Memory Attenuator Search Bank Number Skip Scan Delay Timer Key Tone & Beep Tone Frequency Step Keypad Lock Tone Signal Meter TSC-3000R... -
Page 16: General Operation
Squelch setting and the 6 key on to decrease th e Sq u e l ch se tti n g . The S q u e l c h l e v e l w i l l b e displayed from 00 to 09. -
Page 17: Menu Keys
Rotate lockwise to increase the frequency and counter clockwise to decrease the frequency. In Menu mode, rotate the Control knob to change the selected setting. In Channel memory mode, rotate the Control knob to step up or down through the memories. TSC-3000R... -
Page 18: Selecting Frequencies
. g . E n t e r i n g 4 5 6 . 2 5 f o l l o w e d b y E/VFO r e s u l t s i n 4 5 6 . 2 5 0 0 b e i n g selected. TSC-3000R... -
Page 19: Using The Control Knob
• To change frequency in 10 MHz steps, press the Func key, then rotate the Control knob to change the frequency. (F is displayed while the Func mode is active). Note : The Func mode clears a few seconds after the last key press or control knob change. TSC-3000R... -
Page 20: Mode Selection
Each press will step through the Mode settings in the following order: AM - FM - WFM (Wideband FM) - Auto To automatically have the receiver select the mode for the band you are on, select the Auto Mode. TSC-3000R... -
Page 22: Frequency Bands
150 MHz 25 kHz 255.1125 MHz to 382.100 MHz 370 MHz 12.5 kHz 382.125 MHz to 769.800 MHz 430 MHz 25 KHz 769.8125 MHz to 960.100 MHz 850 MHz 12.5 KHz 960.125 MHz to 1309.975 MHz 1295 MHz 25 kHz TSC-3000R... -
Page 23: Frequency Search
5) Press the SCAN SRC key briefly. The ‘SRCH’ icon will be displayed and the receiver will Search the selected Band starting from the start frequency. Once the end of the band is reached the Search continues at the beginning of the selected Band. TSC-3000R... -
Page 24: Full Search
Squelch or keys so that the noise just disappears. 3) Press and hold the SCAN SRC key for 2 seconds. The ‘SRCH’ icon will be displayed and the receiver will Search the entire frequency range of the receiver. TSC-3000R... -
Page 25: Limited Search
2) Set the Squelch level using the Squelch or keys so that the noise just disappears. 3) Press Func followed by the LMT key. [L1] is displayed. 4) Enter the First frequency using the keypad or the Control knob. TSC-3000R... - Page 26 NOTE: The Limit Search always Searches upwards in Frequency. If the first frequency is lower than the second it will search between the two frequencies. If the first frequency is higher then the second it will search outside the two frequencies. TSC-3000R...
- Page 27 L1 is a lower frequency than L2 L1 is a higher frequency than L2 Example. Frequency Frequency Frequencies Searched 40 MHz 50 MHz 40 - 50 MHz 50 MHz 40 MHz 1309.995 MHz, 150 KHz-40 MHz TSC-3000R...
-
Page 28: Priority Search
3) Press Band/Bank to select the required frequency band you wish to scan. 4) Press Scan/Src. The receiver will begin searching the selected Band and will switch to the Priority channel at an interval set by the ‘Priority Time’ setting in the setup menu. TSC-3000R... - Page 29 • To change the frequency band while searching, briefly press Band/Bank key. • To change the search direction while searching, rotate the control knob clockwise or counter clockwise. TSC-3000R...
-
Page 30: Dual Watch
‘Busy timer’ is set to Busy the receiver will stay on the active To stay on an active frequency indefinitely or to stop the Dual Watch function press Func DW again. The receiver will exit the Dual Watch function. TSC-3000R... -
Page 31: Memory Banks
The Automatic Memory area can store up to 200 frequencies in two banks of 100 memories. The automatic memory is used when searching a band of frequencies. The scanner can automatically store any active frequencies it finds while searching. The Automatic Memory banks are labelled A0 and A1 TSC-3000R... -
Page 32: Limited Search Memories
The Dual Watch Memories consists of 50 memory locations split into 25 pairs of frequencies. The two Dual Watch frequencies are identified as A and b. The 25 pairs are therefore labelled A00, b00 to A24, b24. TSC-3000R... -
Page 33: Storing Frequencies Into The Memories
6) If required, use the number keys to select a new memory bank e.g. for memory bank 16 press 1 and 6 7) To change the memory location, rotate the control knob. 8) Press Func MW again to store the frequency. TSC-3000R... - Page 34 Memory Read mode. 3) To step through the memory banks press the BANK key or enter the memory bank directly using the numbered keys. Memory banks are numbered 00 to 39 4) Select the required channel using the control knob. TSC-3000R...
-
Page 35: Automatic Memories
6) Press the SCAN/SRC key to begin scanning. 7) As active frequencies are found they are automatically stored in the select memory bank. When all 100 channels are fully stored the receiver will Beep. 8) To exit from the Automatic memory mode, press the E/VFO key. TSC-3000R... - Page 36 2) Press Func MR. The receiver will enter the Memory Read mode. 3) Press the BANK key repeatedly to step through the memory banks until A0 or A1 are selected. 4) Select the required channel using the control knob. TSC-3000R...
-
Page 37: Limited Search Memories
4) Press Func LMT. L1 will flash on the display to indicate that you are entering the first frequency limit 5) Press the E/VFO key to accept. L2 will flash on the display to indicate you are now entering the second limit frequency. TSC-3000R... - Page 38 9) Press Func MW again to store the frequencies. The selected frequencies limits will be stored as a pair of channels in locations Axx and bxx where xx is the channel number you selected in step 8 TSC-3000R...
- Page 39 MODE key to directly access Pr blank 4) Select the required channel using the control knob. 5) Set the squelch level to a point where the receiver is just quiet. 6) Briefly press SCAN/SRC. The radio will begin scanning between the selected frequency limits. TSC-3000R...
-
Page 40: Dual Watch Memories
9) Use the control knob to select an empty channel to store the frequency pair. 10) Press Func MW again to store the two frequencies. They will be stored Axx and bxx where xx is the empty channel you selected. TSC-3000R... - Page 41 Du is selected or press SKIP to directly access Du bank. 5) Select the required channel using the control knob. 6) Briefly press the SCAN/SRC key. Dual Watch will begin with the receiver monitoring the channels in the selected Dual Watch memory. TSC-3000R...
-
Page 42: Channel Scan
• To change the bank while searching, briefly press Band/Bank key. • To change the scan direction while scanning, rotate the control knob clockwise or counter clockwise. TSC-3000R... -
Page 43: Full Scan
• To change the bank while searching, briefly press Band/Bank key. • To change the scan direction while scanning, rotate the control knob clockwise or counter clockwise. • The full scan function works only within the Manual Memory Banks(00 through 39 Banks). TSC-3000R... -
Page 44: Priority Scan
B a n d a n d w i l l s w i t c h t o t h e Priority channel at an interval set by the 'Priority Time' setting in the setup menu. TSC-3000R... - Page 45 • To change the channel Bank while searching, briefly press Band/Bank key. • To change the search direction while searching, rotate the control knob clockwise or counter clockwise. TSC-3000R...
-
Page 46: Menu Settings
The Menu settings will vary depending on the selected mode. 1) Press the MENU Key to access the Menu settings 2) Press the volume keys to step through the Menu items. 3) Rotate the Control knob to change the values of each Menu item TSC-3000R... -
Page 47: Vfo Mode
500, Auto for each band. Activates or deactivates the Beep ON, OFF key-press beeps. Determines how long the radio will wait on a frequency after a Delay 1 - 10 Seconds signal has disappeared while scanning or Searching. TSC-3000R... -
Page 48: Memory Read Mode
All Clear ALL CLR receiver. Moves a frequency from one Channel Move CH Move channel to another. Copies a frequency from one Channel Copy CH Copy channel to another. Copies entire bank Bank Copy bA Copy frequencies to another Bank. TSC-3000R... -
Page 49: Copying Frequencies Between Memory Banks
BANK/BAND key. 5) Press E/VFO again to copy the original Bank to the new Bank. The o r i g i n a l B a n k w i l l r e m a i n unchanged. TSC-3000R... -
Page 50: Channel Copy
Bank. 5) Press E/VFO again to copy the o r i g i n a l c h a n n e l t o t h e n e w channel. The original channel will remain unchanged. TSC-3000R... -
Page 51: Channel Move
Control Knob, number keys or the BANK/BAND key to select the preferred channel and Bank. 5) P r e s s E/VFO again to move the frequency to the new channel. The original channel will now be empty. TSC-3000R... -
Page 52: All Clear
Knob or the volume keys to select ‘ALL CLR’ 2) Press E/VFO. ‘dEF yES’ will be displayed. 3) To continue with the All Clear, press E/VFO again. 4) To cancel the All Clear, use the Control knob to select ‘dEF NO’ then press E/VFO. TSC-3000R... -
Page 53: Bank Clear
Knob or the volume keys to select ‘bA CLR’. 3) Press E/VFO. ‘dEF yES’ will be displayed. 4) To continue with the Bank Clear, press E/VFO again. 5) To cancel the Bank Clear, use the Control knob to select ‘dEF NO’ then press E/VFO. TSC-3000R... -
Page 54: Channel Clear
2 ) P r e s s M e n u , t h e n u s e t h e Control Knob or the volume keys to select ‘CH CLR’. 3 ) P r e s s E / V F O t o e r a s e t h e channel. TSC-3000R... -
Page 55: Cloning Stored Memories With Another Unit
CLONING STORED MEMORIES WITH ANOTHER UNIT The memories stored in your receiver can be transferred to or from another TSC-3000R receiver. To perform this function you will need a TCC-1010 cloning cable (available separately). Cloning is performed as follows: 1) Place the two radios side by side and connect the cloning cable as shown in the diagram below. -
Page 56: Specification
CE Declaration CE version of TSC-3000R which diplays the CE symbol on the product label, complies with the essential requirements of the European Radio and Telecommunication Terminal Directive 1999/5/CE. Safety Requirements SPECIFICATIONS General - Frequency coverage : 0.150-1309.995 MHz - Number of memory channels : 1300 (incl. limited search memories, dual watch meemories and auto write memories) - Frequency resolutionn : 5, 6.25, 8.33... -
Page 57: Bank Copy
AM/FM : More than 15 kHz/-9dB Less than 150 kHz/-60dB WFM : More than 150 kHz/-6dB - AF output power : 500mW typical at 40% distortion with an 8 load - Ext.speaker connector : 3-conductor 3.5(d) mm (1/5") 8 TSC-3000R... -
Page 58: Notes
NOTES TSC-3000R... - Page 59 DECLARATION OF CONFORMITY We, TTI Tech Co., Ltd. (TTI house, 1163-4, Gaepo-dong, Gangnam-gu, Seoul, Korea) declare on our sole responsibility that this equipment complies with the essential requirements of the Radio and Telecommunications Terminal Equipment Directive, 1999/5/EC, and that any applicable Essential Test Suite measurements have been performed.
- Page 60 Part Number:820-TS30-000 Version A...
Need help?
Do you have a question about the TSC-3000R and is the answer not in the manual?
Questions and answers