
Subscribe to Our Youtube Channel
Related Manuals for UEi DT304

Summary of Contents for UEi DT304
- Page 1 Test Equipment Depot - 800.517.8431 - 99 Washington Street Melrose, MA 02176 - TestEquipmentDepot.com INSTRUCTION MANUAL DT304...
-
Page 2: Table Of Contents
TABLE OF CONTENTS Introduction ......... .1 Safety . -
Page 3: Introduction
• Follow the manufacturer’s maintenance procedures when servicing equipment • Place ONLY thermocouples (type K,J,T or E) in the DT304 thermocouple ports • Make sure your meter is set for the proper thermocouple type you are using • Be sure the thermocouple you use can withstand the temperature extreme it may be exposed to in your service task •... -
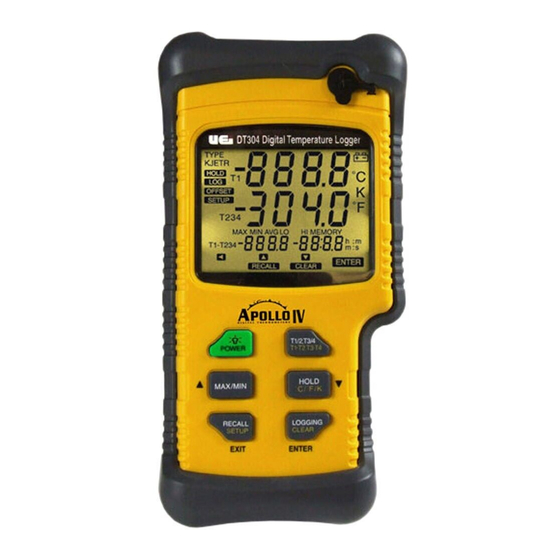
Page 4: Controls And Indicators
Controls and Indicators (top view) 1. Thermocouple T1, T2, T3 and T4 inputs 2. Display 3. Buttons 4. USB jack... -
Page 5: Lcd Display
LCD Display Functional Description 1. Primary Display: T1/T2 or T3/T4 2. TYPE KJET: Type of thermocouple. 3. SETUP: Setup is in progress. 4. RECALL: The logged readings are displayed. 5. OFFSET: The thermocouple measurement includes an offset. 6. HOLD: The display readings do not change. 7. -
Page 6: Buttons
Buttons NOTE: Press all the dual function buttons momentarily to activate the Upper Row Function ,and press these buttons for more than 1 second to activate the Lower Row Functions. Press this button momentarily to turn the backlight on and off. -
Page 7: Setup
Press this button momentarily to recall or stop viewing logged readings and MIN/MAX readings. Press this button for more than 1 second to start or exit “SETUP”. The “EXIT” function is activated in the “RECALL” and “SETUP” mode only. Press this button momentarily to start or stop logging. Press this button for more than 1 second to clear logged readings. -
Page 8: Setting Time/Date
Setting the Date 1. Entering Setup will show the first option of “ “ 2. Press “ENTER” and the display will show “ “ 3. Press “ “ or “ “ to select the correct year. Press “ENTER” 4. Next the meter will indicate month and day with “ “. -
Page 9: Apo
Changing the Auto-Power-Off Time (in minutes) The thermometer enters Auto-Power-Off mode if no button is pressed for 30 minutes. Press “ “ to turn the thermometer on. You can enable or disable Auto-Power-Off mode and also you can select the Auto-Power-Off mode and also you can select the Auto-Power-Off time (in minutes) among the 9 choices below: 1 00:10 h:m... -
Page 10: Offset
4. If you selected a user-defined logging interval (1 second to 23 hours and 59 minutes). • Press “ “ or “ “ until the display shows “h:m” or “m:s”, and then press “ “ to select. The last number in the time display blinks. -
Page 11: Thermocouple
Resetting the Thermometer If you want to retore the thermometer settings as delivered from the factory, press “ “ or “ “ until the display shows “ “ then press “ “ to display “ “ in the primary display. Press “ “... -
Page 12: Hold
Holding the Displayed Temperature 1. Press “ “ momentarily to freeze the readings on the display. The display shows “ HOLD “. 2. Press “ “ momentarily again to turn off the “ HOLD “ function. NOTE: Press “ “ when turning on the thermometer to test the display. -
Page 13: Using Offset
You can only view initial conditions using WS600. The data entries are a time stamp and the T1, T2, T3,T4, T1-T2 or T3-T4 reading for the DT304. You can view these values by pressing “ “ momentarily or using WS600. The thermometer has 9,999 memory locations. -
Page 14: Using Memory Start/Stop Logging
Starting and Stopping Logging Memory clear, and PC communications are in accessible during logging. Recall function is enabled during logging. 1. Set the time and the logging interval, see “How to Change Setup Options”. 2. Press “ “ momentarily to start logging. The display shows “... -
Page 15: Maintenance
5. Press “ “ momentarily or turn off the thermometer to stop viewing logged readings. NOTE: The thermometer calculates the minimum and maximum of all logging sessions in memory. 4. How to Communicate with a PC The thermometer is equipped with an USB interface port. A Windows ®... -
Page 16: Cleaning
These guidelines will help you attain long and reliable service from your meter: 1. Calibrate your meter annually to ensure it meets original performance specifications. 2. Keep your meter dry. If it gets wet, wipe it dry immediately. Liquids damage electronic circuits. 3. -
Page 17: Battery Replacement
Battery Replacement Always use a fresh replacement battery of the specified size and type. Immediately remove the old or weak battery from the meter and dispose of it in accordance with your local disposal regulations. Old or defective batteries can leak chemicals that corrode electronic circuits. WARNING! To avoid electric shock, be sure to turn off the meter’s power and disconnect thermocouples from any equipment before you remove... -
Page 18: Specifications
Specifications Environmental Operating Temperature 14˚ to 122˚F (-10˚ to 50˚C) Storage Temperature -40˚ to 140˚F (-40˚ to 60˚C) Humidity Non condensing <50˚F (10˚C) 85% RH: 50˚ to 86˚F (10˚ to 30˚C) 70% RH: 86˚ to 104˚F (30˚ to 40˚C) 45% RH: 104˚ to 122˚F (40˚ to 50˚C) Altitude Operating - up to 200 m Storage - 10000 m... - Page 19 TP6K K-Type Bead Thermocouple (a standard accessory) Type K-Type, Chromel Alumel, bead style Temperature range -40˚ to +900˚F (-40˚ to +480˚C) Accuracy ±2.0˚F (±1.1˚C) Electrical Measurement range J-Type: -346˚ to +2192˚F (-210˚ to +1200˚C) K-Type: -328˚ to +2498˚F (-200˚ to +1370˚C) T-Type: -418˚...
-
Page 20: Limited Warranty
® Digital Temperature Logger Limited Warranty The DT304 is warranted to be free from defects in materials and workmanship for a period of five years from the date of purchase. If within the warranty period your instrument should become inoperative from such defects, the unit will be repaired or replaced at UEi’s option.
Need help?
Do you have a question about the DT304 and is the answer not in the manual?
Questions and answers