
Summary of Contents for RIPSpeed DVD-722B
- Page 1 DVD/CD/MP3 PLAYER WITH AM/FM TUNER DVD/CD/MP3 PLAYER WITH AM/FM TUNER...
-
Page 2: Safety Information
Safety Information WARNING To reduce the disk of fire or electric shock, do not expose this product to rain or moisture. CAUTION This product is a CLASS 1 LASER PRODUCT. Use of controls or adjustments or performance of procedures other than those specified herein may result in hazardous radiation exposure. -
Page 3: Table Of Contents
Contents Safety Information ..........................................1 Contents ............................................... 2 Panel Controls ............................................. 3 Remote Controls ..........................................4-5 Getting Started ............................................ 6 General Operation ..........................................7 Rotary Knob Menu ......................................... 8-12 Radio ..............................................13 DVD mode ............................................14 Radio and Clock ..........................................15 RDS ( Radio Data System ) ...................................... -
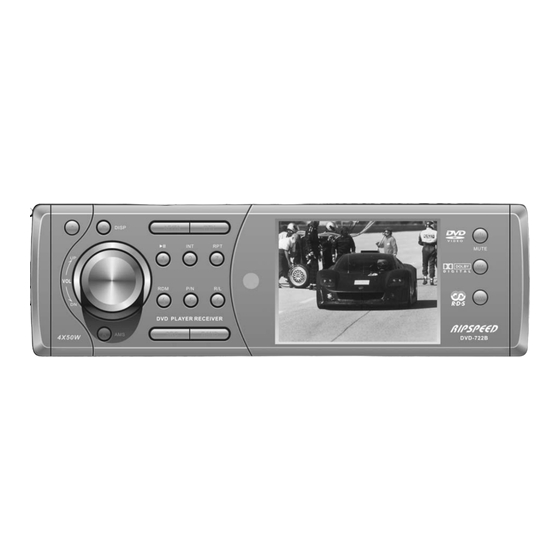
Page 4: Panel Controls
Panel Controls Power On/Off: Press to turn on/off the unit. 1 -Panel open 2 -Rotate the knob to adjust volume level. -Push to select BAS/TRE/BAL/FAD, rotate the knob to adjust level. 3 -AMS: Radio Auto preset/Radio Preset scan 4 -Track random play 5 -Radio - Disc Play (when disc inserted) 6 -Band switch: FM1-FM2-FM3-MW1-MW2 7 -Video System PAL/NTSC/AUTO 8 -DVD Audio Channel -VCD Audio Channel L/R/ST 9 -3 inch TFT display 10 -Radio Tune -Track Skip/Seek 11 -Power ON/OFF(press more than 2 sec.) -Mute 12 - Radio Preset: Press to listen to a preset station hold for more than 2 seconds to store station. -
Page 5: Remote Controls
Remote Controls Power On/Off: Press to turn on/off the unit. 1 -Zoom(DVD/VCD only) 14 -Radio 2 -Title(DVD only) -Disc Play(when disc inserted) 3 -Power on/off 15 -REPEAT 4 -Setup 16 -A-B repeat 5 -Menu cursor 17 -Stop/Return 6 -Enter 18 -Play/Pause 7 -Program 19 -Goto Search 8 -Digit Area 20 -DVD MENU 9 -Audio Mode Select Bas/Tre/Bal/Fad -PBC (for VCD 2.0 or up) -Push more than 2 seconds to Menu mode... -
Page 6: Remote Controls
Remote Controls Replacing the lithium battery of remote control unit. When the range of the operation of the card remote control becomes short or no functions while operating, replace the battery with a new lithium battery. Make sure the battery Polarity replacement is correct. 1. Pull out the battery holder while pressing the stopper. -
Page 7: Getting Started
Getting Started Press the button to open the panel and press to eject the disc. Note: Pressing the RESET hole will erase the clock Light up when you slide the panel down;twinkles when you remove the panel. setting and stored stations. -
Page 8: General Operation
General Operation SWITCHING ON AND OFF 1.Press to turn on the unit. 2.Press SRC once or more to select your desired function: DISC, Tuner(Radio). 3.Press more than 2 seconds to power off. 4.When you switch off the system or car ignition, the settings, tuner presets and the volume level will be retained in the unit's memory. VOL Knob Function Press the knob once to select BASS/TREBLE/BALANCE/FADER, rotate the knob to adjust. -
Page 9: Rotary Knob Menu
Rotary Knob Menu Press the knob more than 2 seconds to enter menu mode, then each press changes the mode as follows: EQ MODE, LOUD, BEEP, CAMERA, 12 /24 MODE, TA MODE, RETUNE, PARKING, MIRROR IMAGE, TA-VOL, VOL-MODE, A-VOL. EQ mode Rotate the knob to select EQ sound effect: ROCK - POP - CLASSIC - FLAT - EQ OFF LOUD mode Rotate the knob to choose loud on or off. - Page 10 Rotary Knob Menu BEEP ON/OFF mode Rotate the knob to choose button beep sound on or off. CAMERA Rotate the knob to turn rear camera on or off. while unit enter camera ON mode, Press the knob more than 2 seconds return to camera OFF mode. Under camera on mode, Press the SRC is invalid. 12/24 mode Select 12 hours mode or 24 hours mode. HOURS HOURS...
- Page 11 Rotary Knob Menu TA mode Rotate the knob to choose TA ALARM or TA SEEK mode. If the TA (Traffic Announcements) is turned on and there is no traffic program identification code received in the specified time, no TA/ TP will display and either TA ALARM or TA SEEK will be activated. TA ALARM mode : Alarm is turned on. TA SEEK mode: TA SEEK is automatically activated. RETUNE mode Rotate the control to choose RETUNE-S or RETUNE-L. RETUNE-S or RETUNE-L is time length selection of TA SEEK retune interval. RETUNE-S: Short, TA SEEK Retune interval is 45 seconds. RETUNE-L: Long, TA SEEK Retune interval is 180 seconds. REMARK: RETUNE mode functions for TA during TA SEEK mode only. PARKING mode Rotate the knob to turn rear parking attention on or off. While unit enter parking ON mode, Play the video disc, The screen appera “ DO NOT WATCH VIDEO WHILE DRIVING” , and blank screen.
- Page 12 Rotary Knob Menu MIRROR IMAGE mode Rotate the knob to choose MIRROR IMAGE mode on or off. While enter MIRROR IMAGE ON mode, The video of camera is mirror image. TA-VOL Rotate the knob to choose TA-VOL level. VOL - mode Rotate knob to choose VOL LAST, the turn-on volume level is the volume level of latest power off. Rotate knob to choose VOL ADJUST, then press the knob to choose A-VOL, and set the A-VOL volume level, In the VOL ADJUST mode, The volume level of power on is the volume level of A-VOL.
-
Page 13: Rotary Knob Menu
Rotary Knob Menu A - VOL Rotate the knob to choose A-VOL level. -
Page 14: Radio
Radio Band 1. Press to power on, then press SRC once or more to select tuner. 2. Press BAND once or more to select FM1, FM2, FM3, MW1, MW2. Display shows wave band, frequency, and preset station number if already stored. Tune Radio tune by step manually: Press less than 2 second. Radio seek automatically: Press more than 2 second. -
Page 15: Dvd Mode
DVD mode Press SRC button to select DVD mode (when disc is insert, and unit is reading disc), then press the DISP button. The LCD wll display:... -
Page 16: Radio And Clock
Radio and Clock AMS : Auto Memory Store Press AMS briefly to scan the preset station 1 - 6 for 5 seconds each. Hold more than 2 seconds, the 6 strongest available stations will be automatically saved in the memory of preset button 1 - 6. Clock Setting 1. Press DISP more than 2 seconds, minute display blinks, rotate the knob to set minute. 2. Press the knob once, hour display blinks, rotate the knob to set hour. 3. Press DISP to confirm. -
Page 17: Rds ( Radio Data System )
RDS ( Radio Data System ) RDS service availability varies with areas. Please understand if RDS service is not available in you area, the following service is not available. RDS Basics AF(Alternative Frequency) When the radio signal strength is poor, enabling the AF function will allow the unit to automatically search another station with the same PI (program identification) as the current station but with stronger signal strength. PS (Program Service name) The name of station will be display instead of frequency. AF Mode: Press AF/TA button less than 2 seconds to switch AF mode on and off. AF on: AF function is activated. AF off: AF function is disabled. Remark: AF indicator on LCD will flash until RDS information is received. If RDS service is not available in your area, turn off the AF mode. Traffic Announcements Some RDS FM stations periodically provide traffic information. TP ( Traffic Program Identification ) Broadcasting of traffic information TA ( Traffic Announcements Identification )Radio announcements on traffic conditions TA Mode: Press AF/TA for more than 2 seconds to turn on / off the TA function. When TA mode is turned on, the TA indicator will blink. When traffic announcement is received, the TA indicator will display. The unit will temporarily switch to the tuner mode (regardless of the current mode) and begin broadcasting the announcement at TA volume level. After the traffic announcement is over, it will return to the previous mode and volume level. When TA is turned on, SEEK, SCAN, AMS function can only be received or saved when traffic program identification (TP) code is received. EON ( Enhanced Other Networks ) When EON data is received, the EON indicator lights and the TA and AF functions are enhanced. TA: Traffic information can be received from the current station or stations in other network. AF: The frequency list of preset RDS stations is updated by EON data. EON enables the radio to make fuller use of RDS information. It constantly updates the AF list of preset stations, including the one that currently tuned into. If you preset a station around the area at your home, you will later be able to receive the same station at an alternative frequency, or any other station serving the same program, EON also keeps track of locally available TP stations for quick reception. - Page 18 RDS ( Radio Data System ) PTY Reception ( Program Type ) RDS FM stations provide a program type identification signal. Example: news, rock, info, sport, etc. PTY Mode: Press PTY to turn on the Program Type reception, the previous PTY type is shown. Press PTY once again to enter the MUSIC type or press twice to enter the SPEECH type, then use buttons 1 - 6 to select the desired program type. The selected PTY type is shown and searching starts if no other function is selected for 2 seconds. If there is no corresponding program type, NO PTY is shown and the unit will return to normal mode. PTY Type Preset: Press PTY once to enter the MUSIC type or press PTY twice to enter the SPEECH type. Then use function to select the desired program type.
-
Page 19: Disc Playback
Disc Playback Disc Load / Eject Load: Press button to slide down the panel. Insert the disc into the slot . Eject: Press button to slide down the panel. Press to eject the disc . Disc playback 1. When disc inserted, display shows READ. For MP3 or disc with mixed files, reading time may exceed 1 minute. 2. ERROR will be displayed if error found in disc operation. 3. For VCD/CD, VCD or CD icon will appear on the display. 4. While MP3/WMA files playback, MP3/WMA icon will appear on the display. 5. For DVD, DVD icon will appear on the display and TITLE appears. Press ENTER or to play. -
Page 20: Disc Playable
Disc Playable File type supported Audio file: MP3(*.mp3), WMA(*.wma) Video file: MPEG 2(*.vob), MPEG 1(*.dat) Picture file: JPEG(*.jpg) MP3 file: ISO 9660 or ISO 9660 + Joliet format - Max. 30 characters. Max. nested directory is 8 levels. The max. album number is 99. The max. length of each track is 99 minutes 59 seconds. Supported sampling frequency for MP3 disc: 8KHz to 48KHz (44.1KHz preferably). Supported bit-rates of MP3 disc are: 32 - 320 kbps (128 kbps preferably). Disc and file NOT supported *.ACC, *.DLF, *.M3U, *.PLS, MP3 PRO files and files with DRM. Open session discs. -
Page 21: Audio/Video/Picture File Playback
Audio/Video/Picture File Playback When MUSIC / PICTURE / VIDEO file is played, Category/Folder/File list will be displayed on the screen, and file/folder name being played will be displayed on top. Current selected item will be highlighted. Category Select to select AUDIO PICTURE VIDEO... -
Page 22: Track Playback
Track Playback select desired track -Press to skip to the next track. -Use 1-9 and 0, 10+ buttons on the remote control to select desired track number. Fast forward / backward during playback Press for more than 2 seconds once or more to select X2, X4, X8, X20 to fast backward or forward track during playback. -During the fast forward or backward operation, press briefly to playback again. -During the fast forward or backward operation, the volume will be muted. INTRO(for CD/VCD only) You can play the beginning of every track for 15 seconds in sequence. 1. During playback, press INT once. -INT ON/OFF will appear on the display. 2. Press INT again to select the current track. Random track playback (For CD/VCD/MP3 Only) You can play all the tracks in random order. - Page 23 Track Playback REPEAT A Selected desired passage to repeat playback. -Press A B once to select starting point. Display shows REPEAT A. -Press A B again to select ending point. Display shows REPEAT A B, and selected passage start to replay. -Press A B once again to exit. Display shows A CANCELLED. PAUSE -During playback, press to pause playback. -The sound will be muted. -Display "PAUSE" in the TV screen, display and blink "PAUSE" on the panel display. Press again to continue playback. PBC - Playback Control ( For VCD only ): 1. If you insert a VCD with PBC, playback starts from the beginning of the 1st track automatically. 2. Press PBC to show menu, use / or digit button to select desired track. Press to return to menu.
-
Page 24: Track Playback
Track Playback Program -Press PROG to enter program list. Use cursor and digit button to enter number. For DVD and File disc, select title and chapter number. For VCD and CD, select track number. -Press to play, or move the cursor to select "PLAY" and press ENTER to play. -If you want to delete the list, move the cursor to "CLEAR", press ENTER to delete all the list set before. -Press PROG again to exit program play. DVD Playback DVD Audio Select Press AUDIO or R/L to select audio language to listen if the DVD has multiple audio languages. VCD Audio Select Press R/L to select audio channel to listen. -
Page 25: Dvd Playback
DVD Playback DVD Subtitle Select Press SUB.T to select the subtitle language to show if the DVD has multiple language subtitles. DVD TITLE Select Press TITLE to display title or chapter list, use cursor or digit number to select, press ENTER to play. DVD Angle Select Press ANGLE to select different angle to view if the DVD has multiple-angle views. ZOOM Press ZOOM button, the picture will be zoomed accordingly. -
Page 26: Dvd Setup
DVD Setup Press SETUP to display setup menu on the screen. to select setup items: SYTSTEM - LANGUAGE - AUDIO - VIDEO - DIGITAL DVD System Setup to select and ENTER to confirm. TV System Screen System Video Output Mode Select the TV system in the setting menu. The screen saver appears if disc stop last Original setting: INTERLACE-YUV. - Page 27 DVD System Setup Setting TV type Setting Password Setting Rating The rating of the disc is from 1 to 8: 1. Press number button " 0000 " on the Select TV type to watch wide screen (1) with the most limits when playing. remote control ,then press the ENTER movies.
-
Page 28: Dvd Language Setup
DVD Language Setup OSD Language Audio Language Subtitle Language Select on screen display language of Select audio language of the DVD from Select subtitle language of the DVD the DVD . which is contained in the DVD. from which is contained in the DVD. CHINESE Menu Language CHINESE... -
Page 29: Dvd Audio Setup
DVD Audio Setup Setting Volume Setup the volume with the buttons. -
Page 30: Dvd Video Setup
DVD Video Setup Brightness Contrast Set the brightness of the video output Set the contrast of the video output Set the hue of the video output with with with Saturation Sharpness Set the saturation of the video output Set the sharpness of the video output with with... -
Page 31: Dvd Digital Setup
DVD Digital Setup Output Mode Dynamic Range DUAL MONO Select the output mode: When you select the compressed mode Select the audio channel from STEREO, LINE OUT: Compress the input signal. as "line out", select it to adjust the com- MONO L, MONO R and MIX MONO. -
Page 32: Electrical Connections
Electrical Connections Wiring Diagram Reverse (Pink) : Active low level input Parking SW (Green/White): Active low level input Camera/Video in... - Page 33 Electrical Connections Using the ISO Connector 1. If your car is equipped with the ISO connector, then connect the ISO connectors as illustrated. 2. For connections without the ISO connectors, check the wiring in the vehicle carefully before connecting, incorrect connection may cause serious damage to this unit.Cut the connector, connect the colored leads of the power cord to the car battery, as shown in the colour code table below for speaker and power cable connections...
-
Page 34: Installation Guide
Installation Guide Intallation Procedures Carefully complete the electrical connections. Check connections before operation. Reset Press to flip down the panel. Then press the Reset hole with a pointed object to reset the unit to restore the system to the original factory settings. Intallaion opening This unit can be installed in any dashboard with a suitable 183mm(w) x 52mm (h) opening as shown above. The dashboard should be 4.75 mm - 5.56 mm thick in order to be able to support the unit. -
Page 35: Anti-Theft System
Anti-Theft System This unit is designed with a flip-down detachable panel. The panel can be detached and taken with you, helping to deter theft. Removing the panel 1. Press to switch off the power of the unit. 2. Press to flip down the panel. 3. At an angle hold the panel to pull it out. 4. Place the panel into the case and take it with you when you leave the car. PULL Installing the panel 1. Hold the panel and ensure the panel faces toward you , and at an angle set the right side of the panel in the... -
Page 36: Trouble Shooting
Trouble shooting If you suspect something is wrong immediately switch power off. Do not use the unit in abnormal condition, for example without sound, or with smoke or foul smell, can cause fire or electric shock. Immediately stop using it and call the store where you purchased it. Never try to repair the unit yourself because it is dangerous to do so. General Car's engine switch is not on: Turn your car's key to ACC or ON. Cable is not correctly connected: Check connection. Fuse is burnt : Replace fuse and Check volume or mute on / off. If the above solutions cannot help: Press the RESET button. Disc Disc is upside down: Place disc in the correct direction,and the label side up. Disc is dirty or damaged: Clean disc or change another disc. -
Page 37: Trouble Shooting
Trouble shooting Radio Station is too far, or signals are too weak: Select other stations of higher signal level. Battery cable is not correctly connected: Connect the battery cable to the terminal that is always live. Error Display Messages Disc is dirty, damaged or upside down: Press to eject the disc. -
Page 38: Specifications
Specifications General AM(MW) Radio Power supply: 12V DC(11V-16V) Frequency range: 522-1620 KHz(Europe) Test voltage 14.4V, negative ground 530-1710 KHz (America) Maximum power output: 50Wx4 channels Usable sensitivity(S/N=20dB): 30 dB μ Continuous power output: 25Wx4 channels (4 10% T.H.D.) Suitable speaker impedance: 4-8 ohm Disc Player Pre-Amp output voltage: 2.0V System: Disc digital audio system (CD play mode: 1KHz, 0 dB, 10K load) Frequency response: 20 Hz - 20 KHz Fuse: Signal/noise ratio: >80 dB Dimensions(WxHxD): 178x50x166mm Total harmonic distortion:...
Need help?
Do you have a question about the DVD-722B and is the answer not in the manual?
Questions and answers