
Related Manuals for Steepletone ENCODE E516 - Truro


Summary of Contents for Steepletone ENCODE E516 - Truro
- Page 1 MODEL: ENCODE E516 - Truro OWNER`S MANUAL NOSTALGIC TURNTABLE RADIO/CASSTTE/CD USB PLAYER/PHONOGRAPH INSTRUCTION MANUAL PLEASE READ BEFORE USE...
-
Page 2: Important Safety Instructions
CAUTION RISK OF ELECTRIC SHOCK DO NOT OPEN THE LIGHTNING FLASH WITH AR- THE EXCLAMATION POINT WITHIN ROWHEAD SYMBOL WITHIN AN AN EQUILATERAL TRIANGLE IS TO PREVENT FIRE OR SHOCK EQUILATERAL TRIANGLE IS IN- INTENDED TO ALERT THE USER HAZARD, DO NOT EXPOSE THIS TENDED TO ALERT THE USER TO TO THE PRESENCE OF IMPOR-... - Page 3 Avoid installing this unit in places exposed to direct sunlight or close to heat radiating appliances such as electric heaters, on top of other stereo equipment that radiates too much heat, places lacking ventilation or dusty areas, places subject to constant vibration and/or humid or moist areas. Do not attempt to clean this unit with chemical solvents as this might damage the finish.
- Page 4 IMPORTANT!! PROTECT TURNTABLE FROM DAMAGE DURING TRANSPORTATION, IT IS LOCKED INTO POSITION WITH A SILVER TRANSIT SCREW, LOCATED IN THE UPPER RIGHT HAND CORNER OF THE TURNTABLE PLATFORM. BEFORE USING THE TURNTABLE, UNLOCK IT TO ALLOW THE PLATTER TO “FLOAT” BY USING A SCREWDRIVER TO TURN THE TRANSIT SCREW DOWN COMPLETELY, IN A CLOCKWISE DIRECTION.
-
Page 5: Unpacking And Setup
UNPACKING AND SET UP • Carefully remove the unit from the carton and remove all polystyrene and other packing material from the unit. Please keep the box and all its packing materials until you are fully satisfied all parts are working satisfactorily or in case the unit needs returning for service. -
Page 6: Power Source
POWER SOURCE This product is designed to operate on 230V 50Hz AC Mains only. Attempting to operate this system from any other power source may cause damage to the system, and such damage is not covered by your warranty. NOTE: You will note that this system is equipped with a standard domestic AC power 3-pin plug. -
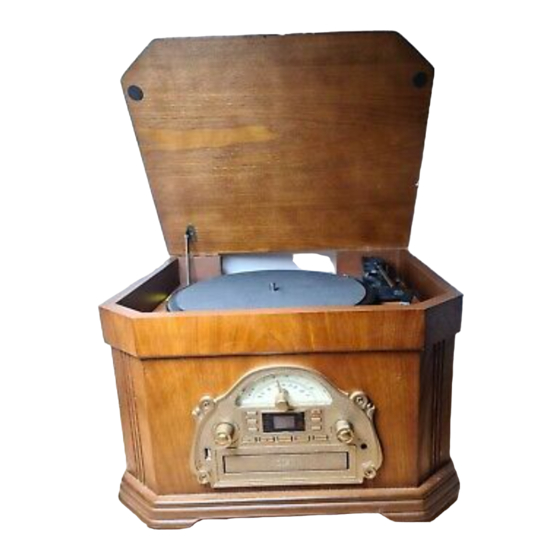
Page 7: Location Of Controls And Indicators
LOCATION OF CONTROLS AND INDICATORS 1) Phonograph Lid 15) CD Drawer 2) Phonograph Lid Support Bracket 16) SKIP REV. Control Button 3) Turntable 17) SKIP FWD. Control Button 4) Tuning Control Knob. 18) OPEN/CLOSE Control Button 5) FM Dial Scale. 19) Tone Arm 6) FM ST (stereo) Indicator 20) CD Track Number Display... - Page 8 BACK PANEL 30) Tone Arm Return Adjustment Hole 31) Tone Arm Return Adjustment Window 32) Subwoofer Jack (6.7mm) (signal out) 33) AUX IN (9.5mm L + R) Jack (external signal Input) 34) FM Wire Antenna 35) AC Power Cord 36) GAIN Hi-Lo Switch RECORD PLAYER 1) Turntable Platter 2) 45rpm Adaptor...
-
Page 9: Listening To The Radio
LISTENING TO THE RADIO 1) Turn the system on by turning the OFF/VOLUME control knob (27) clockwise until a click is heard and set the Volume to a medium level. 2) Set the (AM/FM/PH/CD/TAPE) Function Selector (8) to the AM (= MW) or FM position. -
Page 10: Playing Compact Discs
PLAYING COMPACT DISCS Turn the system on by turning the OFF/VOLUME control knob (27) clockwise until a ‘click’ is heard, and set the volume to a medium level. Set the (AM/FM/PH/CD/TAPE) Function Selector (8) to the CD position, the CD Track number display “- - - “... -
Page 11: Playing Cassette Tapes
b) In CD Playback Mode - ‘current song number - - Cd’shows on the display alternately and 2 seconds apart. c) In Stop Mode, the ’disc’s total track number - - Cd’ shows on the display alternately and 2 seconds apart. b) In MP3 Playback Mode - ‘current song number - - Cd - - Folder number’... -
Page 12: Playing Records
PLAYING RECORDS Before playing any records: • Please ensure the round black turntable mat supplied is placed on the platter to avoid the record slipping. • Also make sure the white protective stylus cover has been removed to expose the stylus. To remove it, hold the tone arm head with one hand and carefully pull the cover off towards the front of the unit. -
Page 13: Usb & Sd Card Operation
USB & SD CARD OPERATION 1) Turn the OFF/VOLUME control knob (27) in a clockwise direction until a click is heard, and set the volume to a medium level. 2) Insert a USB device (MP3 Player /Flash Drive) or an SD Card (none supplied) into the appropriate socket (9 or 28) - see diagrams. - Page 14 NOTE: A) In USB mode - when there is nothing connected to the USB Port, ‘- - -’ flashes for a moment on the LED display and then shows “NOU“ (fig1). B) In USB playback mode - ‘current track number - - USb - - folder fig1 number’...
-
Page 15: Recording From Cd
Recording from Phono or Cassette Set the AM/FM/PH/CD/TAPE Function Selector (8) to “PH” or “TAPE”. In Phono or Tape Playback Mode, press the REC button (21/R2) twice to start recording, play the music (on record/tape) to be recorded to USB/SD. The PH and TAPE recording procedure from RADIO is similar. - Page 16 PROGRAM FUNCTION IN CD/USB or SD MODE This feature allows you to program up to 20 CD tracks and 99 MP3 (USB/SD) tracks for playback in any order. 1) Press the PROGRAM button (12/R12) to enter the Program Mode. The Program number briefly shows '0 0 1', and the PROGRAM indicator light flashes on the display.
-
Page 17: Aux In Operation
AUX IN OPERATION Select to the PH function (8). Insert two ends (L + R) of the connecting cord of the external device (not supplied) into the AUX IN socket on the rear of the cabinet (33) and the other end into the corresponding socket of the external device (which is not supplied). -
Page 18: Cassette Care
CASSETTE CARE Two common causes of trouble experienced when using cassettes are: 1. Tape jamming - leading to uneven speed in playback 2. Tape entangling - the tape wraps itself around vital parts of the mechanism. To reduce the likelihood of these problems occurring, the following precautions should be taken: •... -
Page 19: Compact Disc Care
COMPACT DISC CARE • To remove a disc from its storage case, press down on the centre of the case and lift the disc out, holding it carefully by the edges. • Fingerprints and dust should be carefully wiped off the disc’s recorded surface with a soft cloth. - Page 20 THE TURNTABLE DRIVE BELT IS FACTORY FITTED - USE THESE INSTRUCTIONS ONLY IF THE TURNTABLE FAILS TO REVOLVE ….
-
Page 21: Specifications
: 78rpm Sapphire Stylus available for purchase separately Accessories available separately Stand : A matching stand (Model STD E516) is available for purchase separately Subwoofer : *Steepletone Model T-008 Subwoofer – please ask your Dealer for details Steepletone Lo-Call Helpline : 08457 - 585 681...
Need help?
Do you have a question about the ENCODE E516 - Truro and is the answer not in the manual?
Questions and answers