Advertisement
Quick Links
Advertisement

Related Manuals for LENCO TAB-705


Summary of Contents for LENCO TAB-705
-
Page 1: User Manual
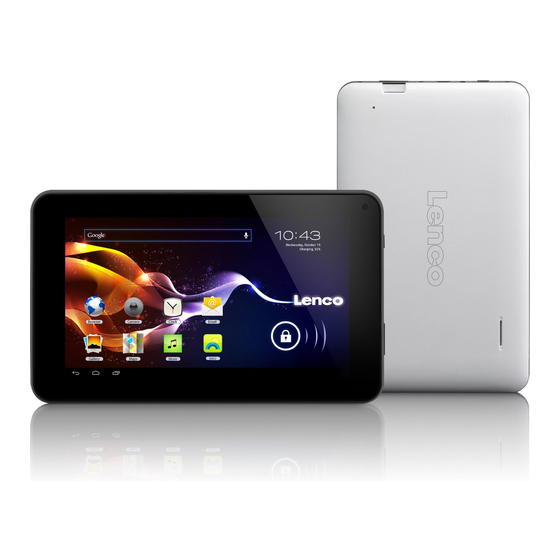
TAB-705 7" (18 CM) TABLET WITH ANDROID™ 4.2 User Manual For information and support www.lenco.com... - Page 2 Dear customer, Thank you for buying this Lenco product. Quality and usability is our top priority. In order to let you fully enjoy this tablet, we have manufactured this product using high quality standards, materials, components, and care. Please read all safety instructions and national restrictions, before you use this tablet.
- Page 3 Safety instructions Explanation of symbols This symbol indicates that there are important operating maintenance instructions in the user manual accompanying the device. This symbol indicates that dangerous voltage is present within this device, constituting a risk of electronic shock or personal injury. CAREFULLY READ THE FOLLOWING SAFETY INSTRUCTIONS BEFORE USE.
- Page 4 Keep your personal and important data safe While using your tablet, be sure to back up all your important data. Lenco is not responsible for any loss of data. When you want to dispose of your tablet, back up all data and then reset your tablet to prevent misuse of your personal information.
- Page 5 Main Functions • 7.0 inch, multi-touch screen display, 1024*600 resolution; • Supports OTG function, through USB connected interfaces such as U disc and removable disc, to save and read data. • Wi-Fi capability can connect to and remember multiple networks, enabling internet access wherever you go.
- Page 6 Battery Charging The device has a built-in rechargeable battery. When the indicator displays low battery, charge the device. Charging the battery Plug the Micro USB cable into the unit, then to the AC/DC Adaptor. A battery symbol will appear on the screen, and the battery will start to charge. If the unit is switched on, the battery charge icon will display at the bottom right of the screen.
- Page 7 Standby mode ON/OFF: To enter Standby mode, press the power button quickly. The screen will turn off. Standby mode puts the unit to “sleep” without a complete power down and helps extend battery life by turning off the screen. To exit Standby Mode and operate the unit once more, press and hold the power button briefly, then release.
- Page 8 Select USB connected. You’ll then see the following interface: Select “turn on USB storage”. Using a Micro SD card The device comes with 8GB of internal storage. You can expand this storage space by using a MicroSD Memory card up to maximum size of 32GB. MicroSD cards are also a good way to transfer files to and from the device.
- Page 9 Other common gestures include: • Touch & hold: Touch & hold an item on the screen by touching it and not lifting your finger until an action occurs. • Drag: Touch & hold an item for a moment and then, without lifting your finger, move your finger on the screen until you reach the target position.
- Page 10 Desktop function menus: To Launch an Application: Tap once on any application icon to launch it. To Reposition an Application Icon: Touch, hold and then slide icons to reposition them on the screen. To Move an Icon to another Desktop Screen: There are 5 Desktops you can position icons onto.
- Page 11 Desktop function menus Long touch any part of the screen, you will then see the following interface to set wallpaper.
- Page 12 Applications screen To go to the Applications Screen, select the Applications icon . This screen is where you can see all the currently installed programs on the unit: Setting up your unit for the first time Before using the unit, we strongly recommend setting up all the necessary items first. By doing this, you are assured all is set up correctly to provide trouble free use.
- Page 13 Wi-Fi: Access the Wi-Fi management interface Data usage: Check mobile data usage More: Set Airplane mode, Ethernet, VPN, Portable hotspot, Mobile networks Sound: Adjust sound settings Display: Adjust screen settings Storage: Check storage space Battery: Check battery usage Apps: Manage all applications Location access: Use your location info or not Security: Set password/screen lock Language and input: Set up input parameters...
- Page 14 Before using a dongle, disconnect the Wi-Fi network and ensure that the “Mobile data” setting is selected. Connect a 3G dongle (not provided) to the device via a USB host cable (not provided) to enable 3G internet. A 3G icon will display at the bottom right side of the screen.
- Page 15 (2) Opening a bookmarked site While in the browser, click the “ ” icon to open the bookmarks menu. Tap the desired link to open the web page. (3) Editing a bookmark In the bookmarks menu, press and hold any bookmark. The following menu will appear. Select “Edit bookmark”...
- Page 16 Using the web browser: (1) To scroll, touch the screen and drag the page. Be careful not to tap on a link unless you wish to visit it! (2) To open a link, simply tap it (3) To go back to the previous page, tap the Back icon (4) To display the available menu items, tap the Menu icon (5) To go back directly to the Home screen, tap the Home icon Watch a video...
- Page 17 The icons in the toolbar above are all of the video playback actions: : Press to increase or decrease the volume. : Displays playback time or allows you to move to a specific point in the video. : Select last/next video, reverse or forward in the current video. : Play/Pause video : Video settings : Return to the previous menu...
- Page 18 : Press to check the music is playing Touch the song name to go below interface. The icons in the toolbar above are the audio playback functions: : To visualize the playback time or to move to a specific point of the audio file.
- Page 19 Viewing your photos Select the gallery icon to access photo albums (1) Photos will display as thumbnails. Slide your finger left or right across the screen to browse photos.
- Page 20 (2) Tap a photo thumbnail to view the photo in full screen. (3) To display previous/next picture, slide your figure across the screen. (4) Display menu: While viewing a picture, tap on the screen or the Menu icon to bring up the menu options.
- Page 21 (7) Touch for more functions as below. Sending and receiving emails This device has an email application pre-installed. You can send or receive emails at any time with this device. Make sure you have an internet connection before using the email app.
- Page 22 (8) Enter your name and then tap “Done” to finish. Note: If you have more than one account, the email app will enter the default account on startup. Managing accounts More than one account can be configured on this device. It is possible to add, delete, or view information about each account.
- Page 23 (5) Select “Input language” (6) Check the ”Use system language” box The default keyboard will set to the language indicated. For example, when "French (French)” is set as the default language, the default keyboard will be French. Product Specifications • 7" capacitive 5-point touch screen, •...
- Page 24 The helpdesk is accessible from Monday till Friday from 9 AM till 6 PM. When contacting Lenco, you will always be asked for the model and serial number of your product. The serial number can be found on the back of the device. Please write...
- Page 25 Important note: It is not possible to send products that need repairs to Lenco directly. Important note: If this unit is opened or accessed by a non-official service center in any way, the warranty expires. This device is not suitable for professional use. In case of professional use, all warranty obligations of the manufacturer will be voided.
Need help?
Do you have a question about the TAB-705 and is the answer not in the manual?
Questions and answers