
Summary of Contents for Edge Craft ChefsChoice Trizor XV
- Page 1 InstructIOns MODEL 15 ® Trizor XV Knife Sharpener ® EdgeSelect —15° Edge Angle Read these instructions before use. It is essential that you follow these instructions to achieve optimum results. © 2011 EdgeCraft Corp.
-
Page 2: Important Safeguards
Important SafeguardS When using electrical appliances, basic safety precautions should always be followed including the following: 1. Read all instructions. Every user should read this manual. ® ® 2. To protect against electrical hazards, do not immerse the Chef’sChoice Trizor XV Model 15 in water or other liquid. - Page 3 You made a good ChoICe ® ® The Trizor XV Model 15 Sharpener from Chef’sChoice is the world’s first sharpener ® designed specially to create the exceedingly sharp and effective Trizor XV , edge on all household cutlery. Now you can enjoy knives that slice with astonishingly ease, yet have the ®...
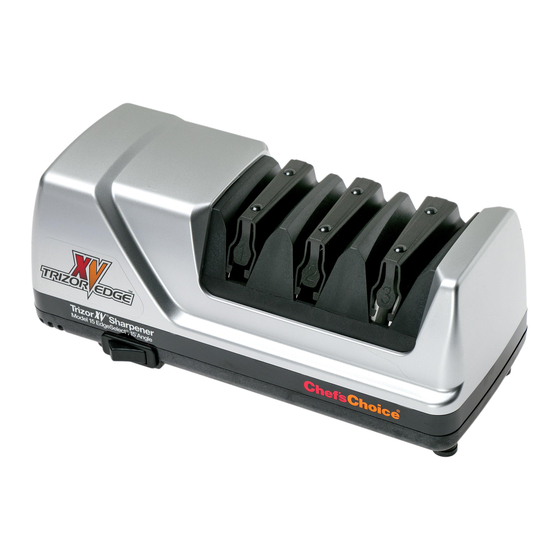
- Page 4 ® gettIng aCquaInted wIth the trIzor XV Sharpener – model 15 The Model 15, Figure 2 is a three stage sharpener with 100% diamond abrasives in the first two ® stages to sharpen and hone the edge, followed in Stage 3 with the Chef’sChoice proprietary stropping/polishing disks to create an astonishingly sharp edge.
- Page 5 Because of their heavy duty and specialized blade designs we do not recommend the Model 15 for the very thick European cleavers or the heavy hunting knives with concave blade faces. These can be readily sharpened in Models 120, 130, 2000, and 2100. The Model 15 is ideal for sharpening Asian cleavers and fish fillet knives.
- Page 6 ® To convert from the existing Euro/American edge to the Trizor XV edge or to sharpen contemporary Asian blades, start with the Sharpening Stage 1 as follows: euro/amerICan and ContemporarY aSIan BladeS Start In SharpenIng Stage 1 Turn ON the power and pull the length of blade thru the left slot (Figure 4) and then thru the right slot of Stage 1, using the left and right slots on alternate pulls.
- Page 7 StroppIng/polIShIng the edge In Stage 3 Pull the blade through the left slot of Stage 3 (see Figure 7) and then through the right slot of Stage 3. Make 3 pairs of pulls, alternating each pull in the left and right slots. You should take about 3 to 4 seconds for each pull for a 5 inch (12 cm) long blade.
- Page 8 detailed structure of the cutting edges likewise vary widely from one manufacturer to the next, however there are some similarities. The cutting edge consists of a small primary facet on the front face of the blade below the large bevel and a much smaller secondary microfacet along the back face.
- Page 9 Figure 5. Make certain the burr is present along the entire length of the edge. If there is no burr or only a partial burr, continue to make additional pulls all in the left slot about five (5) at a time and check for a burr after each group of five (5) pulls.
- Page 10 deSCrIptIon of euro/amerICan and aSIan BladeS In general you will find that Euro/American blades shown in Figure 10a are sturdier than the more delicate and thinner contemporary Asian blades. The variation among commercially available knives of any type is great and in fact some Euro/American blades are very thin and certain Asian knives have a thicker cross-section designed for heavier work.
- Page 11 front of the edge of the sashimi blade as shown in Figures 10c and 10d in order to establish the ge- ometry of the cutting edge. An even smaller cutting micro-facet (barely visible to the unaided eye) is customarily created on the back face of the blade to enhance the sharpness of the finished edge.
- Page 12 When resharpening the Gourmet edge use Stage 3 each time (alternating left and right slots). If after a number of resharpenings, it is taking too long to resharpen, you can speed the process by resharpening first in Stage 2 following the procedures detailed, and then resharpen in Stage 3.
- Page 13 ® Serrated blades of all types can be sharpened in the Chef’sChoice Model 15. However, use only Stage 3 (Figure 12) which will sharpen the teeth of the serrations and develop microblades along the edge of these teeth. Generally five (5) to ten (10) pairs of alternating pulls in Stage 3 will be adequate.
- Page 14 SuggeStIonS 1. Always clean all food, fat and foreign materials from the blade surfaces before sharpening or resharpening. If badly soiled, use detergent and water to clean. 2. Some contemporary Asian knives and Granton type blades are dimpled and some contem- porary and traditional Asian blades are made of layered Damascus steel.
- Page 15 ® 6. To increase your proficiency with the Chef’sChoice Model 15, learn how to detect a burr along the edge (as described on page 6). While you might be able to sharpen well without using this technique, it is the best and fastest way to determine when you have sharpened sufficiently in the preliminary steps.
- Page 16 normal maIntenanCe NO lubrication is required for any moving parts, motor, bearings or sharpening surfaces. There is no need for water on abrasives. The exterior of the sharpener may be cleaned by carefully wiping with a soft damp cloth. Do not use detergents or abrasives. Once a year or so as needed you should remove metal dust that will accumulate inside the sharpener from repeated sharpenings.
Need help?
Do you have a question about the ChefsChoice Trizor XV and is the answer not in the manual?
Questions and answers