
Summary of Contents for Zed-3 CN2x4
-
Page 1: Sip Phone
CN2x4 SIP Phone User’s Manual Manual Part Number 96-00213 Zed-3 501 Valley Way Milpitas CA 95035 +1-408-587-9333 http://www.zed-3.com... -
Page 2: Revision History
The information contained in this document is subject to change without notice. Zed-3 makes no warranty of any kind with regard to this material, including, but not limited to, the implied warranties of merchantability and fitness for a particular purpose. Zed-3 shall not be liable for errors contained herein or for incidental or consequential damages in connection with the furnishing, performance, or use of this material. -
Page 3: Table Of Contents
Preference ........... 46 CN2x4 SIP Phone User’s Manual 1... -
Page 4: Product Introduction
How to use headset ......... . 77 2 CN2x4 SIP Phone User’s Manual... -
Page 5: Product Introduction
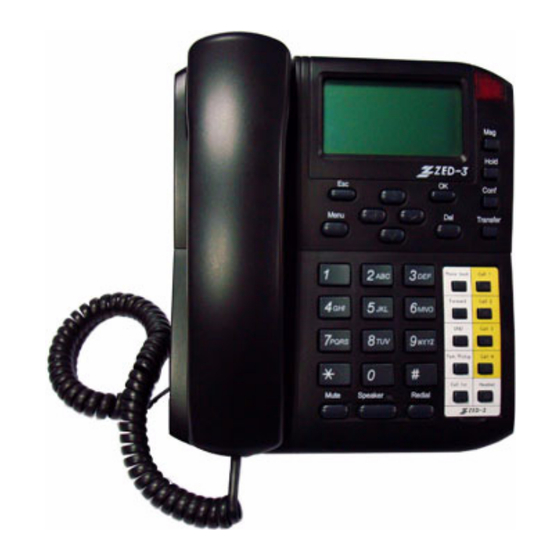
1. Product Introduction C h a p t e r 1 Product Introduction Product Introduction Figure 1-1 SIP Phone Appearance • Standard SIP • Speech codec for VoIP... -
Page 6: Profile And Buttons
CN2x4 SIP Phone User’s Manual • Full-duplex speakerphone with echo cancellation • 10/100Base-T Ethernet Port, use RJ-45 interface • Integrated Ethernet automatic toll switching repeater for PC connection • Downloadable firmware for further upgrade • IP address allocation - DHCP client or static settings •... - Page 7 1. Product Introduction Figure 1-2 Front view of the panel 1.2.2 Bottom View Figure 1-3 Bottom view...
- Page 8 CN2x4 SIP Phone User’s Manual 1.2.3 Structure Figure 1-4 SIP Phone's structure 1.2.4 Button Descriptions Table 1-1 Button Descriptions Button Name Decription 0 - 9, *, # Digit number Digits, * ,# for common use < Menu > Menu button Enter menu mode when the phone is idle <...
- Page 9 1. Product Introduction Table 1-1 Button Descriptions Button Name Decription < ▲ > Page up button In menu: • Move to previous item. • Move to previous one when viewing call records • Tune to upper-level volume < ▼ > Page down button In menu: •...
- Page 10 CN2x4 SIP Phone User’s Manual 1.2.5 Indicator Descriptions The upper right indicator flashs in different mode based on different phone status. As next table: Table 1-2 Indicator Descriptions Color Position Status Description Phone status On the upper Flashing Ringing when it has a coming call...
- Page 11 1. Product Introduction Table 1-3 LCD screen descriptions Name Operation/status Display <Msg> Press this button in Voice mail menu idle state < Hold > Press this button in "call holding" calling < Headset > Press this button in Display: idle state "connecting: xxxx (extension) 00:00:00 (duration)
-
Page 12: Installation
2. Installation C h a p t e r 2 Installation The steps are: • Unpack the case. • Component assembly • Power on • Acquire an IP address for SIP phone • Input IP address in browser's address filed. •... -
Page 13: Installation
CN2x4 SIP Phone User’s Manual Figure 2-1 Installation • Choose a dry ventilated place to place the phone, right side is up. Connect to 10Mpbs or 100Mpbs network via RJ45 terminal, like LAN, Ethernet broadbank access, ADSL, or Cable Modem access. -
Page 14: Acquire Ip Address
2. Installation 3). Power on: place the phone near power jack, connect the phone with the power cable. After installation, the screen shows this: xxxx-xx-xx(年-月-日) xx:xx:xx(时:分:秒) xxxx-xx-xx(year-month-day) xx:xx:xx(hour:minute: second) SIP PHONE CONNECTING SERVER Acquire IP Address The sip phone will acquire IP address actively from DHCP server after connecting with network. You can check the IP address like this: Like below: press <Menu>... -
Page 15: Web Settings
CN2x4 SIP Phone User’s Manual Web Settings Via the build-in Web Management System to complement the initial configuration for CN2x4 SIP Phone. Obtain IP address: To login on Web Management System, you need to know the IP address of network and PC. - Page 16 2. Installation Figure 2-2 Web Management System Showed in the screen: USER NAME: admin b. Press <OK> to show:...
- Page 17 CN2x4 SIP Phone User’s Manual PASSWORD: Press digit buttons, reinput password "0000"; 3). press <OK> to enter [DEVICE CONFIG] sub-menu: a. Press <1>, or use <▲>/<▼> to choose?PREFERENCE] and press <OK> ; b. Press <1>, or use <▲>/<▼> to choose?LANGUAGE] and press <OK>;...
-
Page 18: Phone Function
3. Phone Function C h a p t e r 3 Phone Function LCD Display Descriptions • Date and time On the upper left corner of the LCD screen is current date and time which are got from NTP Server automatically based on your settings. About how to set NTP server, see Part III Web Management System please. -
Page 19: Menu Structure
CN2x4 SIP Phone User’s Manual 2). The screen shows these information in conversation: xxxx ( caller ID ) 00:00:00 (duration) 3). The screen shows these information when you hang up the call. Call End 。 Duration: 00:00:00 Menu Structure Press <Menu> to enter the menu mode when the phone is in idle state. The phone quits the menu when there is a coming call or picking up the handle. - Page 20 3. Phone Function Figure 3-1 Web Management System main interface...
-
Page 21: Menu Functions
CN2x4 SIP Phone User’s Manual Menu Functions Table 3-1 Phone Menu Function Introduction Menu 1-level 2-level item Main menu sub-menu sub-menu Function CALL PROFILE 1~4 ANSWERED Record the number and the time of answered HISTORY CALLS calls CALLS Record the number and the time of calls missed... -
Page 22: Phone Settings
3. Phone Function Table 3-1 Phone Menu Function Introduction Menu 1-level 2-level item Main menu sub-menu sub-menu Function DEVICE PREFERENCE LANGUAGE Set language( English or Chinese ) CONFIG TIME ZONE Set time zone TITLE ON Set display name in idle state ( may be extension number ) DATETIME Set time server's IP address... - Page 23 CN2x4 SIP Phone User’s Manual 3.4.1.2 Network Configurations • Set LAN port The IP address of LAN Port can be obtained automatically or manually. By manually: 1). Enter [System Configuration] sub-menu in idle state. 2). Press <2> or use <▲>/<▼> to choose?Network Configuration] and press <OK> to enter it.
- Page 24 3. Phone Function 1). Enter [System Configuration] sub-menu 2). Press <2> or use <▲>/<▼> to choose?Network Configuration] and press <OK> to enter it. 3). Press <2> or use <▲>/<▼> to choose [Gateway] and press <OK> to set it. a. Use keypad to enter the IP address ( use <*> instead of "." ). b.
-
Page 25: Keyboard Coding Rules
CN2x4 SIP Phone User’s Manual Press <6>, or use <▲>/<▼> to choose [Ring Volume] and press <OK> to enter it. Use <▲>/<▼> to set ring volume.( more stars means higher volume. No star means silence ) Press <OK> to confirm and save it. -
Page 26: Phone Usage
CN2x4 SIP Phone. Making Calls CN2x4 SIP Phone has 4 lines which all can make calls as your wish (the default line is the first one); the caller ID showed to callee is the line's number if supported. - Page 27 CN2x4 SIP Phone User’s Manual 4.1.3 Call Via Headset Press <Headset> and the above light is red. Dial out a number (before that, you should choose a line to make the call ) Press <OK > to call. 4.1.4 Re-Dialing In idle state: Press <Redial>;...
- Page 28 4.1.9 Call Another Number During Conversation When you (user A) is in a conversation with user B (the number is 1002), CN2x4 SIP Phone permits you call another number (user C, the number is 1003) without cuting off the conversation with user B.
- Page 29 CN2x4 SIP Phone User’s Manual 1). Dial out the third party's number (user C, 1003), and pick up the handle or use handfree speaker to make a call; 2). The conversation is built up after user C answered the phone.
- Page 30 4. Phone Usage Connecting: User B 1002 00:05:12 hold the first line (with user B): User A press another idle line's control button (like <Call2>), and hold the conversation with user B. Representation: Line1 indicator is flashing quickly, Line2 indicator is on always (the handfree indicator is on always in handfree state),when you her thes dialing tone, the screen shows: Line 2: Build up the conversation with a third party:...
-
Page 31: Answer Calls
The handfree way: press <Speaker> or <Headset> (if you have a headset) to answer the call. Note: Zed-3 provides you handfree ways by speakerphone and headset. CN2x4 SIP Phone use headset as the default. You can change it by System Tools of the phone or by Phone Settings in Web Management System. - Page 32 Get Another Coming Call If you (user A) get another coming call from user C (1003) during a conversation with user B, CN2x4 SIP Phone lets you answer the third party's call without hanging up the conversation with user A.
-
Page 33: In Calling
CN2x4 SIP Phone User’s Manual Connecting: User B 1002: 00:00:16 1003 incoming Now you can answer user C with or without cutting off the conversation with user B. • Hangup: hook on and press <Call2> to answer user C, the conversation with user B is cut off. -
Page 34: Call Holding
4. Phone Usage 4.3.2.2 How to Park Before parking, you should set parking function button first, the steps are in the part of "Key4" shortcut introduction in 7.4.1.1 default function buttons. Here, we define <Park/Pickup> as parking function button. In conversation, press <Park/Pickup> to get a parking number allocated by system automatically, then hook off. -
Page 35: Call Transfer
CN2x4 SIP Phone User’s Manual PENDING LIST Call1 6079 PENDING Call2 2339 PENDING Use keypad or <▲>/<▼> to choose the desired, press <OK> to recover the conversation with whom you chose. 4.3.5 Call Transfer 4.3.5.1 Blind Transfer Blind transfer is transferring a call to a third party without noticing him/her. Operate as below:... -
Page 36: Do Not Disturb
Hang up: the status of the phone are: handfree incidator is flashing slowly, <Call1> indicator is flashing quickly, the screen shows: 2007-11-30 17:50:02 CN2x4 1001 pending Press <Call1> to recover the conversation with user A in handfree mode. Do Not Disturb If you do not want to be disturbed, you may use this function to avoid any coming calls. -
Page 37: Call Forwarding
3). Press <7>, or use <▲>/<▼> to choose [Call Forward] and press <OK> to set it. • Self-defined function button way: CN2x4 SIP Phone provides <Forword> as the default function button to enter [Call Forward] menu. Press <Forword> to enter the menu directly. -
Page 38: Check Call History
4. Phone Usage After setting the object number, you may set forward conditions next or later. (see 4.5.1.2 Enable Call Forwarding ) 4.5.1.2 Enable Call Forward The activation of forward function is set in [Call Forward] menu along with "Forward Condition". Enable forward function for line 1 e.g. -
Page 39: Phone Book
CN2x4 SIP Phone User’s Manual xxxx (the number desired) 1. Call 2. Save 3.Delete 4.Details 1). Press <1> or use <▲>/<▼> to choose [Call] and press <OK> to call this number. 2). Press <2> or use <▲>/<▼> to choose [Save] and press <OK> to save this number. -
Page 40: Call Volume Adjustment
There are six levels. The system will reserve the level when hanging up. CN2x4 SIP Phone provides receiving and sending SMS. This function's implementation also needs IP-PBX's supports. Right now, CN2x4 SIP Phone can receive and send Chinese, English SMS; but only edit and send English SMS. -
Page 41: Voice Mail Box
CN2x4 SIP Phone User’s Manual • Call: call the sender. • Information: check the sender and received time. • Return : return to the text. Note: The maximal storage is 30, new comer will replace the oldest one. 4.9.2 Write A New Message Press <Menu>... -
Page 42: Web Login
After power on, get the IP address of the phone by this way: Use keypad to query SIP Phone's IP address. (see 2.3 Acquire IP Address) Login to CN2x4 SIP Phone's Web config page: 1). Open a Web browser and input the IP address in the address filed. -
Page 43: Privilege Difference Between Administrator And Common User
Reboot system visible Logout visible Change Language The language can be switched real-time on the page of CN2x4 Web Management System. After login, click "English", or "Chinese" on the upper right corner of the page to change current language immediately. - Page 44 5. Web Login Note: changing the language here only makes sense for this login. It does not impact the language of the phone menu. If you want to change the phone's menu language permanently please set it as the "language" part in 7.1 Preference.
- Page 45 6. Status C h a p t e r 6 Status Click Status on the left navigator, and the page shows you basic information and status about the phone, like line number, line status, firmware version, hardware version, network information etc.(like figure 6-1) Figure 6-1 Web Interface...
- Page 46 7. Configurations C h a p t e r 7 Configurations Click Configurations to enter the page where you may set basic user preference, network parameters, call settings and phone settings here. You may save or cancel any change at any time. (see figure 7-1)
-
Page 47: Preference
CN2x4 SIP Phone User’s Manual Figure 7-1 Configurations Page Preference Here is the basic user information. (see figure 7-2) -
Page 48: Configurations
Figure 7-2 Configurations - Preference • Language: the language of CN2x4 Web Management System. You may choose Simplified Chinese, English, and Korean. Note: You should save it and reboot the device (Tools > Reboot ) to make the language work. - Page 49 The phone sends out all previous characters once it receives a "#". • Phone Book Mode: CN2x4 SIP Phone supports maximal four lines for calling. For your convenience, here we use sharing mode which means multiple lines sharing the same phone book.
-
Page 50: Network Configuration
7. Configurations Note: Save it and reboot the device to make the "speakerphone mic input gain" work. Network Configuration You need to set Ethernet port of the phone in Network Configuration menu. The phone has LAN port and PC port. Among these, LAN port is for up connection with Ethernet, and PC port is for down connection with PC or LAN. - Page 51 CN2x4 SIP Phone User’s Manual Figure 7-8 Configurations - Network Configuration -LAN Port -- PPPoE Figure 7-9 Configurations - Network Configuration - VLAN VLAN QoS: set valid value for QoS, from 0 to 7. • PC Port: PC port has two modes: bridge mode and static IP mode;...
-
Page 52: Call Settings
Call settings are the primary configuration of the phone, has almost all configurations involved SIP . You should make sure these settings are correct completely, or the phone can not be used normally. Each CN2x4 SIP Phone has maximal 4 lines which can be assigned different numbers supported by IP-PBX. - Page 53 CN2x4 SIP Phone User’s Manual • Single Server Mode: the phone supports four different numbers for four lines and supports backup server. • Multiple Server Mode: the phone supports four groups configurations for four lines, these configurations are separated and can work together.
- Page 54 7. Configurations Note: The unique number is assigned by administrator. • Authentication ID: authentication ID assigned by administrator. Four for four lines. • Password: the authentication password assigned by administrator. Four for four lines. • Display Name: it's for displaying caller number. The display name replaces the real caller number on the callee's screen.
- Page 55 CN2x4 SIP Phone User’s Manual Figure 7-14 Call Settings - Single Server Word Mode - Backup Server Setting • Audio Codec Preference: the order of audio codec, or enable or disable certain codec. Press "Audio Codec Preference >>" to check corresponding setting, see figure 7-15:...
- Page 56 7. Configurations Figure 7-16 Call Settings - Multiple Server SIP Work Mode • Phone Number: the number of the phone. Note: The unique number is assigned by administrator. • Display Name: it's for displaying caller number. The display name replaces the real caller number on the callee's screen.
-
Page 57: Advanced Settings
• Ring Type: every line has its own ring type. • Auto Answer Mode: CN2x4 SIP Phone supports auto answer feature, there are two modes if enabled. All Coming Calls: auto-answer all coming calls. Base On List: only auto-answer the numbers on the list (the maximum is 20 numbers). - Page 58 7. Configurations Figure 7-18 Call Settings- Advanced Settings • Signaling Port: the local communication port of the phone, the default value is 5060. • Message Waiting Indication: use SUBSCRIBE request message and MWI function when enabled. • NAT Keep-alive: keep the NAT port alive always when enabled. •...
- Page 59 CN2x4 SIP Phone User’s Manual Figure 7-19 Expiry Settings No Answer Forward Expiry: the duration from forwarding to another number to time out after the first callee's expiry. Count in second. Note: This value should less than the value of "No Answer Expiry".
- Page 60 7. Configurations RTP Payload Type: use payload value in RFC2833. • Signaling QoS: set the value of Signaling QoS, IP TOS and DiffServ are supported right now: IP TOS: set service type when using this option. (see figure 7-21 ) Figure 7-21 Signaling QoS - IPTOS - Service Type DiffServ: set DiiffServ type if use this option.
- Page 61 CN2x4 SIP Phone User’s Manual Relay Proxy Mode: set the IP address, port, user name, password also if use this mode. (see figure 7-24) Note: Relay Proxy mode supports transmission of encrypted or un-encrypted data. We support multiple relay proxy backup mode in case of the breakup of communication caused by certain unavailable relay proxy.
- Page 62 7. Configurations Figure 7-25 Call Settings - Media Setting • RTP Port ( range): the range of local RTP port. The default value is 20008-20024. • RTP Package Length(ms): the time length of Packet Length, cound in millisecond. • Jitter Buffer: there are three processing modes: adaptive mode, sequential mode, fixed mode.
- Page 63 CN2x4 SIP Phone User’s Manual Figure 7-27 Meida QoS - DiffServ - DiffServ Type • Symmetrical RTP: transmit media in symmetrical RTP way if checked. • Media NAT Traversal: Media NAT Traversal supports three modes: STUN(RFC 3489): namely, STUN server mode. Set the IP address or domain of STUN server, an port if needed.
-
Page 64: Phone Settings
7. Configurations P .S., relay proxy mode supports data encryption and un-encryption transmission. Proxy mode supports three modes (1,2,3) when relay proxy handles media proxy. Note: We supports relay proxy backup mode in case of communication breakup caused by certain unavailable relay proxy. Figure 7-30 Media NAT Traversal - Relay Proxy Mode •... -
Page 65: Basic Settings
CN2x4 SIP Phone User’s Manual Figure 7-31 Configurations - Phone Settings 7.4.1 Basic Settings • Title:the title of the phone. • Display Title: the display title of the phone. • Auto Dial: enable or disable auto-dial function. • Auto-Dial Timeout: expiry time of auto-dialing. - Page 66 7. Configurations Figure 7-32 Phone Settings - Function Button Redefination 7.4.2.1 Default Function Buttons According to <Phone book> ~ <Call list>, there are Key 1 ~ key 5 buttons on the left side of self-defined button area of the phone. Every function button has a default function in factory configurations, as below: •...
- Page 67 The default function is "pick up" (web configuration displays "*98", need to cooperate with Zed-3 IP-PBX ), namely, as the third party C, when user A is calling user B and before user B answer the call, user C ( you ) can pick up the phone to talk with user A instead of user B.
-
Page 68: Save Modification
7. Configurations b. Press digit buttons (like 1234) and press <OK> to call "68011234". • Prefix auto-adding with indication: 1). Select a function button (like key 5); 2). Input "prefix + (charactors)" in speed dial in manual mode , like "23(please input number)";... - Page 69 CN2x4 SIP Phone User’s Manual...
-
Page 70: Phone Book
8. Phone Book C h a p t e r 8 Phone Book Using phone book to add a new number and dial it out. The new version supports different phone book for different line. Figure 8-1 Phone Book page Here we use line 1 as an example to illustrate how to add and check the records in phone book. -
Page 71: Add A New Record
CN2x4 SIP Phone User’s Manual Figure 8-2 the Phone Book of Line 1 Add A New Record Click Phone Book > Phone Book 1 > New Contact in left navigator, enter the Add New page to add new name and number (see figure 8-3):... - Page 72 8. Phone Book Figure 8-4 Edit or Delete Records...
-
Page 73: Tools
9. Tools C h a p t e r 9 Tools Upgrade Online Here is current version and upgrade address, you may input the correct address to upgrade online, pay attension to the address of HTTP server which provides upgrade service. Figure 9-1 Upgrade Online There are four steps:... -
Page 74: Change Password
CN2x4 SIP Phone User’s Manual reboot the system: After upgrade, shows next figure: Figure 9-2 Upgrade successfully press [OK] to return to Status page. Change Password Change the passwords of user and administrator here (see figure 9-3): Figure 9-3 Change Password Note: Only show user password here for common users. -
Page 75: Backup/Recover Configurations
9. Tools Backup/Recover Configurations CN2x4 SIP Phone provides backup and recovery of configuration files. The backup configuration file can be protected by password. Figure 9-4 Backup/ Recover Configuration page Backup configuration file: You may use password to protect the configuration file when backing up. Input password and press [Save] to save the file with default name "config.dat". -
Page 76: Reboot System
CN2x4 SIP Phone User’s Manual Figure 9-5 Recover Factory Configuration Reboot System Figure 9-6 Reboot System Prompt... -
Page 77: How To Use Headset
A. How to use headset A p p e n d i x A How to use headset Insert the headset into the port of the phone, the screen shows a icon which means connecting successfully. Press <Headset> to answer and call via the headset after connection. More information about it see Chapter 4 Phone Usage.
Need help?
Do you have a question about the CN2x4 and is the answer not in the manual?
Questions and answers