
Summary of Contents for Tevion WT-548
- Page 1 Two-Way Radio Instruction Manual • Model Number WT-548 After Sales Support TEL: 1300 886 649 N13275...
- Page 2 Two-Way Radio What your year warranty means Congratulations on choosing to buy a TEVION ® product. All products brought to you by TEVION are manufactured to the highest standards ® of performance and safety and, as part of our philosophy of customer service and satisfaction, are backed by our comprehensive year warranty.
-
Page 3: Table Of Contents
Contents What your 1 year warranty means Important safety instructions Buttons and controls Operating instructions Main screen Battery installation Quick start guide A. Start operation Power on / off Key lock / unlock B. Two-way radio operations Selecting a channel Selecting a sub-code Making a call Transmitting a message... -
Page 4: Important Safety Instructions
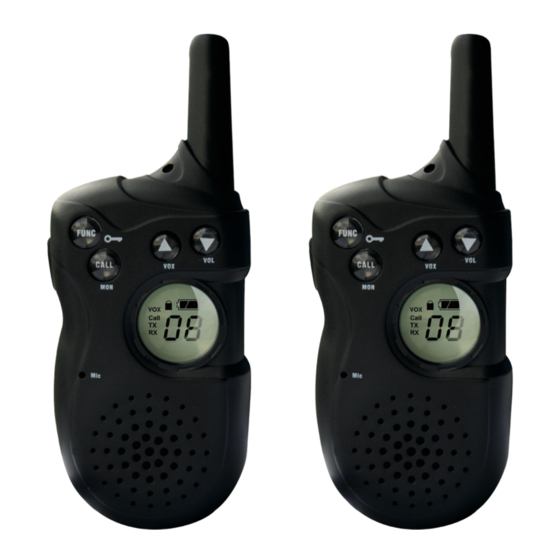
Important safety instructions When using your two-way radio equipment, the following basic safety precautions should always be followed to reduce the risk of fire, electric shock and injury to persons. • Make sure to read, understand and follow all instructions and warnings. • Take care not to drop the two-way radio as a fall may damage the product. - Page 5 Buttons and controls SOFT ANTENNA NECK STRAP HOLE DOWN/VOLUME FUNCTION/LOCK KEY FUNC CONTROL KEY CALL/MON KEY UP/VOX KEY PTT KEY (Push-To-Talk) SCREEN DISPLAY SPEAKER CHARGING JACK EARPHONE JACK NECK (connections not supplied) STRAP HOLE (connections not supplied) After Sales Support TEL: 1300 886 649...
-
Page 6: Main Screen
Operating instructions Main screen See Fig. 1 for an illustration of the main screen. 1 VOX indicator 2 Call mode (Call) 3 Transmitting mode (TX) 4 Receiving mode (RX) 5 Channel number: displays current channel (1-40) 6 Battery level indicator -- Full Fig.1 -- Reminder to change the batteries. -
Page 7: A. Start Operation
Quick start guide A. Start operation Power on / off 1. Press and hold the FUNCTION key for three seconds, a “tic” sound indicates the radio is ready (Fig. 2). 2. Repeat the same to turn off the radio. Key lock / unlock 1. -
Page 8: Selecting A Channel
Function set-up Selecting a channel 1. Press the / key to select the channel (1-40). 2. When switching to the desired channel number, press the FUNCTION key to confirm. NOTE: The last channel number can be recalled. Selecting a sub-code 1. -
Page 9: Volume Level Adjustment
Volume level adjustment 1. Press and hold the FUNCTION key, then press the / VOL key to alter the volume level from “1” to “4” (Fig. 11 shows the volume level). 2. The volume level changes once when the / VOL key is pressed once. 3. -
Page 10: Low Battery Alert
Low battery alert This symbol displayed on the screen indicates the battery level is low. This symbol displayed on the screen, together with a beeping sound, indicates the battery level is low: you must change the battery. NOTE: The unit will automatically turn off when out of battery. Charging The battery icon flashes while charging. -
Page 11: Transmit - Receive Frequencies (Mhz)
Transmit - receive frequencies (MHz) CHANNEL FREQUENCY CHANNEL FREQUENCY CHANNEL FREQUENCY 476.425 476.775 477.125 476.450 476.800 477.150 476.475 476.825 477.175 476.500 476.850 477.200 476.525 476.875 477.225 476.550 476.900 477.250 476.575 476.925 35** 477.275 476.600 22• 476.950 477.300 476.625 23• 476.975 477.325 476.650 477.000... - Page 12 FAQs Problem Solution No power - Reposition or replace the batteries. Message not transmitted - Make sure the Push-to-Talk (PTT) button is completely pressed as you transmit. - Reposition or replace the batteries. Message not received - Confirm radios have the same channel settings. - Make sure PTT is not inadvertently being pressed.
Need help?
Do you have a question about the WT-548 and is the answer not in the manual?
Questions and answers