Table of Contents
Advertisement
Advertisement
Table of Contents

Related Manuals for PageOne Alpha Elite


Summary of Contents for PageOne Alpha Elite
- Page 1 Paging Alpha Elite User Guide www.pageonepager.com...
-
Page 2: Table Of Contents
Contents Introduction Pager Alarms Control Buttons........2 Set a One-Time Alarm ......16 Getting Started Set the Alarm to Alert Daily ....17 Message Alarms Turning Your Pager On ......3 Turning Your Pager Off ......4 Set a One-Time Message Alarm..19 Using the Function Menu ....... -
Page 3: Sending A Test Page To Yourself
Congratulations on purchasing an Alpha Elite pager. Your new pager provides exciting capabilities in messaging and can become a vital part of your business and personal life. The pager’s four-line display and expanded functionality incorporates many of the most advanced electronic, communications and wireless technologies available. -
Page 4: Control Buttons
Effective Use of Your Pager Your pager can help you keep in contact with everyone important to you. By giving your pager number to your business associates, family, and friends, you can be contacted whenever needed. If you have a cellular phone, give your pager number instead of your cellular number. -
Page 5: Turning Your Pager On
Used to navigate through the Function menu Left/Right and through your messages. Directional Buttons Used to display the Function menu, to select Function/Select a pager function, and to activate your Button selection. Used to turn the pager on and to read Read/ messages. -
Page 6: Turning Your Pager Off
Private Time Power On Audible Alarm Example of the Standby Screen When the pager is on and no activity is taking place, the Standby screen is displayed. The Standby screen displays the power-on indicator N and may display other pager status indicators. Turning Your Pager Off Press to display the Function menu. -
Page 7: Using The Function Menu
Using the Function Menu The Function menu provides access to the many features of your pager through the use of symbols and prompts. Press to display the Function menu. When the Function menu is initially displayed a flashes to indicate the location of the cursor. mmmmmmomm VVjV ESCAPE... -
Page 8: Message-Status Screen
Message-Status Screen The Message-status screen shows the current status of your messages. For example, unread messages are indicated by a flashing symbol, locked messages are indicated by g. The Message-status screen also displays the time and date and any activated pager settings. The Message-status screen can be accessed by pressing H, I, G, or F from the Standby screen. -
Page 9: Backlight
Backlight In low-light conditions, the pager’s backlight automatically turns on whenever a button is pressed. You can manually turn the backlight on or off at any time by pressing and holding for two seconds. The backlight automatically turns off when the pager returns to the Standby screen. Receiving/Reading Personal Messages Your pager can receive up to 19 personal messages. - Page 10 Reading a Stored Message From the Message-status screen press H or I to move the cursor to the message you want to read. Press to read the message. Message Reading Features • Press G to read a message line by line. •...
-
Page 11: Display Zoom
Message Preview This feature allows you to scan the first line of your messages. Press Use the H and I buttons to move the cursor through your messages. Note: Previewing an unread message does not remove the unread message status from the message. Display Zoom When this feature is enabled, the standard 4-line display is converted to a 2-line display. -
Page 12: Setting The Time And Date
To Disable Display Zoom From the Function menu, press H to move the cursor to 4. Press . Display zoom is now disabled. Setting the Time and Date From the Function menu, press H to move the cursor to v. Press to display the Set-time-and-alarm screen. - Page 13 Press to activate the time and date setting. 3:15PM 05/05/97z c12:00AM --/--/-- SET TIME Example of Set-Time Screen If you move the cursor past the last symbol in the row (far right), it automatically wraps around to the first symbol in the beginning of the same row (far left).
-
Page 14: Setting The Incoming Message Alert
Setting the Incoming Message Alert You can set your pager’s incoming message alert to an audible alert, a vibrating alert, a chirp (short beep) alert, a chirp alert with vibration, or no message alert (completely silent). Note: Priority messages always have an audible alert. Setting an Audible Alert From the Function menu, press H to move the cursor to s. - Page 15 From the Function menu, press H to move the cursor to l. Press to display the Choose alert menu. Press H or I to move the cursor to the desired alert. The pager gives a sample of each alert as you move through the selections. Press to activate your selection.
-
Page 16: Locking And Unlocking Messages
Locking and Unlocking Messages Up to 10 messages can be locked to prevent them from being deleted or from being replaced when memory is full. When a message is locked, the m symbol is replaced by the g symbol indicating the message is locked. To Lock or Unlock a Message From the Message-status screen, press H or I to select the message you want to lock or unlock. -
Page 17: Deleting Messages
Deleting Messages This feature allows you to delete unlocked and un-alarmed messages. To Delete a Single Message From the Message-status screen, press H or I to select the message you want to delete. Press Press I to move the cursor to A. Press DELETE MESSAGE? is displayed. -
Page 18: Pager Alarms
Pager Alarm Your pager has an alarm that can be set for a specific time and date, or a specific time on a daily basis. At the selected alarm time, your pager alerts. If the alarm times passes without being acknowledged, Q flashes until any button is pressed. To Set a One-Time Alarm From the Function menu, press H to move the cursor to v. - Page 19 The alarm symbol shows the current alarm status. cis displayed if the alarm is enabled, e is displayed if the alarm is disabled. Press I to move the cursor to the alarm symbol. Press F or G until c is displayed. Press I to move the cursor to the hour digits.
-
Page 20: Set The Alarm To Alert Daily
To Set the Alarm to Alert Daily Follow steps 1 through 8 in “To Set a One-Time Alarm” to set the alarm time. When setting the date in step 8, press G until you see double dashes for the month, day, and year (--/--/--). 3:15PM 05/05/97 5:30PM --/--/--z SET ALARM... -
Page 21: Message Alarms
Message Alarms This feature allows you to set a one-time or daily alarm for a selected personal message. You can set an alarm for up to five personal messages. When a message alarm is set, b replaces m in the Message-status screen. - Page 22 Press . The Set-message-alarm screen is displayed. zv 03:15PM 05/05/7z 5:30PM 05/05/97 SET ALARM Example of Set-Message-Alarm Screen The alarm symbol shows the current alarm status. c is displayed if the message alarm is enabled, e is displayed if the message alarm is disabled.
-
Page 23: Set A Daily Message Alarm
Press F or G to adjust the hour digits. Repeat steps 6 and 7 to adjust the minutes, AM/PM/24 hr., and date. Press to activate your selection. You can also set a message alarm while reading the message by following steps 2 through 9 above. -
Page 24: Private Time
Private Time You can select a time period during which your pager is completely silent. Your pager still receives messages but is does not alert. The pager alerts only if an alarm expires or a priority message is received. To Set Private Time From the Function menu, press H to move the cursor to 3. - Page 25 Press and release G until 3 is displayed. Press I to move the cursor to the hour digit. Press F or G to adjust the hour digit. Repeat steps 4 and 5 to adjust the on and off time setting . Press K to activate your selection.
-
Page 26: Maildrop/Information Service Option
Maildrop/Information Service Option Your pager is capable of receiving maildrop messages, also known as information services. Maildrop messages are received and read the same way as personal messages and the icon indicators are located on the second row of the display. mgmmomm 3:15PM 05/05/97... - Page 27 • If the pager’s incoming message alert is set to silent (vibrate), all maildrops with the alert set to on (j), produce a 2-second vibration when a maildrop message is received. • If the pager’s incoming message alert is set to audible, the maildrop alert can be set to either the standard alert, one of the seven pleasing alerts, a chirp alert, a chirp and silent alert, or no message alert via the Choose-alert menu.
- Page 28 Selecting a Maildrop Alert From the Message-status screen, press H, I, or G to move the cursor to the desired maildrop. Press Press I to move the cursor to j. Press . The choose alerts menu is displayed. Press H or I to move the cursor to the desired alert. Press to activate the alert.
-
Page 29: Notebooks
Notebooks Your pager has two notebook areas, a personal notebook for storing personal messages, and a maildrop notebook for storing information service messages. Notebook messages are indicated by . Personal messages are indicated on the first row of the display. Maildrop messages are indicated on the second row of the display. -
Page 30: Storing Personal And Maildrop Messages In Your Notebooks
Storing Personal and Maildrop Messages in Your Notebooks From the Message-status screen, press F , G, H, or I to move the cursor to the personal or maildrop message you want to move into the notebook. Press Press I to move the cursor to u. Press . - Page 31 Press F or G to scroll through the list until is displayed at the beginning of the notebook message you want to delete. Take children to school Look at new stock rates Congratulations on your Example of Notebook Screen in Delete Mode Press to display the Function menu.
-
Page 32: Features
Message Storage Your pager can store up to 19 personal messages in memory. Note: Stored messages differ from locked messages. They can be deleted or overwritten when memory is full and a new message comes in. Automatic Message Deletion If all 19 message slots are full and a new message is received, the oldest, unlocked, un-alarmed, and previously read message is automatically deleted when a new message is received. - Page 33 Key Click If this feature is enabled, and the pager is in the audible mode, a “click” is emitted when any of the pager’s buttons are pressed. The click is not emitted when the pager is in the silent mode. Duplicate Message If the same message is received more than once, DUPLICATE MESSAGE...
-
Page 34: Care And Use
Battery Gauge A battery gauge indicator keeps you informed of the battery level. The indicators are listed on the card attached to the back cover. Cleaning Your Pager To clean smudges and grime from the exterior of your pager, use a soft, non-abrasive cloth moistened in a mild soap and water solution. -
Page 35: Battery Information
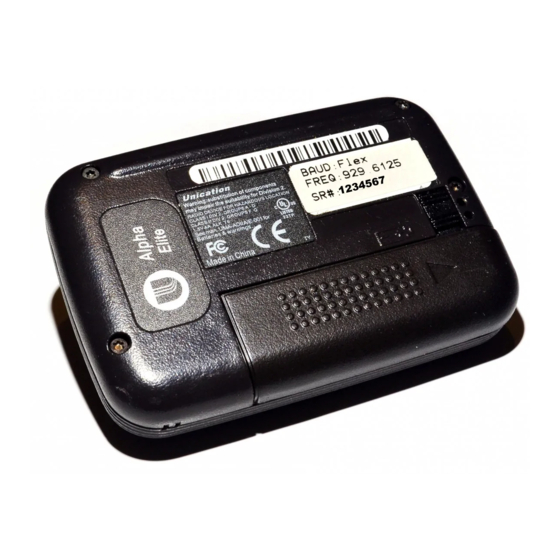
Battery Information Your pager is designed to operate with a single -size alkaline battery (carbon zinc batteries are not recommended). See the diagram on the following page for the battery door location. Installing/Replacing the Battery To install or replace the battery, hold the pager face down and proceed as follows: Unlock the battery door by sliding the door latch away from the battery door. - Page 36 Ì Alpha Elite Pager Battery Replacement (rear view)
- Page 39 P atent Inf ormation T his Unication product is manufactured under one or more Unication U.S . patents. T hes e patent numbers are lis ted ins ide the hous ing of this product. Other U.S . patents for this product are pending.
- Page 40 Alpha Elite™ Quick Reference Card Turning Your Pager On Locking and Unlocking Messages Press From the Message-status screen, press to select the message Turning Your Pager Off you want to unlock/unlock. From the Function Menu, press Press move the cursor to...
- Page 41 Setting the Time and Date Press to move the cursor to the alarm symbol. From the Function menu, press Press until is displayed. move the cursor to Follow steps 3 through 6 in Time and Press Date to set the alarm time. Press to move the cursor to the hour To disable the alarm, in step 5 above,...
- Page 42 Storing Messages in Your Follow steps 3 and 4 in Setting theTime and Date to set the on and off Notebooks times. From the message-status screen, Press to activate your selection. press , or to move the cursor To turn private time off, in step 4 above, to the message you want to move into µ...
Need help?
Do you have a question about the Alpha Elite and is the answer not in the manual?
Questions and answers