
Related Manuals for Intek AR-109

Summary of Contents for Intek AR-109
- Page 1 AR-109 AIR BAND RECEIVER VHF AM / VHF NFM / WFM RADIO OWNER'S MANUAL MANUALE DI ISTRUZIONI...
-
Page 2: Table Of Contents
Index Contents ........................1 Introduction ......................2-3 Contents of Package ..................... 3 Battery Operation ....................4 Controls and Indicators ..................5-10 Operation......................11-15 Specifications ....................... 15 Important Informations ..................16 Declaration of Conformity..................17 User Information ....................17 Notes........................18 IMPORTANT ! It is recommended to carefully read this instruction manual throughout, before using the radios. -
Page 3: Introduction
Applications AR-109 is a pocket size digital Air Band Scanning Receiver, specifically designed for monitoring the Air Band and the Aircraft radio communication traffic. This receiver also covers the VHF NFM band used by amateur radio operators, civil services, marine band, etc. and the WFM radio broadcasting band (88-108 MHz). -
Page 4: Contents Of Package
Introduction - Contents of Package Features and Benefits The radio includes a number of advanced features, nevertheless its operation is user firendly and you may get familiar with it, after few minutes of use. Please refer to the following list of the main feautres in this two-way radio : VHF AM Air Band 118-137 MHz VHF NFM Band 137-175 MHz FM Radio 88-108 MHz... -
Page 5: Battery Operation
Always switch OFF radio before starting the battery charging process. Do not recharge batteries for more than 13-14 hours, in order to avoid overcharge or overheating, which could cause damage to the radio. Use only the enclosed battery charger or original INTEK battery chargers. - 4 -... -
Page 6: Controls And Indicators
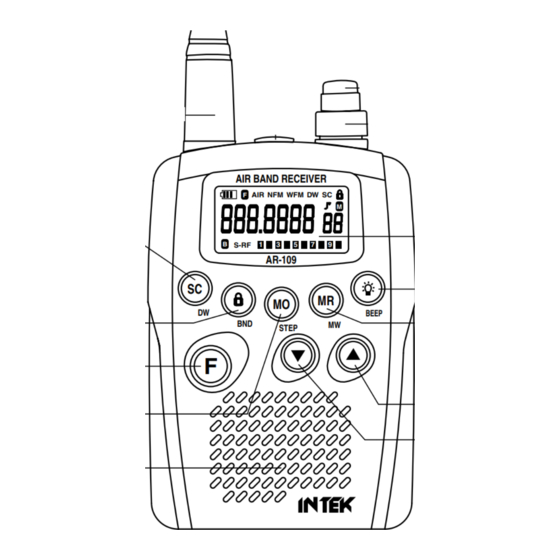
Controls and Indicators Front Panel AIR BAND RECEIVER AIR NFM WFM DW SC S-RF AR-109 BEEP STEP Antenna High efficency rubber SMA antenna. Earset Jack Connect an external earset to this jack. The dust cover prevents dirt and moisture from getting inside the radio. - Page 7 Controls and Indicators VOL/OFF (On-OFF/Volume) Control This knob switches the radio ON and OFF and it adjusts the volume control to the desired level. SQ (Squelch) Control The SQL control allows to silent the receiver by cutting the background noise, when no signals are received.
- Page 8 Controls and Indicators WFM Icon The WFM Icon (E) is lighted when the WFM Radio band is selected. DW Icon The DW icon is lighted when the DW (DUAL WATCH) function has been enabled. SC Icon The SC icon (G) is lighted when the SCAN function has been enabled. KEYLOCK Icon The KEYLOCK (H) icon is lighted when the keypad lock function has been enabled.
- Page 9 Controls and Indicators MR (Memory Read) / MW (Memory Write) Key This receiver contains a total of 99 memory locations for each Air band, VHF FM band and WFM band where desired frequencies can be programmed by the user. Programming of the desired frequencies can be carried our in the following ways for each band.
- Page 10 Controls and Indicators F Key Press this key to select the Function Mode. The F Icon (B) will appear on the LCD Display (5). KEYLOCK / BND key KEYLOCK Press and hold this key for about 3 seconds to enable the keypad LOCK function; the LOCK Icon (H) will appear on the LCD display (5).
-
Page 11: Controls And Indicators
Controls and Indicators Rear Panel Belt Clip To install the belt clip, slide it down into the special slot situated in the rear side of the unit, until the block system make a click. To remove the clip, pull the block tab toward exterior and slide the clip toward the up side of the unit. -
Page 12: Operation
Operation FREQUENCY SELECTION Direct Selection Press the UP (9) or DOWN (10) keys to select the desired frequency, according to the selected frequency STEP (refer to the ITEM 12 at page 8). Cursor Function The desired frequency can be directly entered by using the Curson Function. This function allows to select the 2nd, the 3rd, the 4th and the 5th digit of the used frequency. - Page 13 Operation MEMORY OPERATION This receiver has a total of 99 memory locations, where desired frequencies can be programmed by the user. Memory Read Function Press the MR/MW Key (7) to enter Memory Read Mode. The M Icon (I) will appear on the LCD display (5).
- Page 14 Operation Memory Channels Scanning 1. Press the MR/MW Key (7) to enter Memory Read Mode; the M Icon (I) will appear on the LCD display. 2. Close the Squelch by using the SQ Control (4). 3. Press the SC/DW Key (15) to start the automatic Memory Channels scanning. 4.
- Page 15 Operation DUAL WATCH FUNCTION This receiver is equipped with a Dual Watch function that allows to monitor 2 differents frequencies / memory channels. 1. Select the first frequency or memory channel to be monitored (Channel A). 2. Press the F Key (13) and the SC/DW Key (15); DW Icon (F) will appear on the the LCD display (5).
-
Page 16: Specifications
Operation - Specifications SCAN Delay Time This feature allows the scanning process to stop for the fixed time when a signal is received. After this time, the scanning process will continue. 1. In the Power Save mode, press the F Key (13) and the UP Key (9); the LCD display will show the Sd- 5 indication. -
Page 17: Important Informations
Important Informations Important Informations Important ! Changes or modifications to this product could void your authority to operate this unit. Any adjustment to your radio must be made by a qualified authorized technician or service. To be safe and sure : Never open the cabinet of your radio. -
Page 18: Declaration Of Conformity
(to EC Directive 2006/95, 2004/108, 99/5) DECLARATION OF CONFORMITY With the present declaration, we certify that the following products : INTEK AR-109 comply with all the technical regulations applicable to the above mentioned products in accordance with the EC Directives 2006/95/EC, 2004/108/EC, 99/5/EC. -
Page 19: Notes
Notes - 18 -... -
Page 20: Indice
Indice Indice ............19 Introduzione . -
Page 21: Introduzione
Introduzione Congratulazioni ! Congratulazioni per aver scelto ed acquistato un prodotto di qualità INTEK. Con un uso corretto e seguendo il set-up e le istruzioni d’ uso in questo Manuale di Istruzioni, questo apparecchio vi garantirà un servizio senza problemi per molti anni. -
Page 22: Contenuto Della Confezione
Presa per caricabatterie da parete Contenuto della confezione Per favore controllate che la confezione contenga tutti i seguenti componenti : 1 x Ricevitore AR-109 1 x Antenna in gomma con connettore SMA 2 x Batteria ricaricabile Ni-MH 1 x Caricabatterie da parete 230VAC 1 x Clip da cintura 1 x Manuale d’... -
Page 23: Utilizzo Delle Batterie
Non ricaricare mai le batterie per più di 13-14 ore, per evitare la sovraccarica o il surriscaldamento delle stesse, con conseguenti danni alla radio. Utilizzare solo il caricabatterie in dotazione con il prodotto o i carica batterie originali INTEK. - 22 -... -
Page 24: Descrizione Dei Comandi E Indicatori
Descrizione dei comandi e indicatori Pannello frontale AIR BAND RECEIVER AIR NFM WFM DW SC S-RF AR-109 BEEP STEP Antenna Antenna in gomma, ad alto rendimento con connettore SMA. Presa Microfono-auricolare Presa per il collegamento di un microfono-auricolare esterno. AVVERTENZA ! Usare solo accessori originali. Collegare ed utilizzare accessori diversi da quelli originali può... - Page 25 Descrizione dei comandi e indicatori Manopola VOL/OFF Manopola di accensione e spegnimento della radio. Permette la regolazione del volume di ascolto. In assenza di segnali sul canale in uso, si consiglia di aprire lo SQUELCH e quindi di regolare il volume al livello desiderato utilizzando come riferimento il rumore (fruscio) di fondo. Manopola SQ (Squelch) Il comando SQ permette di silenziare il ricevitore, eliminando il rumore (fruscio) di fondo in assenza di segnali.
- Page 26 Descrizione dei comandi e indicatori Icona AIR L' icona AIR (C) è accesa quando è selezionata la banda aerea. Icona NFM L' icona NFM (D) è accesa quando è selezionata la banda VHF NFM. Icona WFM L' icona WFM (E) è accesa quando è selezionata la banda Radio FM 88-108 MHz. Icona DW L' icona DW (F) è...
- Page 27 Descrizione dei comandi e indicatori spegnerà automaticamente dopo circa 4 secondi oppure ripremere il tasto LIGHT/BEEP (6) per spegnerla. FUNZIONE BEEP Questa funzione consente di emettere un BEEP ogni qualvolta la radio viene accesa e ogni qualvoilta viene premuto un tasto, per confermare il comando inserito. Per attivare o disattivare questa funzione premere il tasto F (13) e il tasto LIGHT/BEEP (6).
- Page 28 Descrizione dei comandi e indicatori Dopo questa selezione, premendo i tasti UP (9) o DOWN (10), la selezione della frequenza si sposterà a seconda dello STEP selezionato. Tasto F Premere questo tasto per selezionare la modalità FUNZIONE, ovvero l' utilizzo dei tasti a doppia funzione.
- Page 29 Descrizione dei comandi e indicatori Pannello posteriore Clip da cintura 1. Per installare la clip da cintura, far slittare la stessa verso il basso nello slot apposito situato nella parte posteriore della radio, finchè il meccanismo di blocco compie un clic. 2.
-
Page 30: Funzionamento
Funzionamento SELEZIONE DELLA FREQUENZA Selezione diretta della frequenza Premere i tasti UP (9) o DOWN (10) per selezionare la frequenza desiderata. Mantenendo premuto uno di questi tasti, la selezione avverrà con velocità maggiore. Lo selezione avverrà a seconda dello STEP di frequenza impostato. (vedi il punto 12 a pag. 26-27). Selezione tramite cursore La frequenza desiderata può... - Page 31 Funzionamento UTILIZZO DELLE MEMORIE Il ricevitore dispone di un totale di 99 canali di memoria programmabili a piacimento. Richiamo dei canali di memoria Premere il tasto MR/MW (7) per entrare in modalità Richiamo Memorie. L' icona M (I) comparirà sul display LCD (5). Premere i tasti UP (9) e DOWN (10) per selezionare il canale di memoria desiderato da 01 a 99 (M).
- Page 32 Funzionamento 3. Premere il tasto SC/DW (15) per attivare la scansione automatica della frequenza. 4. Premere i tasti UP (9) e DOWN (10) per selezionare la direzione della scansione. 5. La scansione si arresta quando viene rilevato un segnale, per permetterne l' ascolto e riprende automaticamente dopo circa 4 secondi quando non è...
- Page 33 Funzionamento FUNZIONE DUAL WATCH Il ricevitore è dotato della funzione Dual Watch, che consente di monitorare 2 frequenze o 2 canali di memoria differenti. Per abilitare la funzione Dual Watch, eseguire le seguenti operazioni : 1. Impostare la prima frequenza o il primo canale di memoria da monitorare (Canale A). 2.
-
Page 34: Specifiche Tecniche
Funzionamento - Specifiche Tecniche Funzione SCAN Delay time (tempo di ritardo della scansione) Questa funzione consente di impostare il tempo entro il quale la scansione automatica si arresta quando viene ricevuto un segnale. 1. Nella funzione Power Save premere il tasto F (13) e il tasto UP (9); il display LCD visualizzerà... -
Page 35: Informazioni Importanti
Informazioni Importanti Informazioni Importanti Importante ! Modifiche o interventi sulla radio possono farvi perdere la vostra autorizzazione ad utilizzare il prodotto. Qualsiasi regolazione o intervento tecnico sul prodotto deve essere effettuata unicamente da un tecnico qualificato o da un centro di servizio autorizzato. Per la sicurezza : Non aprite mai il contenitore della radio (tranne per sostituzione delle batterie). -
Page 36: Avvertenze
Avvertenze - Avviso agli utenti - Garanzia Limitata Avvertenze 1. L' uso delle apparecchiature radioelettriche è regolato dalle norme di legge in vigore. Si consiglia pertanto di prendere visione della regolamentazione in vigore nel Paese di residenza prima di utilizzare la radio. 2. -
Page 37: Dichiarazione Di Conformità
Vittorio Zanetti (amministratore unico) AR-109 Data: N. di serie : Timbro e firma del rivenditore Prodotto importato e distribuito da INTEK S.R.L. Via G. Marconi, 16 - 20090 Segrate (MI) - Tel. 02-26950451 - Fax. 02-26952185 www.intek-com.it / e-mail : intek.com@intek-com.it... -
Page 38: Note
Note - 37 -... - Page 39 Note - 38 -...
- Page 40 PRINTED IN CHINA...
Need help?
Do you have a question about the AR-109 and is the answer not in the manual?
Questions and answers