
Subscribe to Our Youtube Channel
Related Manuals for Wilson Electronics STADIUM GLASS BS7200

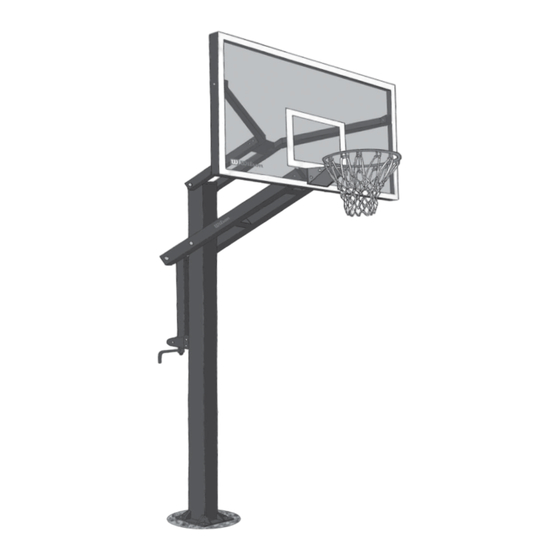
Summary of Contents for Wilson Electronics STADIUM GLASS BS7200
- Page 1 STADIUM GLASS OWNER’S MANUAL BASKETBALL GOAL SYSTEM MODEL NUMBER BS7200 BS6000 BS5400 BS4800 Wilson Sporting Goods, Inc. 070312Stadium_Glass...
- Page 2 When adjusting height, keep hands and fi ngers away from moving parts. Check system twice a year for signs Thank you for purchasing the Wilson basketball of corrosion (rust, pitting, chipping). system. We have ensured that our products are of the...
- Page 3 1.5’ to 2’ from the edge of the playing surface. Flaring the bottom of the hole as shown on the 48” left reduces the negative effects of frost heave in colder climates. 20” Wilson Sporting Goods, Inc.
- Page 4 AHEAD AND UNDERSTAND THESE STEPS BEFORE MIXING THE CONCRETE. 1. Mix concrete according to the manufacturer’s recommendations. 2. Fill the hole up to a level 18” below the playing surface. 18” 3. Immediately proceed to next step. Wilson Sporting Goods, Inc.
- Page 5 The tops of the bars should be approximately 6” below the playing surface. 2. Immediately proceed to next step. 6” 1. Fill hole with concrete up to play surface. 2. Immediately proceed to next step. Wilson Sporting Goods, Inc.
- Page 6 1. Using a level, make sure top of anchor plate is level. Be sure to check for levelness in both directions. 2. Recheck that anchor plate is parallel to play surface. STOP WAIT 3 DAYS FOR CONCRETE TO CURE BEFORE PROCEEDING. Wilson Sporting Goods, Inc.
- Page 7 Make sure pole makes contact with all four washers at the same time. 2. Once pole is level apply the hardware as shown. 3. Finger tighten nuts. Wilson Sporting Goods, Inc.
- Page 8 4 nuts with a wrench. 3. Apply protective caps as shown. Hardware Assembly “F” 1. Assemble upper arm using the hardware found in packaging marked assembly “F”. Do not tighten bolts completely. Wilson Sporting Goods, Inc.
- Page 9 2. Make sure that black plastic washers are placed against all painted surfaces to guard against corrosion and aid in movement of arm. 3. Finger tighten bolts. NOTE: ARM WILL SWING DOWNWARD. Pivot Bar “A” Wilson Sporting Goods, Inc.
- Page 10 2. Make sure plastic washers are placed against all painted surfaces to guard against corrosion and aid in movement of arm. 3. Finger tighten bolts. 4. Snap on top cap as shown. Pivot Bar “B” Wilson Sporting Goods, Inc.
- Page 11 “C” and assembly “D” at the 4 backboard attachment points. “D” CAUTION: BACKBOARD IS “C” HEAVY. “C” 2. Finger tighten bolts. Pivot Bar “C” C & D Pivot Bar “D” Wilson Sporting Goods, Inc.
- Page 12 3. Insert bolt into back of tube and tighten. 1. Remove cover plate from rim assembly as shown. 2. Attach rim to backboard as shown. 3. Level rim and tighten bolts with 2 opposing wrenches. 4. Reattach cover plate to rim assembly. Wilson Sporting Goods, Inc.
- Page 13 3. Repeat for opposite fl ange. Steel 4. Finger tighten bolts. Plastic Self-Locking with Nylon Insert 1. Assemble handle to height adjustment assembly as shown. 2. Apply cap to height adjustment assembly as shown. Wilson Sporting Goods, Inc.
- Page 14 fl anges. 2. Apply hardware in order shown. Make sure plastic washers are placed against all painted surfaces to guard against corrosion and aid in movement of arm. 3. Repeat on opposite side. 4. Finger tighten bolts. Wilson Sporting Goods, Inc.
- Page 15 8’ 1. Lower backboard using handle. 2. Affi x sticker so that its 8 foot mark lines up with the mark you made in the previous step. Wilson Sporting Goods, Inc.
-
Page 16: Limited Lifetime Warranty
1. Keep your proof of purchase receipt (original retail purchaser). Without it, we will not be able to proceed with any warranty service. 2. Call or write Wilson Sporting Goods to receive a Return Authorization # and allow us to better guide you with your specifi c needs. 1-800-333-8326 (Team Sports Customer Service) Or Write us at: Wilson Sporting Goods, Inc.
Need help?
Do you have a question about the STADIUM GLASS BS7200 and is the answer not in the manual?
Questions and answers