Table of Contents
Advertisement
Quick Links
TINA™ HEAVY DUTY-WHEELCHAIR USER MANUAL.
TINA™ FHD800, FHD1000, FHD1400 & FHD1500 RANGES.
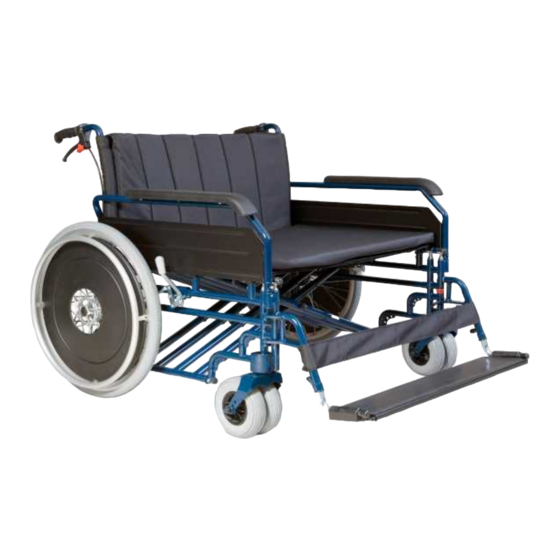
Product shown - TINA™ FHD1500 – 50 stones 318kgs
USER MANUAL
SUPPLIED BY:
RADCLIFFE REHABILITATION SERVICES LTD
UNITS 5-6 THE SIDINGS, TOP STATION ROAD
BRACKLEY, NORTHANTS.
NN13 7UG
Tel 01280 700256
Fax 01280 703428
E-mail: sales@radclifferehab.co.uk
Web Site: www.radclifferehab.co.uk
Advertisement
Table of Contents

Related Manuals for RADCLIFFE REHABILITATION SERVICES TINA FHD800

Summary of Contents for RADCLIFFE REHABILITATION SERVICES TINA FHD800
-
Page 1: User Manual
TINA™ HEAVY DUTY-WHEELCHAIR USER MANUAL. TINA™ FHD800, FHD1000, FHD1400 & FHD1500 RANGES. Product shown - TINA™ FHD1500 – 50 stones 318kgs USER MANUAL SUPPLIED BY: RADCLIFFE REHABILITATION SERVICES LTD UNITS 5-6 THE SIDINGS, TOP STATION ROAD BRACKLEY, NORTHANTS. NN13 7UG... -
Page 2: Introduction
INTRODUCTION Thank you for acquiring a TINA™ Heavy-duty or bariatric wheelchair. The product has been made to exacting standards to demonstrate the duty of care that we have to you, our customer. Just as we have a duty of care to you, we would ask that you read his manual carefully to ensure that you operate within its capability parameters. -
Page 3: Table Of Contents
INDEX INTRODUCTION Page TINA™ HEAVY DUTY WHEELCHAIR Page SAFETY AND USE Page 5 GENERAL SAFETY PRECAUTIONS Wheelchair Users Handling Weight Limit GENERAL GUIDELINES FOR WHEELCHAIR USE Page 6 SAFETY AND HANDLING Parking Brakes Height Adjustable Armrests Large (24”) Wheels Front (8”) Wheels Tyres Transfer to Other Seats Folding and Unfolding the Wheelchair... -
Page 4: Tina™ Heavy Duty Wheelchair
TINA™ HEAVY-DUTY WHEELCHAIR Various options and accessories are available for the TINA™ range of wheelchairs, contact your supplier for details. We are also able to provide special configurations if required. Features: 1. Backpost - Choice of fixed or folding. Extended height backrest or extended height handles. 2. -
Page 5: Safety And Use
GENERAL SAFETY PRECAUTIONS The TINA™ range of wheelchairs is designed to provide mobility to persons who are unable to walk, or have walking difficulties resulting in reduced mobility. These chairs are suitable for indoor and outdoor use but are not indicated for sporting or activities other than mobility of the user. -
Page 6: General Guidelines For Wheelchair Use
The recommended weight limit is specified on the identification label fixed to the cross member of the wheelchair. You will also find the unique identifier serial number on the same label. The seat width is also specified. The weight limits for each chair as follows: TINA™ FHD800 max user weight 25 stones/160 kgs TINA™ FHD1000... -
Page 7: Safety And Handling
Front (8’’) Wheels Check the axles and make sure they are securely attached by turning the front wheels. The front wheels should slow down when spun. Tighten the axle if there is visible wobble or loosen it if the wheel stops abruptly when spun. Tyres If the wheelchair has inflatable tyres, check pressure. -
Page 8: Parking Brakes
Folding and Unfolding the Wheelchair To Unfold 1. Unfold the wheelchair by gripping the armrest closest to you; tip it towards you (lifting the rear wheel and front wheel off the ground and press on the seat tubing until the wheelchair is completely unfolded. -
Page 9: List Of Safety Checks
LIST OF SAFETY CHECKS The initial set up of the chair and safety checks should be made to correspond to your body and your preferences by a suitable qualified professional. After that, remember to perform the following maintenance procedures regularly. REGULAR MAINTENANCE Your wheelchair needs proper maintenance to continue operating safely and easily. -
Page 10: Adjustments
If problems cannot be corrected, consult your local dealer or supplying wheelchair service as appropriate. ADJUSTMENTS BACKS Fixed back No adjustment is possible for this model. ADJUSTMENT. Folding back To fold the back, lift handle slightly and pull on knob (35) and fold the top half of the back down To return it to the upright position, lift the top half of the back and make sure that the sprung pins (32) are in position and then the backrest will be secure. -
Page 11: Reclining Back
Reclining back. To special order only To adjust the backrest unscrew the two knobs on the sliding telescopic struts to the rear of the backrest upright. Adjust backrest to the correct angle and then tighten securely the two securing knobs. N.B. If the knobs are not secure there is a risk of serious injury to the user. FOOTRESTS Adjustable Height Footrest .1. -
Page 12: Elevating Leg Rest
2. Repeat the operation on the other footrest. Removable Foot plate. The foot plate can be slid onto either foot rest. To move or enable the user’s feet to be placed on or off it, either raise the loose end of the footplate and lift the flat red foot hanger release pin to swing it out of the way. -
Page 13: Parking Brakes
Amputee or stump board. The amputee or stump board can be raised as shown above by swiveling on the axis (8). To adjust the height, undo the locking bolt (6) lower or raise as appropriate and retighten. PARKING BRAKES Adjustment of the parking brake (Fig. 12.1) is made by loosening the nuts on the inside of the frame (8) undoing the bolts slightly (5) and sliding the brake assembly along the frame tube until the correct braking force can be applied to the tyre, then retightening the bolts and nuts. -
Page 14: Front Castors
the brake is applied, the wheelchair should remain stationary. N.B. These parking brakes may not retain the chair on ramps when in use with the user and should be tested for safe use. FRONT CASTORS The castors are secured to the castor fork (1) by an axle bolt and axle nut (9&6). If necessary, tighten the axle bolt and axle nut using two spanners. -
Page 15: Removing Armrests
Slacken the locknut (7) and then retighten the axle bolt as necessary. Test for correct tightness by spinning the wheel. It should rotate freely and slow down gradually to a halt. If it stops abruptly, the axle is too tight and must be released slightly. N.B. -
Page 16: Other Options
Adjustable armrests. To adjust the height of the adjustable arm rests, undo the knob (3), raise or lower to the required height, then retighten the knob to ensure the armrest is secured. OTHER OPTIONS. Rear Wheel Setback Kits. The rear wheel set back it is supplied fitted to the chair or as an extra. It is bolted to the rear of the frame as demonstrated above and enables the prescriber to alter the depth of the wheelbase to enable greater stability. - Page 17 against the axle mounting block. The two long securing bolts have locknuts that should be equally tightened on both ends. The wheel axle is then bolted through the appropriate hole. Attendant Drum Brakes. Attendant drum brakes are fitted as standard to Transit versions but are optional on Self Propelling versions.
- Page 18 Webbing Seat and Back. The webbing as seen above can be altered to either take up the users shape or angle the seat or back to enable a more comfortable seating position. Simply release the Velcro straps and retighten according to the shape or posture you wish to attain. The webbing is then covered with either the seat and pack pads (shown below) or a padded canvas is also available for either seat or back.
- Page 19 REAR ANTI-TIP OPTIONS. Fixed. Adjustable Anti tip kits are available for original or retro fitting. They simply slide into the end of the lower side frame tubes and are located by the quick release pin. Adjust to suit the user’s activities and environment.
- Page 20 SPANNER KIT. A spanner kit to enable routine maintenance is available to order. User Manual 2012...
- Page 21 TINA™ WHEELCHAIRS GENERAL SPECIFICATION DATA TINA™ FHD800 RANGE TINA™ TINA™ TINA™ TINA™ TINA™ FHD800-45 FHD800-50 FHD800-55 FHD800-60 FHD800-65 45cm 50cm 55cm 60cm 65cm Seat Width (18") (20") (22") (24") (26") 42cm (16½") 42cm (16½") 42cm (16½") 42cm (16½") 42cm (16½")
- Page 22 TINA™ WHEELCHAIRS GENERAL SPECIFICATION DATA TINA™ FHD1000 RANGE TINA™ TINA™ TINA™ TINA™ TINA™ TINA™ FHD1000-50 FHD1000-55 FHD1000-60 FHD1000-65 FHD1000-70 FHD1000-75 Seat 50cm 55cm 60cm 65cm 70cm 75cm Width (20") (22") (24") (26") (28") (30”) 42cm (16½") 42cm (16½") 42cm (16½") 42cm (16½") 42cm (16½") 42cm (16½")
- Page 23 TINA™ WHEELCHAIRS GENERAL SPECIFICATION DATA TINA™ FHD1400 RANGE TINA™ TINA™ TINA™ TINA™ FHD1400-60 FHD1400-65 FHD1400-70 FHD1400-75 60cm 65cm 70cm 75cm Seat Width (24") (26") (28") (30”) Seat Depth 50cm (20") 50cm (20") 50cm (20") 50cm (20") 58cm (23") 58cm (23") 58cm (23") 58cm...
- Page 24 TINA™ WHEELCHAIRS GENERAL SPECIFICATION DATA TINA™ FHD1500 TINA™ FHD1500-65 TINA™ FHD1500-70 TINA™ FHD1500-75 65cm 70cm 75cm Seat Width (26") (28") (30") 42cm (16½") 42cm (16½") 42cm (16½") Seat Depth 50cm (20") 50cm (20") 50cm (20") 58cm (23") 58cm (23") 58cm (23") 38-48cm 38-48cm...
-
Page 25: Power Packs
Other seat width configurations on application. POWER PACKS. The U-B-Let EasyGo PLUS power pack is recommended for use with the TINA™ Heavy-Duty Wheelchairs and users up to 250kg (approx.. 40 Stone). The unit is easily fitted under a wheelchair, with no tools required. It simply clips to the pre fitted mounting brackets. With the speed controller on the push handle, the attendant can easily control the motor power while guiding the chair. -
Page 26: Warranty Terms & Conditions
For all warranty claims please contact: Radcliffe Rehabilitation Services Limited Units 5-6 The Sidings, Top Station Road Tel: 01280 700256 Fax: 01280 703428 Email: Sales@radclifferehab.co.uk Web Site: www.radclifferehab.co.uk TINA™ is a registered Trade Mark of Radcliffe Rehabilitation Services Limited User Manual 2012... - Page 27 Other TINA™ Products: User Manual 2012...
Need help?
Do you have a question about the TINA FHD800 and is the answer not in the manual?
Questions and answers