Table of Contents
Advertisement
Advertisement
Table of Contents

Summary of Contents for Fission E-E030
- Page 1 User Manual Model Number: E-E030...
-
Page 2: Table Of Contents
Contents What Your 1 Year Warranty Means ..................Important Safety Instructions ..................... Precautions ........................Before Use ......................... Location of Parts ........................ Preparation for Use ......................Listening to a Record ......................Audacity Software ......................Installing the Audacity Software ..................Configuring Audacity for Microsoft Windows ..............Preparing to Export and Save for MP3 Formats ............... -
Page 3: What Your 1 Year Warranty Means
What Your 1 Year Warranty Means Great care has gone into manufacturing this product and it should therefore provide you with years of good service when used properly. In the event of product failure within its intended use over first year after the date of purchase, we will rectify the problem as quickly as possible once it has been brought to our attention. -
Page 4: Important Safety Instructions
Important Safety Instructions When using electrical products, basic precautions should always be followed including: Read Instructions - All the safety and operating instructions should be read before the product is operated. 2. Retain Instructions - The safety and operating instructions should be retained for future reference. - Page 5 12. Lightning - For added protection for this product during a lightning storm, or when it is left unattended and un-used for long periods of time, unplug it from the wall outlet and disconnect the cable system. This will prevent damage to the product due to lightning and power-line surges as the cable system is used as the disconnect device.
-
Page 6: Precautions
Precautions Safety Information CAUTION In order to shut off the power of this product completely, unplug the power cord from the wall outlet. Be sure to unplug the unit if you do not intend to use it for an extended period of time, such as a vacation. -
Page 7: Before Use
Before Use Choose unit installation location carefully. Avoid placing it in direct sunlight or close to a source of heat. Avoid locations subject to vibrations and excessive dust, cold or moisture. Keep away from sources that hum, such as transformers or motors. Do not open the cabinet as this might result in damage to the circuit or electrical shock, if a foreign object should get into the set, contact your dealer. -
Page 8: Location Of Parts
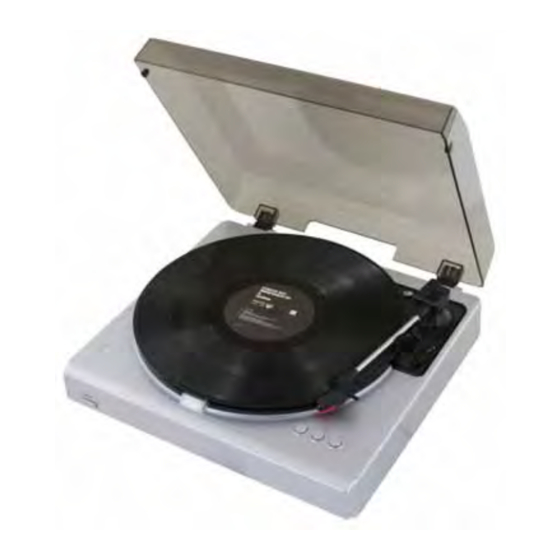
Location of Parts POWER SWITCH LARGE CHROME SCREW CUE LEVER SPEED CONTROL SWITCH TONE ARM REST TONE ARM EJECT BUTTON STOP BUTTON PLAY BUTTON 10. TURNTABLE 11. USB JACK 12. LINE OUT 13. AC POWER CORD Page After Sales Support TEL: 1300 886 649... -
Page 9: Preparation For Use
Preparation for Use Connect the AC power cord to the AC outlet. The transit screw protects the phonograph chassis during transportation. If the speed of your phonograph seems slow or you hear a rubbing sound, adjust the screw with a coin to correct the balance of the turntable. -
Page 10: Listening To A Record
Listening to a Record Connect the AC power cord to the AC outlet. Plug the 2 ends of the LINE OUT Cable into the auxiliary input (Aux) on your TV, home entertainment receiver or other music system. Be sure that the red RCA Cable is inserted into the red jack and the white RCA Cable is inserted into the white jack. -
Page 11: Audacity Software
Audacity Software The provided CD disc contains the following software: • Audacity-src-1.2.6----------For source codes • Audacity_for_MAC---------For Macintosh • Audacity_for_WIN----------For Windows • AUTORUN.INF • The GNU General Public License.html The software is compatible with Window 98, 2000, ME, XP, VISTA and Macintosh. Audacity Installation and USB Connection Connect the USB cable to the turntable and to your computer. - Page 12 There are five folders in the Audacity disk. Select Audacity_for_WIN for Windows system, and select Audacity_for_MAC for Macintosh system. Double click the Audacity_for_WIN for Windows system, and double click the audacity- win-1.2.6 to install the audacity software. Page After Sales Support TEL: 1300 886 649...
- Page 13 Double click the Audacity_for_MAC for Macintosh system. There are three folders that will appear as shown below. If your computer is Mac OS X system (Intel CPU), please enter the Intel folder to install the audacity software. If your computer is Mac OS 9 system, please enter the Mac OS 9 folder to install the audacity software.
-
Page 14: Installing The Audacity Software
Installing the Audacity Software The Audacity Setup Wizard will appear. Click on Next to install the software. Click on “I accept the agreement” and click on Next. Page After Sales Support TEL: 1300 886 649... - Page 15 Continue to click on the Next button. Page After Sales Support TEL: 1300 886 649...
- Page 16 Click on the Install button to start installation. Page After Sales Support TEL: 1300 886 649...
- Page 17 Click on Finish to complete installation. You can now open the Audacity software and start recording your files. (For additional information, visit the Audacity website at http://audacity.sourceforge.net) Page After Sales Support TEL: 1300 886 649...
-
Page 18: Configuring Audacity For Microsoft Windows
Configuring Audacity for Microsoft Windows Audacity Interface Audacity Interface---Settings and controls. Page After Sales Support TEL: 1300 886 649... - Page 19 Audacity Control Buttons Using the attribute controls at the top of the screen to go to beginning, Play, Record, Pause, Stop and End. Use the File, Edit, View, Project, Generate, Effect and Analyse menus to Save, Export, and edit the music. 1.
- Page 20 Audacity Preferences Click the “Edit” on the Audacity interface, select “Preferences”. The screen will open up Audacity Preferences. You can see the Audio I/O, Quality, File • Formats, Spectrograms, Directories, Interface, Keyboard and Mouse tabs in the Audacity preference interface. Page After Sales Support TEL: 1300 886 649...
- Page 21 Select the recording device: microphone (USB Audio CODEC) Click the “Audio I/O” at the Audacity Preferences interface. • Click the “Device” and select “microphone (USB Audio CODEC)”. • Click the “Channels” and select 2 (stereo). • Click “OK”. • NOTE: If you couldn’t find the “ microphone (USB Audio CODEC) “ from the Device list, close •...
-
Page 22: Preparing To Export And Save For Mp3 Formats
Preparing to Export and Save for MP3 Formats Prepare for MP3 Export--- (Additional software “lame_enc.dll” needs to be installed.) Please make sure that the Audacity disc is still inserted in your computer. Click the “Edit” Tab on the Audacity interface, select “Preferences”. Select the File Formats Tab and click on the Find Library Button. - Page 23 A dialog box will appear. Click “Yes”. Another box appears to locate the “CD ROM”. You will find the “lame_enc.dll” software. Click the software then click Open. Page After Sales Support TEL: 1300 886 649...
- Page 24 Click on the OK Button. Now the MP3 software set up is complete and you may proceed with the recording and exporting to MP3 format. Page After Sales Support TEL: 1300 886 649...
-
Page 25: Export And Save For Wav, Ogg Or Mp3 Formats (After Recording Is Completed)
Export and Save for WAV, Ogg or MP3 Formats (After Recording is completed) The provided CD disc contains the following software: • When the song is finished, click the ( ) button on the screen. Then press the “STOP” button on the turntable. •... - Page 26 Once you have chosen to which file format recording should be exported, the interface below appears. Here you may provide the file name and the location where it will be saved, ie. desktop. Then click “Save”. Save as WAV Save as Ogg Follow the same steps as above for “Save as MP3”.
-
Page 27: Recording Operation
Recording Operation To upload music into the computer: 1. Place the record on the turntable. 2. Move the tone-arm over to the record to start playing. 3. Click the Record( ) button to start recording. The waves (top and bottom) will show on the interface. 4. -
Page 28: General Problem For All Windows Version
General problem for all Windows version 1. When the turntable is connected, you cannot hear any sound if you need to listen to video or music. It is because the default playback device has been changed to USB AUDIO CODEC once the turntable connects to the PC. -
Page 29: Adjustment For Windows 7 And Some Vista System Only
Adjustment for Windows 7 and some Vista system only if you do not have the fluctuant wave on the Audacity interface or the sound is distorted when recording, adjust the recording level as follows: • Click “Start” at the lower left corner and go to the Control Panel. Page After Sales Support TEL: 1300 886 649... - Page 30 Adjustment for Windows 7 and some Vista system only • In Classic View, double click onto the Sound Icon. Page After Sales Support TEL: 1300 886 649...
- Page 31 Adjustment for Windows 7 and some Vista system only • Or in Control Panel Home View, click “Hardware and Sound”. Then click “Sound”. Page After Sales Support TEL: 1300 886 649...
- Page 32 Page After Sales Support TEL: 1300 886 649...
- Page 33 Adjustment for Windows 7 and some Vista system only • In the Sound Interface, select “Recording” tab. • Then, choose a recording device. Herein we recommend you to select Microphone of USB AUDIO CODEC which is highlighted in the picture and click “Properties”. Page After Sales Support TEL: 1300 886 649...
- Page 34 Adjustment for Windows 7 and some Vista system only • Select “Levels” and adjust the Volume Reading. The reading is from 0 to 100. Normally it should be 3-8. However, you may refer to the Input Level Indicator from the Audacity panel that doesn’t excess 0.
- Page 35 Adjustment for Windows 7 and some Vista system only Input Level Indicator Page After Sales Support TEL: 1300 886 649...
-
Page 36: Dividing Tracks
Dividing Tracks NOTE: Follow the previous instructions to upload the songs, DO NOT click the “Stop“ button when the first song is finished. Click the “Pause “button on the computer. For the next song, replace the album or move tone-arm to another desired song. Click the “Pause” button to continue the upload. Only click the “Stop”... - Page 37 2. Move the cursor to the wave graphic area, left click the mouse and hold and drag from left to right. You can see the time bar colour changing to gray (highlighted). Release the mouse when the highlighted time bar has reached 1:45 (end of the first song). 3.
- Page 38 See interface example below, saved as WAV format: Second song to be divided and saved: 1. Move the cursor to the wave graphic area at 1:45 (beginning of the second song). Left click the mouse and hold then drag from left to right until you reach 4:00 (end of the second song). You can see the area from 1:45 to 4:00 highlighted.
- Page 39 To Title Additional Songs (for MP3 format only) During “EXPORT SELECTION AS MP3 “, the software only provides one time to title the song being saved. All subsequent songs being divided from the same track are with the same title. To change the titles, follow steps below: 1.
-
Page 40: Configuring Audacity For Mac
Configuring Audacity for Mac Audacity Interface for Mac Audacity Interface---Settings and controls. At the top of the main Audacity window, to the right of the play control buttons, you will see the input and output level metres (labelled L and R). There is an icon under the output level metre that looks like a microphone. - Page 41 Audacity Control Buttons Using the attribute controls at the top of the screen to go to beginning, Play, Record, Pause, Stop and End. Use the File, Edit, View, Project, Generate, Effect and Analyse menus to Save, Export, and edit the music. 1.
- Page 42 Audacity Preferences Click “Audacity” on the Audacity menu, select “Preferences”. • The screen will open up Audacity Preferences. You can see the Audio I/O, Quality, Import/ Export, Interface, Spectrograms, Directories, Smart Recording, Theme, Keyboard and Mouse. Page After Sales Support TEL: 1300 886 649...
- Page 43 Select the recording device: Core Audio (USB Audio CODEC) • Click the “Audio I/O” at the Audacity Preferences interface. • Click the “Device” and select “Core Audio (USB Audio CODEC)”. • Click the “Channels” and select 2 (stereo). • Click the “OK”. NOTE: If you couldn’t find the “Core Audio (USB Audio CODEC)”...
- Page 44 To set the Smart Recording Select the Smart Recording in the Audacity Preference menu, and set the Sound Activation Level (dB) to -36, and then click OK. At the top of the main Audacity window, to the right of the input and output level meters (labelled L and R), you will see the input and output volume.
- Page 45 Export and Save Files (After Recording is completed) • When the song is finished, click the ( ) button on the screen. Then press the “STOP” button on the USB Turntable. • You have a music upload on your computer now. •...
-
Page 46: Faq's
FAQ’s In case of a trouble with the unit, please look through below and see if you can solve the problem before calling your dealer. No Sound: • If you are not getting any sound into the software application, go back to the preferences as shown above and make sure you have selected the USB input for the recording device. -
Page 47: Specifications
Poor Sound Quality: • Check your cartridge connection to make sure it is secured to the tone arm. The cartridge must be connected to the tone arm whenever using the turntable. • Make sure that your RCA plugs are plugged into a source or not touching bare metal. If you are experiencing noise through the USB, you may have interference from the RCA plugs.
Need help?
Do you have a question about the E-E030 and is the answer not in the manual?
Questions and answers
How to change the drive belt?
belt has broken the one under the turntable where can we buy one