
Related Manuals for Grand Classic 720-0077-LP

Summary of Contents for Grand Classic 720-0077-LP
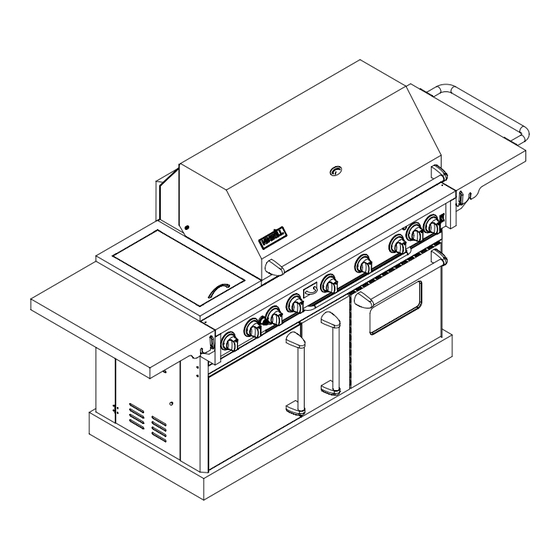
- Page 1 STAINLESS STEEL GAS GRILL USE AND CARE GUIDE MODEL NO: 720-0077-LP GRILL PLUS OVEN FOR OUTDOOR USE ONLY PLEASE CONTACT 1-800-913-8999 FOR ASSISTANCE DO NOT RETURN TO PLACE OF PURCHASE. 2005/08/07 Version 1...
-
Page 2: Table Of Contents
Feel free to contact us if we can help you. When you write please include the model number of the grill. We thank you for buying The Grand Classic Grill plus oven and wish you many years of enjoyment. Note: This appliance is NOT intended to be installed in or on recreational vehicles or boats. -
Page 3: Precautions
Do not try lighting this appliance without PERSONAL INJURY: reading the “LIGHTING INSTRUCTIONS” When properly cared for, your Grand Classic Grill with section of this manual. Oven will give safe, reliable service for many years. However, extreme care must be used since the grill... -
Page 4: Placement Of The Grill
PRECAUTIONS When using the grill, do not touch the grill rack, burner thereby damaging the grill and making it unsafe to grate or immediate surroundings as these areas become operate. Inspect the grill twice a year. extremely hot and could cause burns. Use only dry potholders. -
Page 5: Assembly Instructions
ASSEMBLY INSTRUCTIONS INSTALLATION OF SIDE SHELF The screws used to attach the side shelf are already screwed into the side panel (see the figure below). Remove the screws from the side panel, align with the holes in the side shelf, and then re-screw into the holes on the side panel of the grill. Diagram (1) 2 sets each side... -
Page 6: Installation Of Push Bar
INSTALLATION OF PUSH BAR The screws used to attach the push bar are already screwed into the right side shelf. Remove the screws from the right side shelf, align with the holes in the push bar, and then re-screw into the holes on the right shelf of the grill. Press the cap against the ends of the push bar, and gently tap them into place. -
Page 7: Installation Of Flame Tamers
INSTALLATION OF FLAME TAMERS The stainless steel flame tamers are shown in figure below. BATTERY INSTALLATION... -
Page 8: Rotisserie Kit Assembly
ROTISSERIE KIT ASSEMBLY The screws for rotisserie mount are already screwed into the rotisserie kit. Loose the screws and install. Assemble the rotisserie skewer as shown in the figure below. Diagram (2) 6 pieces... -
Page 9: Guide Rack And Rack Assembly
Guide Rack and Rack Assembling Pictorial... -
Page 10: Installation Of Propane Tank
INSTALLATION OF PROPANE TANK Attach regulator to the propane tank by turning the regulator handle clockwise (see the figure below). Turn off LP supply at cylinder when appliance is not in use. Put the gas tank into the gas tank pull-out tray. Then tighten up the gas tank fixed pole. PROPER ORIFICE LOCATION OF THE BURNER... -
Page 11: Gas Hook-Up
CONNECTION: reconfigured for natural gas use. Your Grand Classic Grill with Oven is equipped with gas supply orifices for use only with liquid propane gas. It is Followings are the Heat output ratings: also equipped with a high capacity hose/regulator assembly for connection to a standard 20lb. - Page 12 Please remove the 'Fire Tested' label from the rear burner Each grill burner is tested and adjusted at the factory before use. All burners in your new Grand Classic grill prior to shipment; however, variations in the local gas have been fire tested at the factory. You may notice a supply may make it necessary to adjust the burners.
-
Page 13: Operating Instruction
“HI” and “LO”. motor. NOTE: The Grand Classic grill with oven is designed to After your first use of the rotisserie burner it is likely that grill efficiently without the use of lava rocks or the stainless steel adjacent to the burner will darken to a briquettes of any kind. -
Page 14: Using The Oven
USING THE OVEN OVEN VENT: Do not block the ducts at the rear of the range when cooking in the oven. It is important that the flow of hot air from the oven and fresh air into the oven burner never be interrupted. Avoid touching the vent openings or nearby surfaces during oven or broiler operation –... -
Page 15: Lighting Instructions
LP tank. Always keep your face and body as far from the grill as possible when lighting. Your Grand Classic has an exclusive patented built-in ignition. The igniter is built in to the valve. To ignite TO LIGHT THE ROTISSERIE BURNER:... - Page 16 LIGHTING ILLUSTRATIONS Main & Side Burner Lighting Illustration Rotisserie Burner Lighting Illustration 1. Make sure the lid is open. 1. Push and turn the rotisserie knob to “HI". 2. Push and turn one of main or side burner knob 2. Press the electric igniter 3 to 4 seconds to “HI”...
-
Page 17: Using The Side Burner
LIGHTING ILLUSTRATIONS (cont’d) 4. Push &Turn the Knob to light the oven Burner 4. After the burner is lit, adjust the temperature. It may take about 35-50 seconds to light the Oven burner as you need. USING THE SIDE BURNER MATCH LIGHTING: WARNING: IMPORTANT! USING THE SIDE BURNER:... - Page 18 GREASE TRAY CLEANING: ENSURE THAT THE GAS SUPPLY AND The grease tray should be emptied and wiped down THE KNOBS ARE IN THE “OFF” periodically and washed in a mild detergent and warm POSITION. MAKE SURE THE RANGETOP water solution. A small amount of sand or cat litter may BURNER IS COOL BEFORE REMOVAL.
- Page 19 OVEN MAINTENANCE & CLEANING (#56) (#107) CLEANING INSIDE THE OVEN: Bottom of the oven is partially covered by the Oven Cover (#56). This cover may be removed for cleaning by lifting it up and out of the oven. The Flame Tamer (#107) can be removed by loosening the nuts attached to the screws holding the flame tamer in place.
-
Page 20: Removal Of The Oven Door
REMOVING THE OVEN DOOR The oven door can be removed for cleaning. Please see the following illustrations. Oven Door Disassembling as shown in the figure: 1. Slide the locking bracket (Left & Right each) of 2. Keeping the door at 30-45 degrees angle, lift the hinge toward the door with screwdriver or finger. -
Page 21: Troubleshooting
TROUBLESHOOTING SPIDER AND INSECT WARNING!!! Spiders and insects can nest in the burners of this or any other grill, and cause the gas to flow from the front of the burner. This is a very dangerous condition in which can cause a fire to occur behind the valve panel, thereby damaging the grill and making it unsafe to operate. -
Page 22: Oven Grill Parts List
EXPLODED DRAWING AND PARTS LIST... - Page 23 DESCRIPTION DESCRIPTION Lid, Front Oven Cover Heat Indicator Oven Rack Name Plate Rack guidance Heater Insulating Spacer Oven Handle Assembly, Lid Bracket for Thermocouple Warming Rack Upper Plate for Oven Cooking Grid With Hole Rear Plate for Oven Cooking Grid Vent Flame Tamer Assembling Liner for Oven Rear Plate...
-
Page 24: Electric Wiring Diagram
ELECTRICAL WIRING DIAGRAM 250 RED 500 W HITE 1800 RED 1800 RED BLOCK 700 W HITE W HITE 1500 W HITE 290BLOCK WARNING! ELECTRICAL GROUNDING INSTRUCTIONS: this outdoor cooking gas appliance is equipped with a three-prong (grounding) plug for your protection against shock hazard and should be plugged directly into a properly grounded three- pronged receptacle. -
Page 25: Grilling Hints
GRILLING HINTS The doneness of meat, whether rare, medium, or well done, is affected to a large degree by the thickness of the cut. Expert chefs say it is impossible to have a rare doneness with a thin cut of meat. The cooking time is affected by the kind of meat, the size and shape of the cut, the temperature of the meat when cooking begins, and the degree of doneness desired. - Page 26 MEATS Beef Grill, turning once when juices rise to the surface. Do not leave hamburgers unattended since a flare-up could Hamburgers 1/2 to 3/4 inch Medium 10 to 18 minutes occur quickly. High 8 to 15 minutes Steaks Rib eye, WEIGHT OR FLAME APPROXIMATE...
- Page 27 WEIGHT OR FLAME APPROXIMATE SPECIAL INSTRUCTIONS FOOD THICKNESS SIZE TIME AND TIPS FISH AND SEAFOOD Grill, turning once. Brush withmelted butter, margarine or oil Steaks to keep moist. Halibut 3/4 to 1 inch Medium to 8 to 15 minutes Salmon High Swordfish Whole...
-
Page 28: Grill Recipe Suggestions
GRILL RECIPE SUGGEST IONS chops. Mix well. Pour over chops and marinate one hour in a cool BBQ SALMON TANGY SEAFOOD KABOBS place. Turn the BBQ grill on full. 1 lb. large shrimp, shelled & Heat 10 minutes. BBQ the chops divined 2 large salmon steaks and brush with the marinade... - Page 29 aluminum minutes longer or until minutes before serving. potatoes are tender. Let stand 5 cooked. This may take 30 minutes. Remove from grill and cool for VEGETABLE KABOBS BEEF AND LAMB KABOBS handling. Strip off the skin and 3 medium-sized zucchini Serve 4 chop eggplant finely.
- Page 30 process until the entire rack is Time: 1-1/2 hours to 2 hours 1 tsp. pepper accordion pleated. Fasten the second Bring pork to room temperature ½ tsp. garlic flakes meat hook into the rack. Turn your before placing it on the spit rod. 1 tsp.
-
Page 31: Limited Warranty
LIMITED WARRANTY MODEL 720-0077-LP (GRILL Plus OVEN) STAINLESS STEEL OUTDOOR GAS GRILL Nexgrill Industries Inc. warrants to the original consumer purchaser of each Outdoor Gas Grill that when subject to normal residential use, it is free from defects in workmanship and materials for the periods specified below. This warranty excludes grills used in rental or commercial applications.
Need help?
Do you have a question about the 720-0077-LP and is the answer not in the manual?
Questions and answers