
Related Manuals for i-Stor iS607

Summary of Contents for i-Stor iS607
- Page 1 Dual-Bay Storage Enclosure for 3.5” Serial ATA Hard Drives LAN+ USB2.0 Combo External RAID 0, 1 Subsystem User Manual 中文 (English/Deutsch/ v1.0 August 23, 2007...
-
Page 3: Table Of Contents
LAN User Guide Table of Contents CHAPTER 1 - INTRODUCTION ......1 Bonjour ............22 BTorrent ............ 23 ..........1 ACKAGE ONTENTS ..........24 AINTENANCE ........1 YSTEM EQUIREMENTS Disk Utility..........24 ..........2 ETAILED RAID Setting..........25 Front View ............2 Firmware Upgrade ........28 LED Indicators..........2... -
Page 5: Chapter 1 - Introduction
User Guide Chapter 1 - Introduction A SATA enclosure like no other, the i-Stor LAN offers the latest in network attached storage technology. Workstations connected to the same network have access to the i-Stor’s massive dual bay storage space. Plus, with 2 available USB host ports, any attached USB device is also accessible on the network. -
Page 6: Detailed View
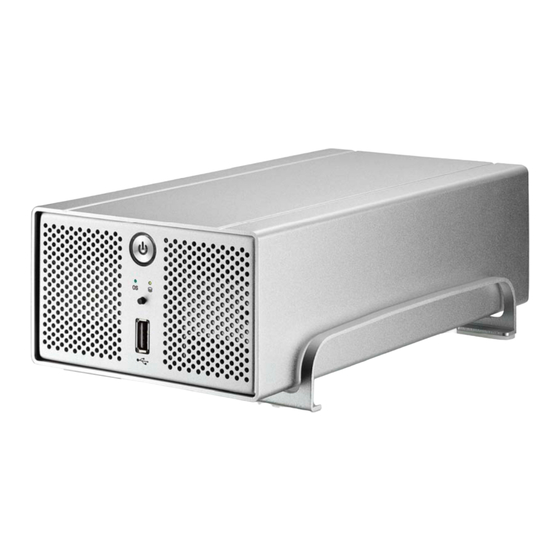
LAN User Guide Detailed View For a detailed description on how each of these ports and buttons work, please refer to the following chapters. Front View 1. ON/OFF switch (blue when ON) 2. Ventilation holes 3. Status LEDs (see LED Indicators) 4. -
Page 7: Installation Guide
To protect your files and help prevent the loss of your data, we strongly recommend that you keep two copies of your data, one copy on your i-Stor and a second copy either on your internal drive or another storage media such as a CD, DVD, Tape or an additional external drive. -
Page 8: Chapter 2 - System Setup
LAN User Guide Chapter 2 - System Setup HDD Installation Your unit may come with a pre-installed hard drive. Before opening such an enclosure, please read the warranty and any other notes from your vendor carefully before doing so, as this could void your warranty. -
Page 9: Power On/Off Procedure
During boot up, the OS LED will be blinking. To turn off the i-Stor LAN, stop all current downloads, then turn off the power using the ON/OFF switch. Once the system has shut down, and if it will not be in use for a longer period of time, remember also to remove the power supply from the wall socket. -
Page 10: How To Login
1. Turn on your i-Stor LAN and make sure it is connected to the same network as your computer. 2. Start the NetTool utility by double clicking on the EXE file and then pressing the Setup button. - Page 11 LAN User Guide 6. In step 2, you can define the name for your device and set up the IP configuration. We recommend using the “Automatically obtain an IP address (DHCP)”. When set, press Next to continue. 7. In step 3, you can set up the date and time. Select your time zone from the drop down menu, set the date, the time and then press Next to continue.
- Page 12 LAN User Guide 8. In step 4, you can compare your new settings with the previous configuration. If you find a mistake, go back to make changes but if everything is OK, press Save. 9. The setup wizard will remind you that the previous settings will now be updated with the new configuration.
-
Page 13: Login On A Mac
By default, the Bonjour service is not enabled, so the only way to access the login page is by using its IP address. First, you will have to find out the IP address of your i-Stor LAN and then use the web browser to access the web configuration interface. -
Page 14: Bonjour
User Guide Bonjour If the Bonjour service on the i-Stor LAN is enabled, all you need to do is access the Bonjour tab in your bookmarks folder and select the i-Stor LAN. 1. Turn on your i-Stor LAN and make sure it is connected to the same network as your computer 2. -
Page 15: Chapter 3 - Web Configuration
LAN User Guide Chapter 3 - Web Configuration Open your web browser, enter the IP address of your i-Stor LAN and login. The default login is as follows: Username: admin Password: admin For more information about the initial setup and finding your IP address, refer to Chapter 2. -
Page 16: Quick Setup
For Mac users, follow the setup wizard from step 1 to 6 to quickly prepare your i-Stor LAN for file sharing. -
Page 17: Add User
LAN User Guide Add User Use this setup wizard to quickly add and configure a new user account. • Step 1: Enter the user name and password for the new account. At the same time, you can also create a private folder for that user and set the quota limit. -
Page 18: Add Share
LAN User Guide Add Share Use this setup wizard to quickly add a new share. • Step 1: Enter the share name and an optional description for the share. • Step 2: Configure the Windows/FTP access permissions by adding (read only or writable) and removing the members or group from the list. -
Page 19: Users And Groups
User Guide Users and Groups In this menu, the admin can manage the users and groups for the i-Stor LAN. Start by adding your users first, then create the groups and assign the members to their groups. Note: If there is no hard drive installed or the HDD is not yet formatted, this menu is not available. -
Page 20: Group Management
User Guide Group Management In this section you can see all existing groups for the i-Stor LAN and manage them by adding or removing them from the list. Groups are not required to grant access to the i- Stor LAN but will help the admin to manage multiple users and easily share a folder among a group of people. -
Page 21: File And Print
• Windows Setting: In this section, you can change the workgroup that the i-Stor LAN belongs to and modify its description. The IP for the WINS Server (Windows Internet Name Server) can be left blank unless this is required for your network. -
Page 22: Share Management
Share Management In this section you can manage the shares and access rights. • Existing Shares: Lists the current shares on the i-Stor LAN. • Adding Shares: To add a new share, clear the form by pressing the “Clear Form”... -
Page 23: System
LAN Settings In this section you can define the hostname for your i-Stor LAN and set up the IP configuration. We recommend using the “Obtain IP/DNS address automatically”. When selecting a hostname, make sure to use a unique name and not one that has already been used on the local network. -
Page 24: Time Settings
NTP server and set the time manually. Turn Off Server In this section, you can restart the server or turn off the i-Stor LAN via the web browser. Make sure that nobody is accessing the device when you restart or turn it off. -
Page 25: Information
LAN User Guide Information In this section, you can find the product name, the current firmware and the current IP address. Disk Usage In this section, you can find a summary of the hard disk status and disk usage. Press the “Refresh”... -
Page 26: Network Service
When the iTunes option is enabled, you can store your MP3 music files in the /public/music folder and play them directly from iTunes. The i-Stor LAN will automatically appear in iTunes under shared devices. -
Page 27: Btorrent
To start downloading files, you will have to download a torrent file from the internet first and then upload it to the i-Stor LAN. Once the torrent file has been added, you can start downloading. The files will be stored in your /public/btdownload folder. -
Page 28: Maintenance
(has to be exactly 20 characters). • File System: .For drives that are not in a RAID array, there is a choice between EXT2, EXT3 and FAT32. For drives installed in the i-Stor LAN, we recommend using EXT2 for optimum performance and functionality. -
Page 29: Raid Setting
User Guide RAID Setting In this section you can manage the RAID array and set up your drives. The i-Stor LAN supports RAID 0 and RAID 1. Two hard drives of identical capacity and make are required. If only one drive is installed, the RAID configuration will not be available. - Page 30 LAN User Guide Rebuilding a RAID array When using RAID 1 and one of the drives has failed, the faulty HDD has to be replaced and the RAID 1 array rebuilt. 1. Login and go to the RAID Setting menu to check the disk status. If there is a problem, it will show which drive has to be replaced.
- Page 31 LAN User Guide 4. Depending on the capacity, this will take a while. Do not turn off the power or interrupt the system in any other way. The HDD LED will be ON while the RAID array is being rebuilt.
-
Page 32: Firmware Upgrade
LAN User Guide Firmware Upgrade In this section you can check the current firmware version and upgrade if a new one is available. Download the new firmware and store in on your computer, then browse for the *.gz file, select it and start the upgrade. The upgrade process takes about 10-20 minutes. -
Page 33: Restore Configuration
LAN User Guide Restore Configuration To quickly restore previous settings or set up multiple units, you can save the configuration and then use this function to upload a previous backup. Browse for the config.tar file on your computer and press the “Restore” button to restore the previous settings. -
Page 34: Log File
User Guide Log File This menu includes all the log files of your i-Stor LAN. You can find logs for the SAMBA, FTP and DHCP server as well as system and administration logs. Note: To delete the old log files, press the Clean button beneath the log. -
Page 35: Chapter 4 - Network Storage
User Guide Chapter 4 - Network Storage To access the data on the i-Stor LAN via the network connection, you may use either FTP or SMB. Before you can access the shared folders, you will have to set up your users, groups and shares. -
Page 36: Windows Explorer
User Guide Windows Explorer Use Windows Explorer and type \\ followed by the IP address of your i-Stor LAN. It will list all available folders and shares on your i-Stor LAN, which you can then access directly. You can copy files to the network storage as if it were a folder on your local drive. - Page 37 LAN User Guide 2. Follow the setup wizard and fill in the path to your i-Stor LAN. Alternatively, you can also browse for the shares by clicking on the Browse button and locating the folder that way. 3. Once the drive has been mapped, you are able to find and access it under My Computer.
-
Page 38: File Access On A Mac
1. Click on “Go” and choose “Connect to Server”. 2. Type smb:// followed by the IP address of your i-Stor LAN or click on the Browse button to locate the folder on your network. Click on the Connect button once the server address has been filled out. -
Page 39: Ftp
1. Click on “Go” and choose “Connect to Server”. 2. Type ftp:// followed by the IP address of your i-Stor LAN. Click on the Connect button once the server address has been filled out. -
Page 40: Chapter 6 - Additional Features
UPnP The i-Stor LAN supports UPnP v1.0. To access the device on a PC, go to My Network Places and the i-Stor LAN will be listed as an UPnP device. You can select it and access the configuration page. Note: There is no need to configure anything, this function is turned ON by default and other devices will be able to recognise it automatically. -
Page 41: Itunes
If the iTunes support for Bonjour is enabled, the i-Stor LAN will appear as a shared music folder in your iTunes library. Store your MP3 files in the music folder of the i-Stor LAN and play them over the network. -
Page 42: Usb Printer
Installation on a PC 1. Connect your USB printer to one of the USB ports on the i-Stor LAN and turn both devices on. 2. Login to make sure the printer server is enabled and the printer is recognised. - Page 43 LAN User Guide 3. On your PC, go to Start and select “Printers and Faxes” 4. Go to File and select “Add Printer” to bring up the printer setup wizard. 5. Click on Next to start the wizard, then select “A network printer…” and hit Next once more.
- Page 44 LAN User Guide 7. Browse for the i-Stor LAN and select the lp printer, then hit Next. 8. After you hit Next, a pop-up window will appear asking for a driver. Select your printer model from the list or browse for the corresponding driver on your local drive.
-
Page 45: Installation On A Mac
LAN User Guide Installation on a Mac 1. Start the Printer Setup Utility in the Utilities folder. 2. Select More Printers Page 41 / Chapter 6 - Additional Features... - Page 46 LAN User Guide 3. Select Windows Printing and the workgroup your computer and i-Stor LAN belong to. Browse for the i-Stor LAN, select it and hit Choose. 4. Enter the login and password, which can either be your admin login or the login of a user account.
- Page 47 LAN User Guide 5. Select the lp printer from the list, browse for the corresponding printer model to install the correct printer driver and hit Add. 6. Done, your printer has been set up and you can now print the first page.
-
Page 48: Btorrent
User Guide BTorrent Used in conjunction with its built-in BitTorrent™ client, the i-Stor LAN can be set to download media files from the Internet and have it saved directly to the internal SATA hard drives. You can then turn off your computer and go about other things (like sleeping!) and when you come back, you will have all kinds of new media files to enjoy. - Page 49 5. The file is now being downloaded and if you like, you can turn off your computer. 6. Once the file has been downloaded, you can delete it from the download list and access the media file on your i-Stor LAN. All files will be stored in the /public/btdownload folder.
-
Page 50: Chapter 7 - Appendix
LAN User Guide Chapter 7 - Appendix Specifications • One or two 3.5" SATA-I or SATA-II hard drives Application (1.5Gb/s) • 20-750GB • RAID (EXT2, EXT3), non RAID (FAT32, EXT2, EXT3) • For RAID 0 & 1, two hard drives of identical capacity and make are required •... -
Page 51: Ntfs
FTP or file transfer protocol is a commonly used protocol for exchanging files over any network that supports the TCP/IP protocol (such as the Internet or an intranet). There are two computers involved in an FTP transfer: a server (i-Stor LAN) and a client (user’s computer). -
Page 52: About This Manual
LAN User Guide About this Manual This manual was written using the i-Stor LAN model iS607 and the v2.6.0-n firmware revision. Images and descriptions may therefore slightly vary between this manual and the actual product you have. Chapter 7 - Appendix / Page 48...
Need help?
Do you have a question about the iS607 and is the answer not in the manual?
Questions and answers