
Summary of Contents for EVL PRO SCANNER 150-250
- Page 1 EVL PRO SCANNER 150-250 / PRO STAR 150-250 USER MANUAL (VER3.3) PLEASE KEEP THIS MANUAL FOR FUTURE REFERENCE...
- Page 2 PRO SCAN 150-250 PRO STAR 150-250...
-
Page 3: Safety Instructions
For your own safety, please read this user manual carefully before installing the device. Ke ep this devi ce away f rom rai n and moisture ! U nplug mains l ead before opening the housing. Every person involved with the installation, operation and maintenance of this device has to: -be qualified -follow carefully the instructions of this manual INTRODUCTION:... -
Page 4: General Guidelines
For safe operation, it is absolutely necessary to follow the safety instructions and warning notes written in this user manual. If the device has been exposed to temperature changes due to environmental changes, do not switch it on immediately. The arising condensation could damage the device. Leave the device switched off until it has reached room temperature. -
Page 5: Installation Instructions
Operate the device only after having familiarized with its functions. Do not permit operation by persons not qualified for operating the device. Most damages are the result of unprofessional operation. Please use the original packaging if the device is to be transported. For safety reasons, please be aware that all modifications on the device are forbidden. -
Page 6: Mounting The Device
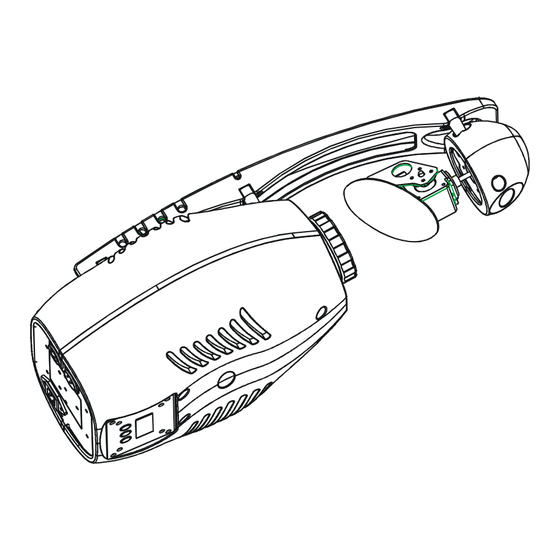
1) Unscrew the 2 screws on the back of the housing, holding the plate where the lamp is underneath. 2) Gently pull the socket holder using the knob in the middle. 3) Carefully insert the lamp into the socket. Please remember there is only one way to insert the lamp. Gently slide the lamp and its lamp holder back into place and fasten the 2 screws. -
Page 7: Dmx-512 Control Connection
Cautions: The effect should be installed outside areas where persons may reach it, walk by or be seated. When installi ng the device, make sure there is no highly inflammable material within a distance of min. 0,5m Overhead mounting requires extensive experience, including amongst others calculating working load limits, installation material being used, and periodic safety inspection of all installation material and the device. - Page 8 DMX-512 connection with DMX terminator For installations where the DMX cable has to run a long distance or is in an electrically noisy environment, such as in a discotheque, it is recommended to use a DMX terminator. This helps in preventing corruption of the digital control signal by electrical noise.
-
Page 9: Control Board
If you set a different address, each unit will start to ' listen' to the channel number you have set, based on the quantity of control channels of the unit. That means changing the settings of one channel will affect only the selected fixture. In the case of the scanner, which is a 8 channel fixture, you should set the starting address of the first unit to 1, the second unit to 9 (8 + 1), the third to 17 (9 + 8), and so on. -
Page 10: Main Functions
ON/OFF Clear lamp time CLLT S-01 ~ S- 48 Steps of Program Run STEP 01XX (00~FFH) Edit the channels of each C-01 ~ C-30 SC 01 30XX (00~FFH) scene E DI T TIME (sec.) T - - X (1~ 9) Time for each scene SC 48 CNIN... - Page 11 Select "AUTO" or "SOUN" by pressing [UP] . Press [ENTER] for selecting the desired extension menu. Select "ALON" or "MAST" by pressing [UP] . Press [ENTER] to confirm. Press [EXI T/DN] in order to return to the main menu. Display the DMX value, Reverse display, Shut off LED display Display the DMX 512 value of each channel With this function you can display the DMX 512 value of each channel.
- Page 12 Main Menu 2 1. Press [ENTER] for 3 seconds to enter the main menu (display flashing). 2. Press [UP] to select 'SET ' . Pan Reverse With this function you can reverse the Pan-movement. Select 'rPAN' by pressing [UP] button. Press [ENTER] , the display shows 'ON ' or 'OFF'.
- Page 13 Software version With this function you can display the software version of the device. Select 'VER ' by pressing [UP] button. Press [ENTER] , the display shows 'V -X .X ' , ' X.X' stands for the version number, e.g. ' V-1.0' , 'V -2.6' .
- Page 14 Lamp running time With this function you can display the running time of the lamp. Select 'LA T I ' by pressing [UP] button. Press [ENTER] , the display shows ' X X XX' , ' X' stands for the number of hours. Press [ENTER] or [EXI T/DN] to exit.
-
Page 15: Instructions On Use
4. Press [ENTER] , the display shows 'C -X ' , 'X' stands for the channel no. Such as 'C -01' , it means you are editing channel 1 of the selected scene. 5. Select the channel no. you would like to edit by pressing [UP] . 6. - Page 16 V3.2 La m p Dim m e r V3.3 La m p Dim m e r DMX channel's function and values:(V ER3.2 When the 'OLV E' is 'ON') Channel 1 - Color Wheel 1 : 0-19 Open / white 20-39 Light blue 40-59 Pink...
- Page 17 120-139 Light Yellow 140-159 Yellow Green 160-179 Blue 180-199 200-255 Backwards rainbow effect from slow to fast Channel 2 - Rotating gobos, cont. rotation : 0-13 Open 14-27 Rot. gobo 1 (metal) 28-41 Rot. gobo 2 (metal) 42-55 Rot. gobo 3 (metal) 56-69 Rot.
- Page 18 (When Channel 6 is Barrel ) No rotation 8-127 forwards Barrel rotation from fast to slow 128-135 No rotation 136-255 backwards barrel rotation from slow to fast Channel 7 - Speed pan/tilt movement: 0-225 max to min speed 226-235 blackout by movement 236-245 blackout by all wheel changing 246-255...
- Page 19 194-255 Backwards rainbow effect from slow to fast Channel 2 - Rotating gobos, cont. rotation : Open 10-19 Rot. gobo 1 (metal) 20-29 Rot. gobo 2 (metal) 30-39 Rot. gobo 3 (metal) 40-49 Rot. gobo 4 (metal) 50-59 Rot. gobo 5 (metal) 60-69 Rot.
-
Page 20: Cleaning And Maintenance
128-135 No rotation 136-255 backwards barrel rotation from slow to fast Channel 7 - Speed pan/tilt movement: 0-225 max to min speed 226-235 blackout by movement 236-245 blackout by all wheel changing 246-255 no function Channel 8 - Lamp on/off, reset, internal programs: 0-127 colour change normal &Dimmer 0%~100% 128-138... -
Page 21: Technical Specifications
TECHNICAL SPEC IFICAT IONS Power supply : 110VAC,50Hz; 120VAC, 50Hz; 20VAC,50Hz; 230VAC,50Hz; 240VAC, 50Hz; 110VAC,60Hz; 120VAC,60Hz; 220VAC,60Hz; 230VAC,60Hz; 240VAC,60Hz; Power consumption : max. 300W 250W 400W Lamp : CDMT150 GY9.5 socket, Metal Halide; MSD250 GY9.5 socket, Metal Halide; Motors : 6 micro motors Packing dimensions : 64x37x37cm Net weight : 10.5KGS;... - Page 24 NOTES...
Need help?
Do you have a question about the PRO SCANNER 150-250 and is the answer not in the manual?
Questions and answers