
Subscribe to Our Youtube Channel
Summary of Contents for Home Comfort Zones MyTemp System
- Page 1 MyTemp System ™ Room-by-Room Temperature Control and Energy Management User Manual...
- Page 2 The system automatically maintains everyone’s comfort all the time. In fact, you can forget about the system – at least until you visit someone else’s home. When you do notice the difference, please tell your friends about Home Comfort Zones. They will thank you.
- Page 3 • Except for personal use, no part of this publication may be reproduced or reprinted without prior written permission from Home Comfort Zones. Copyright © Copyright 2008. Home Comfort Zones Inc. All rights reserved.
-
Page 4: Table Of Contents
Table of Contents Introductory Topics Multistage Control ..........38 System Quick Start ..........4 Outside Air Control.........40 Using the Touch Screens........5 Smart Controller Properties .......43 Index of Frequently Asked Questions ....6 Important Concepts .........8 Using Advanced System Features Advanced Room Controls........45 Getting Started Programming Your Comfort Schedules ....49 The Home Screen..........16 Selecting a Thermostat Mode ......19... -
Page 5: System Quick Start
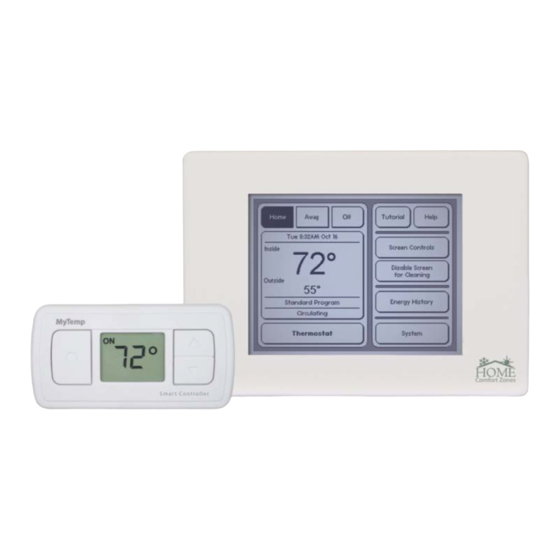
System Quick Start Use the graphical table of contents shown below to navigate within this manual. The home screen as shown below is the first screen you see after your system is installed. From here, you can access all the system features. Tutorial : Access an instructional les- son to get yourself started. -
Page 6: Using The Touch Screens
Using the Touch Screens The home screen and all other screens in the MyTemp Climate Control System are touch screens. Touch screens are designed to be pressed anywhere using your finger or fingernail. Do not use sharp objects. When using a fingernail, some users like to turn their hands so they can see their palms. -
Page 7: Index Of Frequently Asked Questions
Index of Frequently Asked Questions The following frequently asked questions are answered at the end of this manual: • • How do I set the temperature in my house? How do I adjust the system to use less energy when the house is empty? •... - Page 8 Index of Frequently Asked Questions • How do I prevent my child from accidentally changing the temperature of a room with a Smart Controller? • What’s the difference between the three thermostat modes? • Why use the Programmable thermostat mode? •...
-
Page 9: Important Concepts
Important Concepts To get the most out of your system, you should understand the concepts described in this section. In addition, see page 56 for a system diagram and a simple explanation of how the system works. 1. Your personal comfort range 5. - Page 10 Important Concepts The lower and upper limits must differ by at least three degrees. We recommend a six-degree separation. Most users don’t notice a few degrees of difference as long as they are inside their comfort range. However, one degree outside the comfort range can be uncomfortable. Therefore, the system’s priority is to keep every room inside its comfort range.
- Page 11 Our System Works With Your Existing HVAC Equipment The MyTemp system works with the HVAC equipment you already have. When the system senses that one or more rooms aren’t within their comfort zones, it initiates a heating or cooling cycle using your HVAC equipment. Your equipment (like all residential HVAC equipment) requires a certain amount of airflow to work effectively.
- Page 12 In general, the default settings are a good balance between comfort and energy savings. However, the importance of comfort versus energy savings varies from person to person. The MyTemp system provides the information and adjustments necessary to enable you to control...
- Page 13 Important Concepts (continued) your energy usage as well as your comfort. Your system can help you save energy in several ways. The following suggestions are described in detail later in this manual. • Use the widest comfort ranges possible. Decrease the lower limits to use less heating and increase the upper limits to use less cooling. •...
- Page 14 Important Concepts The simplest way to reduce conditioning is to change the upper or lower limit of the comfort range for that room, especially during peak conditioning hours. You can also improve the room’s insulation by using window treatments (blinds, tinting, curtains, and so on); adding more insulation to outside walls, ceiling, and floor;...
- Page 15 HVAC design, forcing a compromise in the location of the HVAC equipment, the supply duct system, or the return-air paths. Without special care, remodeling almost always increases HVAC supply ducting and return problems. The MyTemp system does an excellent job of compensating for mistakes and weaknesses, and keeps all rooms as comfortable as physically possible.
- Page 16 Important Concepts The simple and unexpected solution was to take the unused room out of saver mode so that it also received air conditioning. The airflow through three ducts was enough to cool the top floor so the temperatures in all three rooms dropped into their comfort ranges. Circulation immediately started, mixing the warmer top-floor air with the cooler bottom-floor air.
-
Page 17: The Home Screen
Provides the Home Comfort Zones support phone number and an introduction to the help system. If you have a Home Comfort Zones modem, this button also leads you to the Home Comfort Zones Connected Assistance service. See page 54 for more information about Connected Assistance. - Page 18 The Home Screen Energy History: Provides a 24-hour history of temperature and HVAC system use in your home. You can also check each room for its current temperature and system status. System: Allows you to customize your system settings as described starting on page 29. Thermostat: Allows you to adjust your upper and lower limits.
- Page 19 The Home Screen (continued) The following activities may appear when you press the Activity button on the home screen: Starting up Only displayed when the system is first turned on. Cooling Performing a cooling cycle. Ideal No conditioning cycle required because your home is within all Ending Cooling The air conditioner has stopped but cool airflow temperature limits.
-
Page 20: Selecting A Thermostat Mode
Selecting a Thermostat Mode You can choose one of three thermostat modes to control your home’s temperature, as follows: Basic: This is the simplest mode. Basic mode allows you to set a lower limit and an upper limit for the entire house. The system applies your settings to all rooms in the house, but only conditions rooms that go outside their limits. -
Page 21: Basic Thermostat Mode
Selecting A Thermostat Mode: Basic Thermostat Mode Basic thermostat mode allows you to set a lower limit and an upper limit for the entire house. The screen at left appears when you select System > Basic. This is the temperature control screen. Start Cooling At: This is the upper limit and indicates the warmest indoor temperature you allow before air conditioning begins. -
Page 22: Programmable Thermostat Mode
Selecting A Thermostat Mode: Programmable Thermostat Mode Programmable thermostat mode allows you to define varying comfort ranges based on time of day and day of week. The screen at left appears when you’ve selected System > Programmable to define your thermo- stat mode. - Page 23 Selecting a Thermostat Mode: Programmable Thermostat Mode (continued) This area shows the currently active schedule, in this case a weekday schedule. 2. Adjusting the Time Schedule 1. Scheduling the Days On the left side of the screen, press on the time that is closest to the First, press Change Day Grouping to select the day (or days) of the week that you want to group together with the same comfort schedule.
- Page 24 Selecting a Thermostat Mode: Programmable Thermostat Mode times already listed on the screen. 4. Setting Optional Parameters Depending on what’s already programmed, you may need to adjust a The temperature control screen for the programmable thermostat previously listed time to complete the new time range. Do this by mode differs from that shown on page 20 (which is for basic mode) in pressing on the time, and then adjusting it with the up and down that it includes two buttons, as follows:...
-
Page 25: Programmable Zones Thermostat Mode
Selecting A Thermostat Mode: Programmable Zones Thermostat Mode (continued) This area Next Zone changes the The Programmable Zones thermostat mode allows you to group rooms into displays the currently active zone by cycling Zones lists zones. A zone represents all rooms that follow the same usage pattern, and currently you through the zones you have all your... - Page 26 Selecting a Thermostat Mode: Programmable Zones Thermostat Mode Creating Zones. When creating zones, don’t think of your house only in terms of regions such as the upstairs and downstairs. Instead, think of zones as containers that group together rooms that have similar patterns of use, therefore, similar conditioning needs.
- Page 27 Selecting a Thermostat Mode: Programmable Zones Thermostat Mode (continued) Example 1: Creating a Zone for One Room Suppose you want the laundry room to be the only room in a zone because it doesn’t require as much conditioning as other rooms. Starting from the Programmable Zones screen, press the following sequence of buttons: Zones >...
- Page 28 Selecting a Thermostat Mode: Programmable Zones Thermostat Mode usage. For example, Utility Rooms. Note on keyboard usage: Use the Back key to delete characters one at a time After creating a zone, you are ready to program its comfort and the Shift key to capitalize letters. schedule.
- Page 29 Selecting a Thermostat Mode: Programmable Zones Thermostat Mode (continued) Example 3: Moving a Room from One Zone to Another Setting Comfort Schedules for Your Zones Suppose you decide that, after all, you want the laundry room to follow After creating a new zone, you must define its temperature schedule. the same temperature schedule as the rest of the upstairs rooms.
-
Page 30: The System Menu
The System Menu The System Menu, accessed from the home screen by pressing the System button, is the main screen through which you customize and fine tune system settings to meet your particular needs. Password Protection: By default, password protection is off for the system. -
Page 31: Update Time And Date
Update Time and Date (System >) When you press Update Time and Date, a screen appears where you press the up and down arrows to adjust the time and date. The day of the week is automatically selected based on the date entered. -
Page 32: Conditioning In Relation To Outside Temperature
Conditioning with Relation to the Outside Temperature (System > HVAC System Controls >) This screen allows you to define when you definitely don’t want to use heating and air conditioning. As long as the outside temperature is above the Never Heat Above limit, the furnace remains off. - Page 33 Conditioning with Relation to the Outside Temperature (continued) Usage Scenarios If your priority is comfort rather then energy savings, then you could Use this screen to block conditioning in winter or summer for increased set the Never Cool Below temperature to 50°F, which allows the air energy savings.
-
Page 34: Temperature Differential And Circulation Control
Temperature Differential and Circulation Control (System > HVAC System Controls >) Circulation Control dictates how much circulation you want to use throughout the house to even out temperature differences. Temperature Differential allows you to increase or decrease the default six-degree differential enforced by the system between the upper and lower limits. - Page 35 Temperature Differential and Circulation Control (continued) Usage Details (Circulation Control) Usage Scenarios Always Circulate: Circulation Control: Circulation is on at all times. Optimally, use In winter, you may want to decrease the this setting only when your equipment requires it. amount of air blowing through the vent.
-
Page 36: Airflow Pressure
Airflow Pressure (System > HVAC System Controls >) Airflow Pressure allows you to set the amount of air pressure for the whole house as a percentage of the maximum airflow. The system uses the Normal pressure setting unless you’ve set a room to Quiet mode. See the usage details section on the next page for information about Quiet mode. - Page 37 Airflow Pressure (continued) Usage Details Usage Scenarios Quiet mode is one of the many factors that changes how many rooms Lower the Normal Airflow Pressure if you notice excess airflow are conditioned at any one time. The system controls the overall noise or breeziness in the house in general.
-
Page 38: View Plenum Conditions
View Plenum Conditions (System > HVAC System Controls >) The Plenum Conditions screen allows you to monitor the status of your heating, ventilation, and air-conditioning (HVAC) equipment. It displays the current temperature and pressure inside the ductwork near your furnace (or air handler in the case of a heat pump installation). The temperature is recorded in °F. -
Page 39: Multistage Control
Multistage Control (System > HVAC System Controls >) Note: This button does not appear on the HVAC System Controls screen if you don’t have multistage equipment. Press here to choose between auxiliary heat, 2nd stage heat, or 2nd stage cool, depending on your HVAC system. Use this screen to define when to turn on any staged conditioning equipment you may have. - Page 40 Multistage Control Usage Details Usage Scenarios If conditioning need is not met after: Typically, the HVAC starts automatically, but this screen allows you to Set the amount of define how little you want to wait for auxiliary heat, 2nd-stage heat, or time the 1st-stage equipment runs before you switch to the auxiliary or 2nd-stage cool to help bring temperatures into their comfort range.
-
Page 41: Outside Air Control
Outside Air Control (System > HVAC System Controls >) Press here Note: This button does not appear on the HVAC System Controls screen if you don’t have outside air equipment. This screen contains one or two tabs depending on your configured equipment. - Page 42 Outside Air Control economizer when the outside temperature falls below room Usage Scenarios temperatures by the specified amount. This tells the system how Cooling long to wait before starting the economizer. The system starts the : Typically, the economizer kicks in automatically, but this economizer when enough rooms meet this criteria.
- Page 43 Outside Air Control (continued) filter and fewer air filter changes. condition the fresh air to within your comfort range. Springtime allergens may require you to minimize fresh-air intake. Less fresh- • Stop if outside temperature below: Use this setting to halt air intake results in fewer air filter changes.
-
Page 44: Smart Controller Properties
Smart Controller Properties (System > Smart Controller Properties >) This screen lists every room in the house that contains a Smart Controller. The display shows the name of the room, whether the Smart Controller is in On or Saver mode, and whether it is enabled or disabled. - Page 45 Smart Controller Properties (continued) Usage Details Usage Scenarios Enable/Disable Enable/Disable : Disable the selected Smart Controller(s) and re- : The disable setting is often used in homes with enable them, as desired. Disabled Smart Controllers report children so they don’t accidentally change the Smart Controller temperature information, but you can’t use the buttons.
-
Page 46: Advanced Room Controls
Advanced Room Controls (System > Advanced Room Controls >) In general, you use the controls on this screen to Press a room or group of rooms, then adjust rooms that are press the Edit Selected Room(s) to habitually hot or cold, fix adjust advanced room parameters. - Page 47 Advanced Room Controls (continued) Usage Details Airflow: Anticipation overrides the Activate aux. heat if temp. The Normal setting allows the system to deliver as much differential is greater than setting. That is, auxiliary heat turns on airflow as possible into a room. If you set a room to Quiet mode, the only if the temperature differential is greater than that specified at the system opens more ducts to reduce air pressure and, thus, air noise.
- Page 48 Advanced Room Controls that if there’s one or more rooms in the house that you can use as a Circulation: For the specified room(s), choose one of the catchall for excess air for the sake of rooms that are more following: important to you, then set this room to In Range for both Extra •...
- Page 49 Advanced Room Controls (continued) Anticipation Room Priority: : Disable anticipation, for example, if the furnace or Suppose in summer you let your house air conditioner is close to your bedroom and turning it on too early temperatures rise while you’re at work. Room Priority allows you to wakes you up.
-
Page 50: Programming Your Comfort Schedules
Note: This is an advanced feature. Use it only if you understand how the three thermostat modes function. One of the most powerful features of your MyTemp system is the ability to save your comfort schedules to specific programs. A program is a saved comfort schedule that contains all necessary information about zones and parameter settings. - Page 51 Programming Your Comfort Schedules (continued) button on the right. Programs don’t apply to the Basic thermostat thermostat mode). When you change a comfort schedule, you are mode because it sets one comfort zone for the entire house. actually editing the copied program. That is, you are creating a variation of the program you used as a starting point.
-
Page 52: Viewing Your Energy Consumption
Viewing Your Energy Consumption Press Energy History on the home screen to view the Status screen. This screen allows you to access the previous 24-hour history of your home. The screen lists the rooms that contain Smart Controllers, their current temperatures, and current conditioning cycle, if any. - Page 53 Viewing Your Energy Consumption (continued) Press View History on the Status screen to view the energy history for the entire house. The figure below demonstrates the graph for the whole house. The thick grey line plots the outside temperature while the thin lines are the low and high inside temperatures throughout the home.
-
Page 54: Calculating Your Cost Savings
Calculating Your Cost Savings On the home screen, press Thermostat then Cost Prediction to view the Cost Predictions screen, which allows you to enter your basic energy expenditures and select how you want to calculate energy costs. When you make changes to temperature schedules, the system predicts how much the new settings will cost. -
Page 55: Connected Assistance
Connected Assistance Note: For urgent issues, always call the Home Comfort Zones support To use Connected Assistance, do the hotline at 1-877-509-1200. following: If you have a connected Home Click on the Connected Assistance Comfort Zones modem, which is button as shown at left and then click installed at Home Comfort Zone’s... - Page 56 Connected Assistance Click Next if you If you press Next, you can would like to include enter your contact information in additional information the next screen. The name, with your request. telephone number and email address is for Home Comfort Zone convenience only;...
-
Page 57: System Diagram
System Diagram At the heart of your Home Comfort Zones system lies a sophisticated computer that is housed inside the master unit that is generally mounted near or onto the plenum of your air handler. The computer program constantly monitors your home and your equipment and intelligently directs conditioning based on the current needs of each room. - Page 58 System Diagram Unlike the Smart Controllers, the main display does not contain a Special Case: Homes With Two Air Handlers temperature sensor. The inside temperature it displays is that shown on If you have two air handlers, you also have two main displays. Each a Smart Controller chosen by the installer.
-
Page 59: Frequently Asked Questions
Frequently Asked Questions How do I set the temperature in my house? Note: We recommend at least a six-degree separation, which allows adequate comfort while avoiding unwanted conditioning cycles. See page 33 for details. On the thermostat screen, press the up and down arrows to increase or decrease the comfort zone setting for the house, time, or room. - Page 60 If changing the vent cover is not enough, contact Home Comfort Zones support for In some cases, the duct is not designed or installed properly so using the possible solutions.
- Page 61 Frequently Asked Questions (continued) How do I adjust the system to use less energy How do I prevent the system from heating on a when the house is empty? warm day or in the summer? On the Basic thermostat screen, press the Away Setting button and The outside temperature can prevent heating when a room temperature then the arrows to adjust the upper and lower limits.
- Page 62 Frequently Asked Questions From the home screen, press the following buttons: How can I temporarily start heating or cooling in a System > Advanced Room Controls room? Optionally, temporarily change the circulation control parameter to If you want to quickly start heating in a room, press the Smart Always Circulate (page 34) for the time period the windows are Controller’s up button two or three times.
- Page 63 Frequently Asked Questions (continued) How do I prevent my child from accidentally 70°F -- 75°F 11:00 p.m. (go to bed) changing the temperature of a room with a Smart 62°F -- 74°F Controller? Notice that from 8:00 a.m. to 5:00 p.m. the comfort range widens. Select Disable on the Smart Controller Properties screen.
- Page 64 Frequently Asked Questions together so that you can reduce heating at night and during the day Why use programs? when they are not used. You might group adult rooms in one zone and children’s room in another zone to maximize comfort and A program is a convenient way to rapidly change your settings for energy savings.
-
Page 65: Glossary
Default values Circulation Parameter settings as set by Home Comfort Zones before and The HVAC system fan is running without conditioning. during installation. These are the values you see when you first Circulated air is only a few degrees warmer or cooler than use your system. - Page 66 HVAC equipment. The plenum carries conditioned air to A visible indication that a button has been pressed. The display the rest of the duct system. The Home Comfort Zones is inverted from normal (dark changed to light or light changed system provides pressure, temperature, and humidity to dark) when the button is selected.
- Page 67 Glossary (continued) Upper limit The highest temperature for a comfort range. The system calls for cooling when the temperature reaches the upper limit. Vent The covering over the end of a duct that allows airflow into the room. Zone A room or group of rooms that has a unique comfort schedule.
-
Page 69: Support Phone Numbers
Support Phone Numbers Home Comfort Zones Company Headquarters 8239 S.W. Cirrus Drive Beaverton, Oregon 97008 Main Phone: 1-800-396-0523 503-626-2797, ext. 2 24/7 Support Hotline: support@homecomfortzones.com 1-877-509-1200... - Page 70 8239 SW Cirrus Drive Beaverton, Oregon 97008 Business Hours: 8:00AM - 6:00PM (PST) Monday - Friday Main Phone: 1-800-396-0523 After Hours Support 24 hours / 7 days a week: 1-877-509-1200 Printed in the U.S.A. www.HomeComfortZones.com HCZ DOC 100.0001 V4.3 MAY 2008 ©...
Need help?
Do you have a question about the MyTemp System and is the answer not in the manual?
Questions and answers