Table of Contents
Advertisement
Advertisement
Table of Contents

Subscribe to Our Youtube Channel
Summary of Contents for Hudson UBE-BDP
- Page 1 HUDSON UBE-BDP OWNER’S MANUAL...
-
Page 2: Table Of Contents
Table of Contents Important Safety Information Before You Start Asembly part List Assembly Instruction 6-10 Console Overview 11-13 Monitoring Your Heart Rate 14-16 Exploded View Parts List (2011-10-DT3558) -
Page 3: Important Safety Information
Important Safety Information WARNING! Before using this unit or starting any exercise program, consult your physician. This is especially important for persons over the age of 35 and/or persons with pre-existing health conditions. The manufacturer or distributor assumes no responsibility for personal injury or property damage sustained by or through the use of this product. -
Page 4: Before You Start
Before You Start Thank you for purchasing this new UBE-BDP ! This quality product you have chosen was designed to meet your needs for cardiovascular exercise. Before you start, please read the Owner's Manual and become familiar with the operation of your new unit. -
Page 5: Asembly Part List
ASSEMBLY PART LIST... -
Page 6: Assembly Instruction
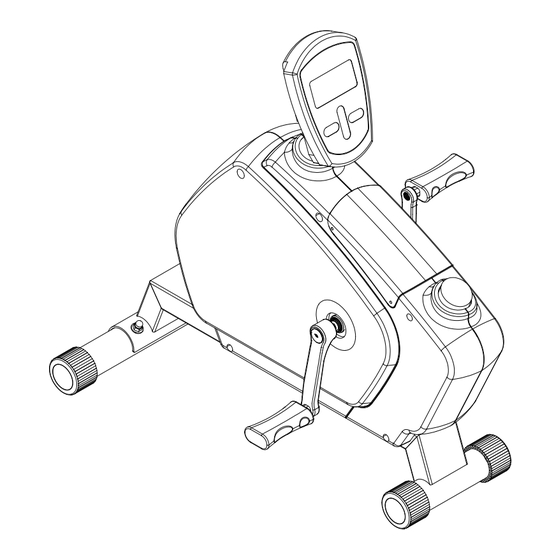
Assembly Instruction REMOVE ALL SECURITY TAPE AND WRAPPING BEFORE BEGINNING FIGURE 1 Attach the Rear Foot Tube (49)to Main Frame (1) using : Qty 2 – (48) M8X19mm Washer Qty 2 – (47) M8 Acorn Nut Make sure that the Rear Foot Tube (49) with Foot End Caps (17) are assembled to the rear of Main Frame (1) firmly. -
Page 7: Assembly Instruction
Assembly Instruction FIGURE 2 Step 1: Thread the Right Pedal (5) into the hole of Right Crank (34). Secure in place by turning it clockwise to tighten. Note: Right Pedal (5) is marked with an “R”. Step 2: Thread the Left Pedal (4) into the hole of Left Crank (33). Secure in place by turning it counter-clockwise to tighten. - Page 8 Assembly Instruction FIGURE 3 NOTE: Insert the batteries provided into the back of Monitor (3).
- Page 9 Assembly Instruction FIGURE 4 Step 1: Connect the Sensor Wires (42) and Gear Box Wire (27) to the wires out from Monitor (3) Secure Monitor (3) to the monitor bracket which is welded on the opening section of the Frame (1)) by using Screws (2). Note: The Screws(2) will already be installed into the back of Monitor (3) when you remove it from the box.
- Page 10 Congratulations! You have completed the assembly of your new exercise machine ! -10-...
-
Page 11: Console Overview
Console Overview Congratulations on purchasing a Deluxe fitness computer. This state –of-the art fitness hardware is one of the most powerful tool you can have your possession. To use your Deluxe computer, read the following instruction carefully. MAIN DISPLAY B.KEY BOARD SLECT KEY + key -/ RESET Key... - Page 12 rapid continuous). 3. Programming calories: Depress “SELECT” key to advance to the calories windows, then use “+” or “-” key to enter your desired calories burned, each press of “+” or “-“ key will increase or decrease calories by 10 Kcal. 4: Programming HIGH AND LOW PULSE RATE LIMITE: Depress “SELECT”...
- Page 13 Use select key into the setting mode, and cycle through the functions as below : Time Distance Calories Pulse Limits To select the different speed scale, depress and hold the button of “Select” for two seconds. The speed scale will flash. Press the button “+” or “-“ to select it. b.
-
Page 14: Monitoring Your Heart Rate
Monitoring Your Heart Rate Monitoring Your Heart Rate To obtain the greatest cardiovascular benefits from your exercise workout, it is important to work within your target heart rate zone. The American Heart Association (AHA) defines this target as 60%-75% percent of your maximum heart rate. Your maximum heart rate may be roughly calculated by subtracting your age from 220. - Page 15 Monitoring Your Heart Rate Fitness Safety The target heart rate chart indicates average rate zones for different ages. A variety of different factors (including medication, emotional state, temperature and other conditions) can affect the target heart rate zone that is best for you.
-
Page 16: Monitoring Your Heart Rate
Monitoring Your Heart Rate -16-... -
Page 17: Exploded View
Exploded View -17-... -
Page 18: Parts List
Parts List ITEM Q’TY ITEM Q’TY PART NAME PART NAME Frame M8x12.5x14.9L Spacer M5X10mm Metal Sheet Screw #6003 Precise Bearing Monitor Pulley Axle with Plate Left Pedal Crank Shaft Nut Right Pedal Idler Pulley Top Cover Sensor Wire With Sensor Bottom Left Housing Magnet Bottom Right Housing...
Need help?
Do you have a question about the UBE-BDP and is the answer not in the manual?
Questions and answers