
Summary of Contents for Irradio RD-40
- Page 1 RD-40 Radio Digitale portatile con sistema PLL e sveglia PLL Digital tuning portable Receiver Manuale d’uso User’s Manual...
- Page 2 ATTENZIONE: L'esposizione diretta dell’apparecchio alla pioggia o ad una eccessiva umidità ambientale può provocare cortocircuiti o principi d'incendio. PERICOLO RISCHIO DI FOLGORAZIONE NON APRIRE IL MOBILE Il triangolo che racchiude Il triangolo che racchiude IMPORTANTE un fulmine indica che un punto esclamativo in- NELL'APPARECCHIO SONO nell'apparecchio sono dica che prima di iniziare...
-
Page 3: Importanti Istruzioni Di Sicurezza
IMPORTANTI ISTRUZIONI DI SICUREZZA 1. Leggere queste istruzioni. lizzo o in caso di violenti temporali 2. Conservare queste istruzioni. può essere prudente scollegare il 3. Prestare la massima attenzione a cavo di alimentazione dalla presa tutte le avvertenze. di corrente. 4. -
Page 5: Descrizione Dei Comandi
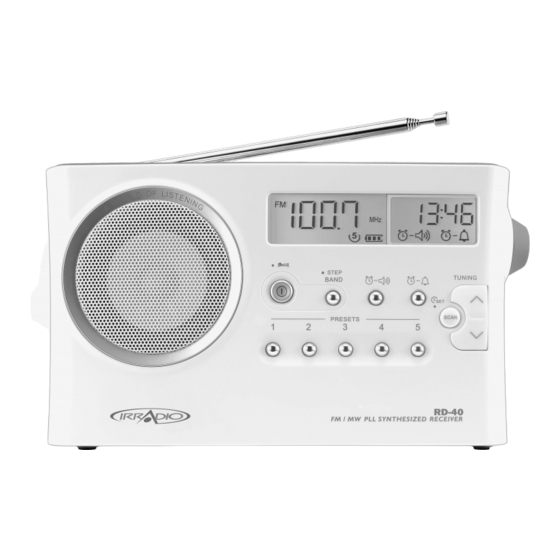
DESCRIZIONE DEI COMANDI 1. Pulsanti di regolazione della sintonia 2. Scansione delle preselezioni e regolazione dell’orologio 3. Selezione diretta delle preselezioni 4. Manopola di regolazione del volume 5. Display LCD 6. Programmazione della sveglia 7. Programmazione dell’accensione automatica 8. Selezione della banda di ricezione e dei passi di sintonia 9. -
Page 6: Regolazione Dell'ora
ALIMENTAZIONE TRAMITE BATTERIE 1. Rimuovere, premendo l’apposito gancetto, il coperchietto del vano batterie sul lato posteriore dell’apparecchio. 2. Inserire all’interno del vano quattro batterie formato ”D” (UM-1). 3. Assicurarsi che le batterie siano posizionate secondo le polarità indicate all’interno del vano. 4. -
Page 7: Uso Della Radio
USO DELLA RADIO Questa radio prevede tre diverse modalità di sintonizzazione, rispettivamente basate sulla ricerca automatica in scansione, sulla ricerca manuale e sul richiamo delle preselezioni. RICERCA AUTOMATICA IN SCANSIONE 1. Premere il pulsante di accensione. 2. Selezionare la banda desiderata, premendo il pulsante BAND. Per ottenere la migliore ricezione in banda FM estendere completamente e orientare l’antenna telescopica, e in banda AM (MW) ruotare l’apparecchio. - Page 8 MEMORIZZAZIONE DELLE PRESELEZIONI Questo apparecchio prevede la possibilità di memorizzazione di cinque emittenti per ogni banda. 1. Premere il pulsante di accensione. 2. Sintonizzare l’emittente desiderata, utilizzando una delle procedure indicate nei precedenti paragrafi. 3. Tenere premuto uno dei pulsanti PRESET finché la radio non emette un se- gnale acustico.
- Page 9 A. Impostazione dell’orario: dell’orario: 1. L’orario di accensione può essere può essere programmato mentre la radio è indifferentemente accesa o spenta. 2. Premere il pulsante di programmazione dell’accensione automatica . Nel display verrà visualizzato la relativa indicazione lampeggiante. 3. Mentre l’indicazione lampeggia, tenere premuto per più di due secondi il pul- sante .
-
Page 10: Funzione Snooze
1. L’orario di accensione può essere può essere programmato mentre la radio è indifferentemente accesa o spenta. 2. Premere il pulsante di programmazione della sveglia . Nel display verrà visualizzato la relativa indicazione lampeggiante 3. Mentre l’indicazione lampeggia, tenere premuto per più di due secondi il pul- sante . -
Page 11: Retroilluminazione Del Display
RETROILLUMINAZIONE DEL DISPLAY Premendo qualsiasi pulsante, il display si illumina per circa 15 secondi. Durante la scansione automatica o quando suona un allarme, il display si illumina automa- ticamente. PASSI DI SINTONIA I passi di sintonia possono variare di Paese in Paese. Se si desidera utilizzare, per esempio, in America una radio acquistata in Europa, si deve selezionare un passo di sintonia idoneo, che permetta di sintonizzare tutte le emittenti disponibili. -
Page 12: Caratteristiche Tecniche
CARATTERISTICHE TECNICHE Alimentazione Corrente CC 6V 400mA negativo centrale Batterie 4 X UM-1 (tipo D) Duranta batterie Ca. 170 ore di ascolto per 4 ore al giorno a volume normale con batterie alcaline Copertura frequenze FM 87.50 – 108 MHz AM 522 –... - Page 13 GARANZIA CONVENZIONALE La Società MELCHIONI S.p.A., distributrice sul territorio italiano del marchio IRRADIO, vi ringrazia per la scelta e vi garanti- sce che i propri apparecchi sono frutto delle ultime tecnologie e ricerche. L’ apparecchio è coperto dalla garanzia convenzionale per il periodo di UN ANNO dalla data di acquisto da parte del primo utente.
- Page 15 WARNING TO PREVENT FIRE OR ELECTRIC SHOCK HAZARD, DO NOT EXPOSE THIS PRODUCT TO RAIN OR MOISTURE. CAUTION RISK OF ELECTRIC SHOCK DO NOT OPEN CAUTION: TO REDUCE THE THE LIGHTNING THE EXCLAMATION RISK OF ELECTRIC POINT WITHIN THE FLASH AND ARROW- SHOCK, DO NOT REMOVE TRIANGLE IS A WARN- HEAD WITHIN THE...
-
Page 16: Important Safety Instructions
IMPORTANT SAFETY INSTRUCTIONS 1. Read these instructions. 2. Keep these instructions. 3. Heed all warnings. 4. Follow all instructions. 5. Do not use this apparatus near water. 6. Clean only with dry cloth. 7. Do not block any ventilation openings. Install in accordance with the manufacturer’... - Page 17 10. Protect the power cord from being walked on or pinched particularly at plugs, convenience receptacles, and the point where they exit from the apparatus. 11. Only use attachments/accessories specified by the manufacturer. 12. Use only with the cart, stand, tripod, bracket, or table specified by the manufacturer, or sold with the apparatus.
-
Page 19: Lcd Display
Controls Tuning Up/Down Scan tuning and Time setting Preset buttons Volume Control LCD display Buzzer alarm set Radio alarm set Band and Tuning step selection Power button Headphone socket DC input socket Telescopic aerial Battery compartment LCD Display Sleep and snooze status Radio alarm Frequency Buzzer alarm... -
Page 20: Battery Operation
Battery operation 1. Remove the battery cover on the rear of the unit by pressing the catch. 2. Insert four UM-1 (D size) batteries into the spaces in the compartment. 3. Take care to ensure all batteries are inserted with correct polarity as shown on the rear cabinet. -
Page 21: Setting The Clock
Setting the clock 1. Clock can be set either the radio is power on or off. 2. Display will show “ - : - - “ when the batteries are installed or when the radio is connected to the mains supply. 3. -
Page 22: Storing Stations In Preset Memories
Manual tuning/station searching 1. Press the Power button to turn on the radio. 2. Select the required waveband by pressing the Band button. Adjust the antenna as described above . 3. A single press on either the Tuning up or down button will change the frequency in the following increments: FM: 50 or 100 kHz MW: 9 or 10 kHz... -
Page 23: Setting The Radio Alarm
Recalling stations from preset memories 1. Press the Power button to turn on the radio. 2. Select the required waveband. 3. Momentarily press the required Preset button, the preset number and station frequency will appear in the display. Setting the radio alarm When the radio alarm is selected, the radio will turn on and play the chosen radio station at the chosen alarm time. - Page 24 b. Setting radio alarmed station: 1. During setting radio alarm time and radio alarm symbol is flashing, press Band button to activate the radio to select required wake-up band and station by manual tuning and recall the preset stations. 2. When above radio alarm time and station are set, press and hold radio alarm button for 2 seconds followed by a beep tone to switch alarm on or off.
-
Page 25: Snooze Function
4. Using Tuning Up/Down button to select required alarm hour, then press Scan button again. The Minute digit will then flash. 5. Using Tuning Up/Down button to select required alarm minute, then press button again to complete alarm setting. 6. Press and hold down Buzzer alarm button for more than 2 seconds followed by a beep tone to switch on or off the alarm. -
Page 26: Display Backlight
Display backlight Press any buttons will illuminate the LCD display for approx. 15 seconds. During scanning stations and alarm activated, will also automatically illuminate the display. Setting tuning step Tuning steps on some countries are different from where you purchase the radio. If you buy the radio in Europe and intend to use in Northern America or some Southern American countries, you may have to adjust tuning step so the radio may continue to serve you well. -
Page 27: Specifications
Specifications Power Requirements AC Power adaptor DC 6V 400mA center pin negative Batteries 4 X UM-1 (D size) Battery Life Approx . 170 hours of listening for 4 hours a day at normal volume using alkaline cells Frequency Coverage FM 87.50 – 108 MHz MW 522 –... - Page 28 Melchioni S.p.A. Via P. Colletta, 37 20135 MILANO - iTALY Tel. +39 02 57941 - Fax +39 02 55181914 www.melchioni.it...
Need help?
Do you have a question about the RD-40 and is the answer not in the manual?
Questions and answers
mi occorre il cavo di alimentazione
The power cable for the Irradio RD-40 is an AC power adaptor that supplies DC 6V at 400mA with the center pin negative.
This answer is automatically generated