Advertisement
OPERATING MANUAL
Compact Circular Saw
241-9853
IMPORTANT:
Carefully read this Owner's Manual before using this tool. Pay close atten-
tion to all Safety Instructions, Warnings, and Caution sections. Use this tool
properly, and only for its intended use.
Safety symbols in this Manual are used to flag possible dangers. The safety
symbols and their explanations require the operator's full understanding. The
safety warnings do not, by themselves, eliminate any danger, and they are not a
substitute for proper accident prevention measures.
This Safety Alert Symbol indicates caution, warning, or danger. Failure to obey
a safety warning can result in serious injury to yourself or others. To reduce the risk
of injury, fire, or electric shock, always follow the safety precautions.
Advertisement
Table of Contents

Summary of Contents for KRAFTtech 241-9853
- Page 1 OPERATING MANUAL Compact Circular Saw 241-9853 IMPORTANT: Carefully read this Owner’s Manual before using this tool. Pay close atten- tion to all Safety Instructions, Warnings, and Caution sections. Use this tool properly, and only for its intended use. Safety symbols in this Manual are used to flag possible dangers. The safety symbols and their explanations require the operator’s full understanding.
-
Page 2: Table Of Contents
Operation……………..……………………………………………..Page 14 Maintenance……………..…………………………………………..Page 18 Troubleshooting……………..……………………………………….. Page 18 Exploded View……………..…………………………………………. Page 19 Parts List……………..……………………………………………..Page 20 Warranty……………..……………………………………………..Page 22 SPECIFICATIONS Model 241-9853 Rated Voltage 120V~ 60Hz Rated Power Input 12 A No Load Speed, n 5500/min Saw Blade Size 7 1/4”... -
Page 3: Rules For Safe Operation
RULES FOR SAFE OPERATION KNOW THE TOOL To operate this tool, carefully read this Owner’s Manual and all labels affixed to the saw before using. Keep this Manual available for future reference. IMPORTANT This tool should only be serviced by a qualified service technician. For more information, call the toll-free helpline, at 1-866-869-4090. - Page 4 Don’t expose power tools to rain or wet conditions. Water entering a power tool will increase the risk of electric shock. Do not abuse the cord. Never use the cord to carry the tools or pull the plug from an outlet. Keep cord away from heat, oil, sharp edges or moving parts.
- Page 5 nameplate of the tool. A power source with voltage greater than that specified for the tool can result in serious injury to the user – as well as damage to the tool. TOOL USE AND CARE Use clamps or other practical way to secure and support the workpiece to a stable platform.
- Page 6 SPECIFIC SAFETY RULES FOR CIRCULAR SAWS DANGER! Keep hands away from cutting area and blade. Keep your sec- ond hand on auxiliary handle, or motor housing.If both hands are holding the saw, they cannot be cut by the blade. Keep your body positioned to either side of the saw blade, but not in line with the saw blade.
- Page 7 will run eccentrically causing loss of control. Never use damaged or incorrect blade washers or bolts. The blade washers and bolt were specially designed for your saw, for optimum performance and safety of operation. Causes and operator prevention of kickback: Kickback is a sudden reaction to a pinched, bound or misaligned saw blade, causing an uncontrolled saw to lift up and out of the workpiece toward the operator.
-
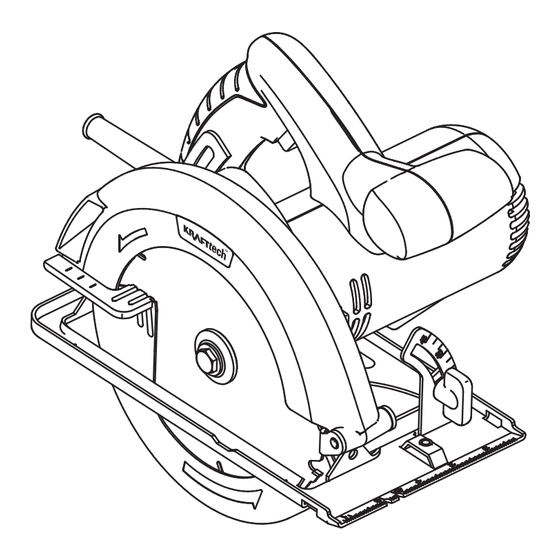
Page 8: Description
KICKBACK. Do not use the circular saw near fumes or combustible liquids. Never slow the blade down with your hands, or by applying pressure to the side of the blade. Never apply force! Move the circular saw forward gently and steadily. DESCRIPTION KNOW YOUR CIRCULAR SAW (See Fig. - Page 9 This saw can be used for the purpose listed below: • Cutting all types of wood and wood products. NOTE: The use of abrasive cut-off wheels is not recommended with this saw. KICKBACK (Figs. 2-5) Kickback occurs when the blade stalls rapidly and the saw is driven back toward the operator.
- Page 10 • Use clean, sharp, and properly set Fig. 5 blades. Never make cuts with dull blades. • Support the workpiece properly before beginning a cut. • Use steady, even pressure when making a cut. Never force a cut. • Do not cut warped or wet lumber. Correct support •...
- Page 11 CHANGING THE SAW BLADE WARNING! To prevent personal injury, always disconnect the plug from the power source before installing or and removing the saw blade! TO REMOVE THE SAW BLADE 1. Unplug the saw. 2. Depress and hold the spindle-lock button. 3.
- Page 12 5. Retract the lower blade guard into the upper blade guard using the lower blade guard handle. Make sure the lower guard spring works properly, allowing the guard to move freely. 6. Verify that the saw teeth and the arrow on the saw blade and the arrow on the lower guard are pointing in the same direction.
-
Page 13: Adjustments
If the lower blade guard does not snap closed at any time, unplug the saw from the power supply. Exercise the lower guard by moving it rapidly back and forth from the full open position to the closed position several times. This will usually restore the guard to its normal operating condition. -
Page 14: Operation
ADJUSTING THE CUTTING ANGLE (Fig. 9) 1. Loosen the angle-locking knob, Fig. 9 which is located on the 0°-45° bevel gauge on the base plate. 2. Tilt the body of the saw (Fig. 9) until the required angle is reached (refer to the scale on the 0°-45°... - Page 15 5. Clamp the workpiece securely, so Fig. 12 that the workpiece will not move during the cut. 6. Always place the saw on the portion of the workpiece that is supported, and not on the “cut off” piece. 7. Place the workpiece with the “good”...
- Page 16 Rip cutting using a straight edge: 1. Secure the workpiece. Fig. 14 2. Clamp a straight edge to the workpiece using C-clamps. C-clamps NOTE: Position the C-clamps so that Straight edge they will not interfere with the saw housing during the cut. 3.
- Page 17 WARNING! Attempting a bevel cut without having the bevel adjustment lever securely locked in place can result in serious injury. To bevel cut (Fig. 15) 1. Hold the saw firmly with both Fig. 15 hands, as shown. 2. Rest the front edge of the base on the workpiece.
-
Page 18: Maintenance
8. Release the trigger, and allow the blade to come to a complete stop. 9. Lift the saw from the workpiece. 10. Clear the corners out with a hand saw or sabre saw. WARNING! Never tie the lower blade guard in a raised position. Leaving the blade exposed could lead to serious injury. -
Page 19: Exploded View
Exploded View... -
Page 20: Parts List
Parts List Part Name Stator Ball Bearing Tapping Screw Carbon Brush Brush Support Snailed Spring Rotor Left Housing Felt Block Lock Button Spring Spindle Lock Bearing Support Needle Bearing Gear Gear Shaft Ball Bearing Spring Lower Guard Assy Cover Washer Guard Stopper Thread forming Screw... - Page 21 Part Name Cord Anchorage Left Handle Cord Guard Power Cord & Plug Right Handle Right Housing E Ring Lever Wave Washer Plain Washer Depth Bracket Rivet Screw Square Neck Bolt Support Plain Washer knob Spring Pin Base Plate Inner Flange Blade Out Flange Flange Screw...
-
Page 22: Warranty
KRAFTtech LIMITED WARRANTY This KRAFTtech product is guaranteed against defects in workmanship and materials for a period of 2 years from the date of origin retail purchase. For any help, please dial our customer service center. Toll free number: 1-866-869-4090. - Page 23 Additional Limitations This warranty applies only to the original purchaser, and may not be transferred. Neither the retailer nor the manufacturer shall be liable for any other expense, loss or damage, including but not limited to any indirect, incidental, consequential or exemplary damages arising in connection with the sale, use or inability to use this product.
Need help?
Do you have a question about the 241-9853 and is the answer not in the manual?
Questions and answers