
Subscribe to Our Youtube Channel
Related Manuals for Stanley VF80


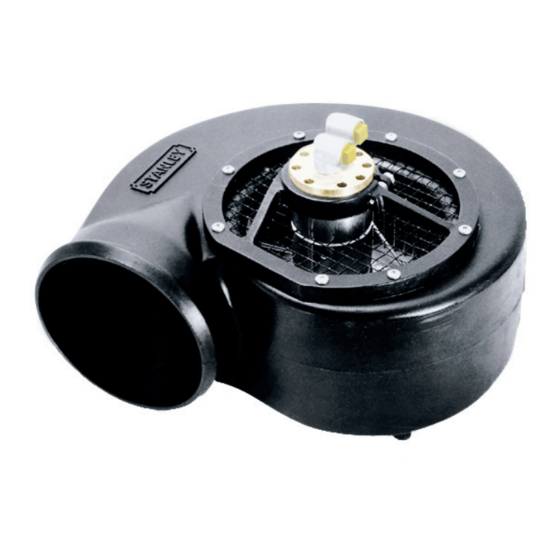
Summary of Contents for Stanley VF80
- Page 1 VF80 HYDRAULIC VENTILATING FAN afety peratiOn and aintenance USer ManUaL © 2012 Stanley Black & Decker, Inc. New Britain, CT 06053 U.S.A. 07193 1/2013 Ver. 4...
-
Page 3: Table Of Contents
REPAIRS AND / OR SERVICE TO THIS TOOL MUST ONLY BE DONE BY AN AUTHORIZED AND CERTIFIED DEALER. For the nearest authorized and certified dealer, call Stanley Hydraulic Tools at the number listed on the back of this manual and ask for a Customer Service Representative. -
Page 4: Safety Symbols
Always observe safety symbols. They are included for your safety and for the protection of the tool. LOCAL SAFETY REGULATIONS Enter any local safety regulations here. Keep these instructions in an area accessible to the operator and mainte- nance personnel. 4 ► VF80 User Manual... -
Page 5: Safety Precautions
• Do not operate a damaged, improperly adjusted, or incompletely assembled tool. The VF80 Hydraulic Vent Fan will provide safe and de- pendable service if operated in accordance with the in- • To avoid personal injury or equipment damage, all structions given in this manual. -
Page 6: Tool Sticker & Tags
OPERATION MANUAL. OPERATION MANUAL. TAG TO BE REMOVED ONLY BY TAG TO BE REMOVED ONLY BY TOOL OPERATOR. TOOL OPERATOR. SEE OTHER SIDE SEE OTHER SIDE SAFETY TAG P/N 15875 (Shown smaller then actual size) 6 ► VF80 User Manual... -
Page 7: Hose Types
HOSE SAFETY TAGS To help ensure your safety, the following DANGER tags are attached to all hose purchased from Stanley Hydraulic Tools. DO NOT REMOVE THESE TAGS. -
Page 8: Hose Recommendations
HOSE RECOMMENDATIONS 8 ► VF80 User Manual... -
Page 9: Htma Requirements
2000 psi 2000 psi 2000 psi (at the power supply outlet) (172 bar) (138 bar) (138 bar) (138 bar) (138 bar) NOTE: These are general hydraulic system requirements. See tool specification page for tool specific requirements VF80 User Manual ◄ 9... -
Page 10: Operation
3. The tool should be clean, with all fittings and fasten- ers tight. OPERATING PROCEDURES 1. Observe all safety precautions. 2. Place the vent fan in the area to be ventilated. 3. Start the vent fan. 10 ► VF80 User Manual... -
Page 11: Tool Protection & Care
This can cause damage to internal seals. • Always replace hoses, couplings and other parts with replacement parts recommended by Stanley Hydraulic Tools. Supply hoses must have a mini- mum working pressure rating of 2500 psi/172 bar. •... -
Page 12: Troubleshooting
Check power unit for proper flow and pressure. 4–12 gpm/15–45 lpm at 500–2000 psi/35–140 bar. Couplers or hoses blocked. Remove restriction. Pressure and return line hoses Be sure hoses are connected to their reversed at ports. proper ports. 12 ► VF80 User Manual... -
Page 13: Specifications
Connect Size and Type ....................112 in. Female Pipe, 90 Fining Discharge ....................Accepts 8 in. Spiral Wire Discharge Hose Hyrevz™ Motor ............................P/N 21445 ACCESSORIES 8 in. Diameter × 20 ft/6.1 Flex Exhaust Hose ....................04430 VF80 User Manual ◄ 13... -
Page 14: Vf80 Parts Illustration
VF80 PARTS ILLUSTRATION 14 ► VF80 User Manual... -
Page 15: Vf80 Parts List
MAIN SHAFT 00148 BALL BEARING 00166 RETAINING RING 00708 RETAINING RING 00718 CAPSCREW 07177 CERTIFICATION PLATE 07179 PAN HEAD SELF-TAPPING SCREW 06316 BUSHING 00713 DOWEL PIN 33459 INLET RING 03263 HEX NIPPLE 03971 COUPLER SET VF80 User Manual ◄ 15... - Page 16 Stanley Hydraulic Tools 3810 SE Naef Road Milwaukie, Oregon 97267-5698 USA (503) 659-5660 / Fax (503) 652-1780 www.stanleyhydraulic.com IMPORTANT To fill out a Product Warranty Recording form, and for information on your warranty, visit Stanleyhydraulic.com and select the Warranty tab.
Need help?
Do you have a question about the VF80 and is the answer not in the manual?
Questions and answers